Split Hem Sheridan Sweater

Winter finally hit here in the midwest.  And by winter, I mean the below-freezing temps with wind that just bites at your face!  Since I walk my dog everyday, I’m out in this cold whether I like it or not.  In the mornings, I usually just throw on a sweatshirt over a few layers, but for 2022, I feel like I need “nicer” cozy clothes.  Don’t get me wrong, the dog walks will probably always include a sweatshirt, but I would stay in them all-day long and that’s the cycle I want to break.  It’s been two years of sweatsuits and I’m ready to get out!  So, with this sweater knit I bought last year and  my TNT, Sheridan Sweater, I’m working to get out of this rut.

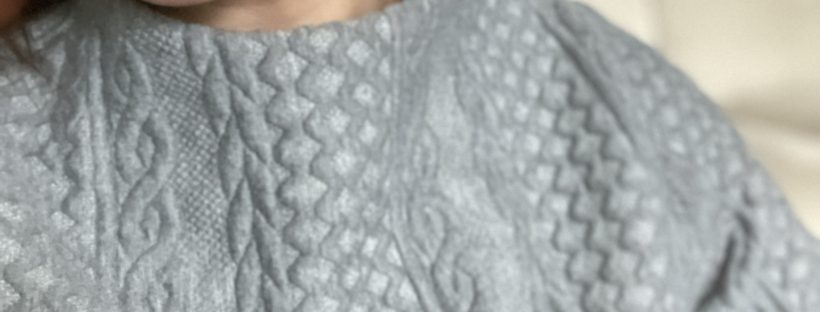
I know I need more texture in my tops (not just the knit sweatshirt/jersey look) and sweaters would bring it in.  But since I don’t knit or crochet, I have to bring it in through other ways.  For sure, I have to do some thrifting, but I also had this incredible cable knit-look fabric in my stash. I bought this from Fabric.com  after seeing so many other makers use it and it certainly delivers.  The fabric is a really nice thick knit that isn’t too heavy but has the feel of a real sweater.  While the inside “stuffing” frayed a bit depending where you cut the fabric, I was able to use my regular sewing machine, serger, and even cover-stitch to make this top.

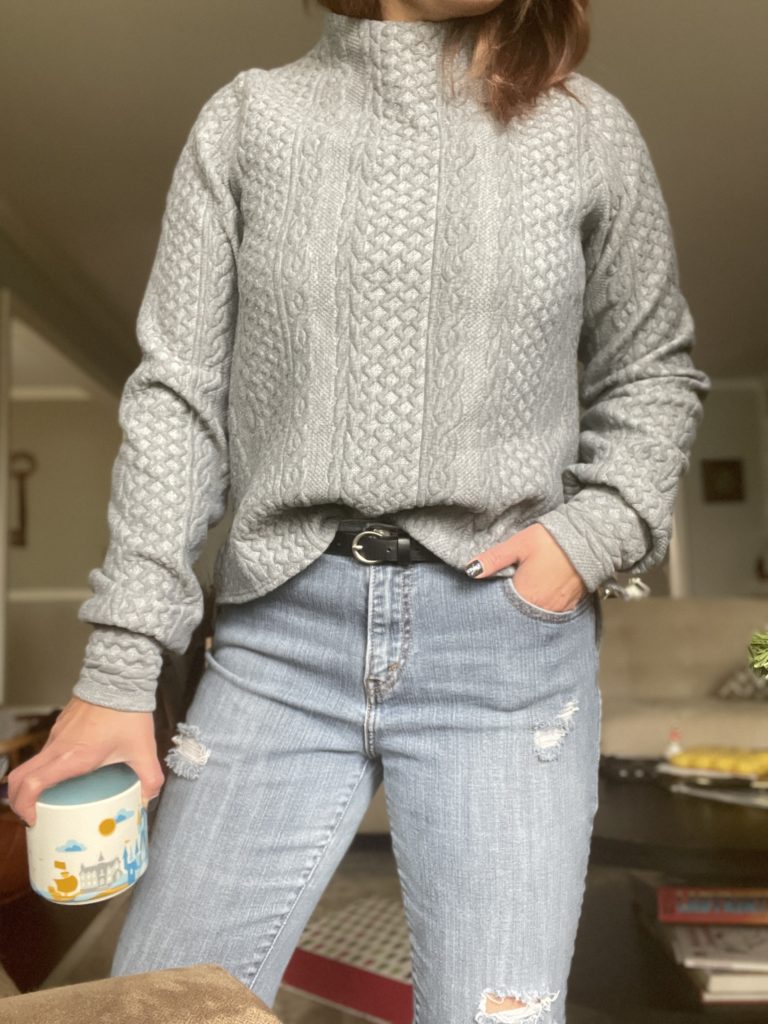
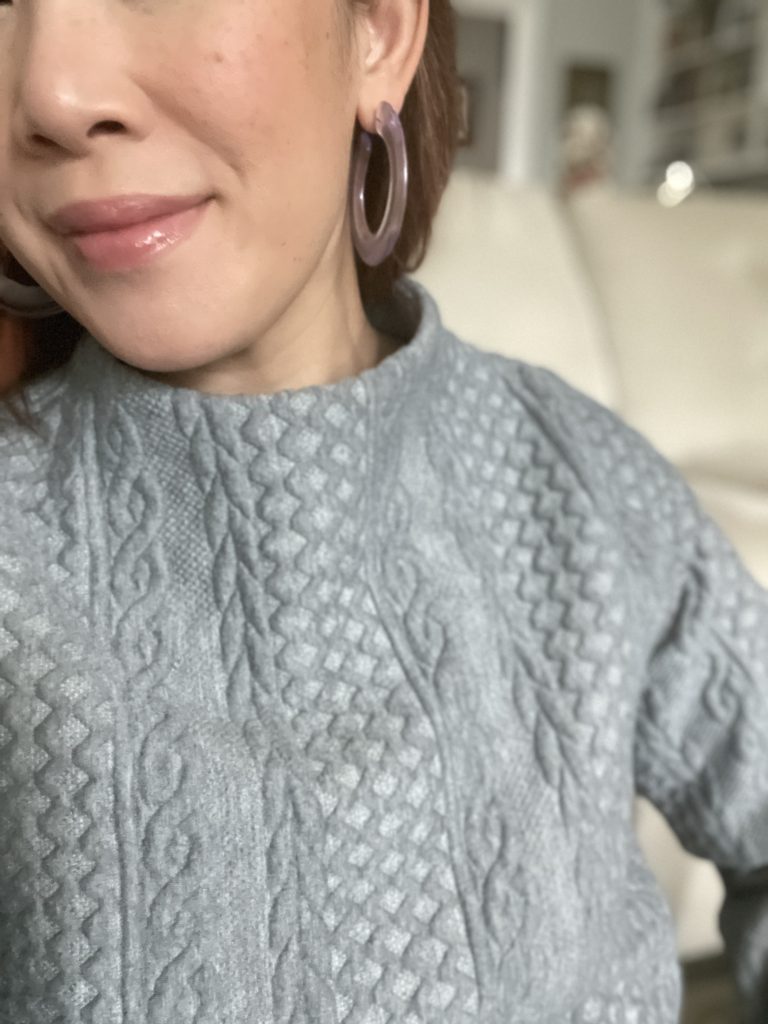
This is the fourth time I’ve made the Sheridan Sweater, a pattern by Hey June Handmade.  You can check out two I made on this post.  I’m a big fan of this pattern and really love the funnel neck view.  I’m always the “cold” one in the family and I like to have my neck covered, but I’m not a fan of turtlenecks.  My skin is pretty sensitive with fabric textures, so I always like some kind of loose covering like a cowl seen here in my Halifax Hoodie or this funnel neck.  Since I already have two Sheridans that are identical with the exception of color, I knew this one had to be different.  In addition to the fabric, I also hacked the pattern to make an uneven split hem, which is perfect for to half-tuck into my jeans.

These are all of the modifications on my size 10, view B Sheridan:

  • Increased the funnel neck by 1/2″
  • Omitted interfacing on the neck facing (fabric is thick enough)
  • Lengthened full front by 1″ and the back by 2 1/2″
  • Marked 3 1/2″ from the bottom front for the split hem
  • Used 3/8″ single fold with cover-stitching for hem
  • Made a 1/2″ narrow shoulder adjustment (typical for me with HJ patterns)
  • Narrowed out the sleeve 2″ on each side (4″ total) for a less formal balloon sleeve

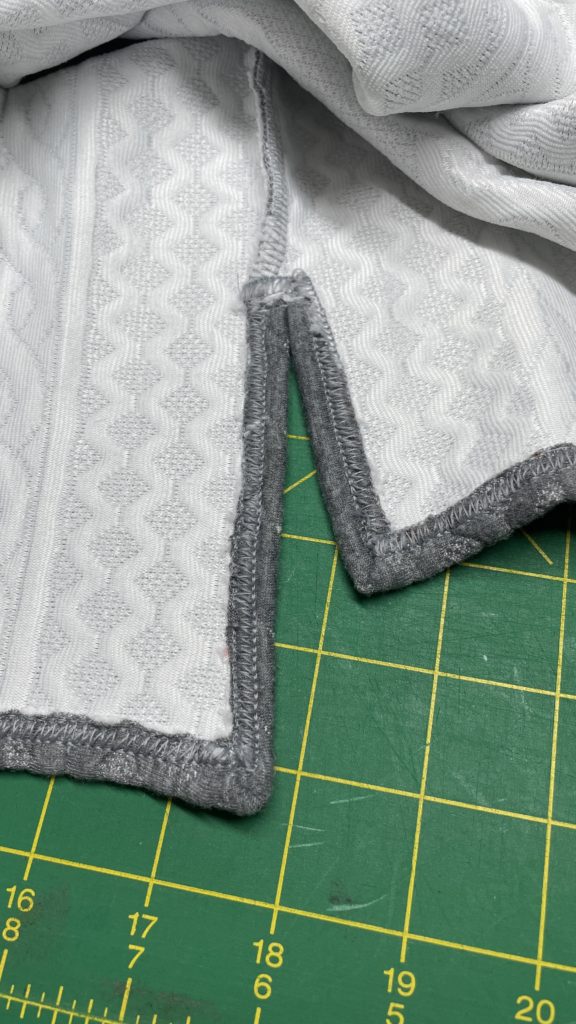
I was “winging” the split hem (which I kinda regret now) and wished I added more length to the hem and especially at the side seams for the split.  While this isn’t the prettiest cover-stitching, you can’t really tell from the outside (thank goodness!) it worked out in the end.  I used some Mettler Seraflex to help tack down the hem right at the split (on the side seams) and after using my cover-stitch, realized I should’ve just used it on the hem this whole time — Lesson Learned! It’s a great thread that has stretch which you use with a straight stitch.  Since the hem is loose and not getting much strain, the Seraflex would’ve been a good alternative to cover-stitching.  I also used it in the cuffs (for less bulk than my serger) and also for tacking down the funnel neck to the facing.

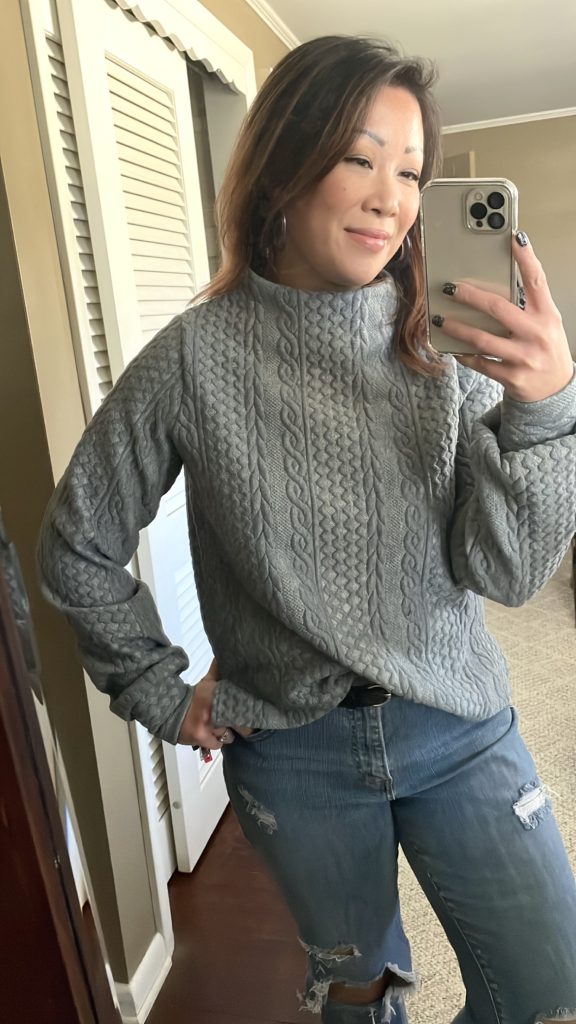
Despite the small regret with the hem, I’m really pleased with this Sheridan Sweater.  It has the comfy-cozy, cable knit look I needed and it’s VERY warm too!  This was a great wardrobe addition  while I brace this bitter cold!  Do you like this knit-look without being a real sweater?  I think I may have to invest in some more of this fabric!

Happy Sewing,

Cristy


This post may contain affiliate links.  You can read my disclosures, here.

Holiday Tartan Pants with the Chi-Town Chinos

I have always loved the chic preppy look of tartan pants.  They are a bit out there, but still SO fun and a great way to liven up an outfit — especially around the holidays.  But unfortunately, I just was never confident enough to believe that I could rock the look.  Plaid placement is key and the right amount of ease is needed to not turn these overlapping stripes into curvy roadways that make my  body look wider than it really is.  Don’t get me wrong, I LOVE having curves, but don’t need the plaid to push my silhouette down.  By making my own pants that are custom to my frame, I’m happy (actually, surprised!) with how this print actually lengthens my 5’3″ body.

FABRIC

Ever since the end of summer, I’ve been on the hunt for some good plaid suiting…whether it be wool or another cool weather fiber.  Initially, it was just so I could have some gray trousers for dressed up occasions.  But I found myself falling in love with holiday colored plaids too.  I have always loved how J. Crew would always have their tartans out for the holidays and wanted a sophisticated blend of colors like their style.  Most of the fabrics I found were always a little “off,” until I found this Blue/Red  Nirvana Plaid from Melanated Fabrics.  It was exactly the style, scale and fabric blend I was searching for!  And the best part is I found it on sale during Black Friday — we were meant to be!

What I love about this fabric is that it has a medium hand and twill finish, but also includes spandex for a 2-way stretch.  When you’re curvy, some extra stretch is always welcome!  The fabric is also a generous 56/57″ width, actually giving me a lot of extra to make a top or even a possible jacket later on. (That’s something I can deal with in 2022!)

This fabric is great for pants since the polyester content makes it pretty wrinkle-free…and I’ve had these tossed all over the place in-between wear and I haven’t had to re-iron them yet.  The Nirvana plaid is also completely opaque and not scratchy…so no extra lining is required.  There is actually rayon in the fabric that makes it VERY comfortable to wear.

The only downside to this fabric is that it does fray pretty easily.  I would recommend finishing all the edges to keep the fabric from unraveling.  My pocket lining is leftover from a Minerva kit and that was unraveling quite a bit too….so I ended up always trimming down my pants every few steps.  If I end up using the rest of this plaid, I will definitely finish the edges to save myself the sewing room mess!

PATTERN

When I bought this fabric, I had a completely different pants pattern in mind.  During Black Friday, I also picked up the By Hand London Jackie Trousers.  But after making the toile, I thought all the pleats wouldn’t look right and be too busy with such a stand-out tartan pattern.  It’s also a VERY relaxed fit with lots of ease since it’s also a unisex pattern.  So instead, I’m going to save the Jackie Trousers for a gray wool suiting I have that isn’t as busy and won’t make me feel like a balloon!

I’m glad I went with my gut and turned to my TNT (tried and true) Chi-Town Chinos (with expansion pack 2) by Alina Design Co, instead.  You can check out the very first pair I made here.  Since I’ve made these pants, as well as, the shorts before, I knew the changes I would have to make to fit my body.  My waist measured an 8 and my hips measured at a 12.  I generally have a two size difference between waist and hip and have tested between so many different adjustments over the years.  After 4 pairs of Chi-Town Chinos, I think I have it.

Here were my mods:

  • Cut a 10 (knowing I would take in extra later) and blended the hips out to a 12
  • Added 1 1/4″ to the rise in order to be mid-level and right at my belly button.  (The original drafting is for a low-rise chino.)  I added the length to the top of both the from and back pants template in order to keep the dart in place and not accidentally raise it too high.
  • Took out an additional 1/2″ out of each dart (1/4″ on both sides)
  • Took out an additional 1/2″ out of the center back
  • Added 1/2″ to the back crotch length for my back-side
  • Removed 2″ of length at the leg’s shorten/lengthen line
  • After making the pants, cut off an additional 1 1/2″ off off the hem
  • Interfaced the size 8 waistband so it wouldn’t stretch out with wear
  • Omitted back pockets

PLAID MATCHING

During my research of plaid pants, I unfortunately came across a bunch of poorly matched patterns….like, not even close to matching.  And I also saw some bad cutting, where one leg was cut on the bias and the other was on the grain…what?!?!  I couldn’t believe these pants were actually sold at one point!  But, there were a few pair that I definitely liked.  The ones I liked made sure to have the prominent stripe run vertically centered on the front and back legs.  This makes your eyes run up and down, with helps for a lengthening illusion.  You really have pay attention to the template’s grainline to get this right.  I also tried to make sure the big red stripes wouldn’t run horizontally across the apex of my back side and thus, widen me.  I wasn’t completely successful, but having the two red stripes on my backside, helps to even out the gaze…which is still winning!

When cutting the pant legs, I chose the widest part of the hip to be where I focused on matching. My main goal was to not have the horizontal stripe run directly into my crotch.  As you can see, it still runs across the pelvis and back, but not angled down into the crotch.  I cut every piece of the  chinos out separately to make sure all points were matched up.

To have nice side and inseams, I used A LOT of pins to hold the pants in place.  The Chi-Town Chinos have a generous 5/8″ seam allowance and it’s important to pin at the seam line and not just at the edge of the fabric.  If you pin just at the edge of the fabric, the pattern can shift very easily.  I know it’s a major “don’t,” but I will sew over my pins when I need to pattern match this much.  During the fit and basting process, I made sure to pattern match then.  If I was off a little bit, I could always go back and easily pick the stitching and re-pin for the final stitching.  Although this is takes patience and time, the pattern matching is well worth the effort!

One last tip I have is to use a walking foot when top-stitching…especially at the waistline.  Initially, I didn’t use one and with the twill weave along with the spandex fiber content, the plaid really shifted on me.  I picked all the stitching (ugh!) and then used a walking foot with extra pins to evenly guide the fabric while sewing so the plaid wouldn’t be lopsided.

I never thought I could wear patterned pants….mainly from RTW trauma years ago.  But I know NOW, with the right ease and fabric placement, I can do it.  This is really opening up my world and you better believe my pants will be much more fun going forward!  Isn’t sewing for yourself amazing?  Do you have any fun holiday makes in the works?


Merry Stitchmas Friends!

Cristy


Review Fibre Mood Agatha Dress with Rayon

Over the summer, I was in a rush to make this Fibre Mood Agatha dress for the first wedding of 2021 and I completely forgot to write it up until now.  Let’s be honest though…most of my blogging was set aside while managing my family during the pandemic!  I was still sewing to save my mental state and am trying to catch up now while I have a little extra time 🙂

With the warmer weather approaching and vaccines coming out, I knew this was going to be one of the very first “big” social events for the family.  After a year of just sweatsuits and leggings, I really wanted to make something special and use up some fabric in my stash.  If there was any perspective gained from the pandemic, it was to use up all the “good” fabric and not let it sit on the shelves!

PATTERN

I’m not sure exactly where I saw this silhouette, but I wanted to make a flowy long dress with flutter sleeves for the midwest heat.  After a good bit of research at my typical spots – IG, Pinterest, and Google, I finally found the closest pattern to what I wanted.  And that pattern was the Fibre Mood Agatha…However, it was drafted for knit fabrics and of course, I wanted to use woven.  In the website description, FM says the pattern can be used for wovens, but I was pretty skeptical.  They mention that you “only” need a side zipper and I’m here to say I made a lot of extra adjustments to account for ZERO stretch.  Since I couldn’t find any other options, I still bought the pattern knowing I would have to muslin the bodice and be fully committed to a few days of fitting.

Although I measured a US 8, I cut a US 10 knowing that everything would have to be adjusted later on.  It gave me a base point to start without going too high and throwing off other fit (like the shoulders and sleeves.)  With the muslin, the armscyes are very generous, so I didn’t need to make the sleeves.  I just had to sew the bodice and waistbands together.  Even after cutting a larger size, I still needed 7/8″ added onto the front and back of the waistbands.  Then I slashed the back bodice in three spots (dividing the back evenly) to account for the new waistbands and created a new back bodice piece.

With the help of hashtags, I found Jessica R. (@mom.maker.model) who had made a few woven Agathas.  She had some good tips and mentioned she had to add about 2″ to the length of the bodice (towards the side of the bust) to make room for the ladies (I am a B-cup and you would have to add more for any size larger.)  Since the bust is gathered, I didn’t have to add more width…but just evenly spread the gathers along the new front waistband.  I had to play with the gathers and the added volume a little bit until I found the fit I liked.  The V-neck is pretty deep and I ended up overlapping the front bodice pieces by 3/4″ for a little extra modesty. With the added length of both the waistbands, I then widened the skirt opening to match.  *The pattern doesn’t mention stay-stitching the waist opening of the circle skirt, but I would HIGHLY recommend it so your skirt doesn’t stretch while making this dress.

For Jessica, she didn’t need to add a zipper, but I definitely had to in order to get the dress over my head! This was such a mental challenge for me because not only was I adding in an invisible zipper, but with the light colored fashion fabric I was using, I also had to account for a lining…and adding pockets!  I really set myself up for a challenge…eek!  I ended up sewing the invisible zipper to the fashion fabric and then hand-stitching the lining into place.

While adding in pockets is normally not a huge issue (but all designers should add them to all patterns anyways!) I, again, had to account for a slight sheerness of this fabric.  The pockets had to actually go behind the lining so they wouldn’t be seen through the front of the dress.  I know some of you are wondering why I didn’t use the lining as the pockets.  But with the slash style, I wanted to use the same fashion fabric to blend the pockets right into the dress whether my hands are using them or not.  To account for this interesting issue, I left openings in the side seams of my lining so the pockets could pop back.  I’ve never seen something like this in a pattern and was proud of my MacGyver sewing idea!

FABRIC

I had this Rifle Paper Co. Citrus Blossom rayon challis in my stash for a good year.  I’m normally not a yellow person, but these prints are always SO beautiful and I definitely needed the color in my wardrobe.  When this collection first came out, I bought enough fabric for a shirt or maybe a short dress….but then I came back to it just a month or so later and bought more.  I’m so glad I did because this circle skirt style uses a lot of fabric!

With rayon challis, it is a light and breathable fabric. I love it for the summer since it has a soft cool hand and drapes well. However, it can be slippery and pretty shifty when sewing.  So I use my fine pins and end up using twice as many as I would with a quilt cotton.  My machine is pretty hardworking, so I also have to switch down to a 70/10 needle when working with rayon.

As I mentioned earlier, I had to use a Bemberg rayon lining in the skirt to keep the dress from being see-through. I cut the lining the same shape as the skirt, but cut off an extra 2″ off the hem so it wouldn’t been seen as I wore the dress.  While I was at it, I also added a lining to the waistband (along with light-weight interfacing) to keep it more structured for a lean look.  Luckily, this was also in my stash and it’s definitely a good fabric to have around to line lighter fabrics.

Overall, this was probably one of my most laborious makes with the added steps of a muslin, adjusting for woven fabric, adding pockets and also adding a lining.  After the wedding and 6 additional months, I can still say that all of this work was WELL worth the effort and I have all of the adjustments ready for a future dress!  I’m so happy with the wearability of the FM Agatha.  While it’s light and flowy for warm weather, I love that my shoulders are covered for those shots of extreme air conditioning in the summer.  Keep a lookout for a new one in 2022!!!


Hugs and Stitches, friends!

Cristy


This post may contain affiliate links.  You can read about my Disclosures here.  While I am a Fibre Mood ambassador, this pattern and the fabric was purchased by me and not part of any promotion.

Introducing the Audrey Envelope Wallet

The Audrey Envelope Wallet is a quick and easy project with minimal sewing and tons of style! It has the your classic envelope shape, but also features three card slots and a large slip pocket for bills (which also doubles to hide your stitching.) 

After designing the Christine Sling, I found myself using that bag almost all the time (which also happens after every bag launch…I can’t help it!)  While my “regular” full wallet could fit, it didn’t leave much room for anything else.  I was able to get away with the Shuffle Cardholder for a long time.  But in some recent situations at sporting events, I felt like I could lose the small cardholder since I was constantly in and out of the bag.  So I needed something in between.

Inspiration

I taught a leather stamping class years ago at a local art studio as a social night out…but with hammers!  I used a smaller envelope design and had the students stamp words onto the wallet and onto the wristlet strap we created together.  The wristlet was pretty cute, but too small for my needs.  I knew back then, the envelope design needed to be bigger for more functionality and adding basic wallet card slots and a pocket for bank notes was needed.

As you know, I really like clean lines and classic styling to most of my bags.  I was really drawn into the simplicity of the envelope shape and how something so functional could be made with limited materials — HELLO stash buster!  With the holidays approaching, I love having a gift that can have an impact (especially in some gorgeous leather) but not take a whole week to make.  Time is precious right now!

It only seems proper that this chic compact wallet be named after my niece, Audrey.  She is a vibrant young woman is likes to be out on the town and is definitely game to join any adventure.  Audrey is lots of fun to be with and to always have around.  She lives all the way out on the west coast, so I definitely miss her a lot!  She also happens to be engaged with a wedding planned for next summer.  I already know I will HAVE to make a clutch with this design just for the occasion!.

Fabric

This pattern is written for fabrics which can be left with a raw edge without any additional finishing required. This includes leather, vinyl and cork.  While these substrates can be on the pricey side, the Audrey Envelope Wallet requires very little in material.  If there is no direction to your print or grain, you just need over 1 sq ft of fabric.  This makes it SO great for using up old scraps or upcycling from an old jacket.

On the cover page, I used a fun Gold-Fleck Cork from Cork and Cloth.  It’s a great high-quality Portuguese cork…I would recommend staying away from any of the cheaper imitations you find at the big box stores.  They tend to flake more than the ones from Portugal.  The other wallet on the cover page (and the one featured in the instructional video) features a Red Matte Firm Temper Leather from Measure Fabrics.  As of the publication of this post, the red version is sold out, but there is a gorgeous cobalt blue hide that’s ready for a maker.  I really loved working with this leather given it’s super smooth finish and firm hand.  It gives the wallet such a nice shape, even when completely empty!

HARDWARE

Hacking Ideas: Add a wristlet strap or a contrasting strip to the back pocket

Besides using little material, you only need one fastener for the whole wallet.  In the video and the pattern instructions, I used a set of snaps, but you can easily substitute them for something you have on-hand.  A small turn lock or even button studs would look great with this bag.

As I was playing with the wallet, you can also add an eyelet for a wristlet strap as well.  These are not part of the pattern, but can be easily added for more versatility as a wristlet.  You can even change the card slots with a contrasting fabric or add rivets to help secure the pockets.  There are so many ways hardware can change up the look of Audrey.

Supplemental Video

Since this is a pretty simple pattern of just 6 pages, I already filmed a video to help with construction.  Since the video is for public viewing, you will still need the pattern template for cutting and the instructions for specific measurements.  I hope you enjoy the extra resource to help you through sewing!


I hope all of you enjoy this quick and easy pattern as much I had in developing it!  Who would you gift an Audrey Envelope Wallet to this holiday season?


Happy Sewing!

Cristy


This post may contain affiliate links.  You can read my disclosure here.

Christine Sling Tester Inspiration

The Christine Sling pattern pulls together a classic camera bag silhouette with a modern wide statement strap. The possibilities of fabric combinations are truly endless.  For a full rundown of pattern specifics, including features and where to source materials, check out the Christine Sling Intro here.

TESTER BAGS

As I develop a pattern, there are so many considerations that have to take place.  My first priority is to always make a bag approachable for beginning sewists who have basic domestic machines.  That’s why I like to always like to have full fabric versions of a pattern, but I also like to show more complex versions with other substrates for more advanced bag-makers.  My testing group runs the gambit of experience and I am so appreciative of their knowledge and different skillsets.

Carrie (@carriedwithyou) made not one, but TWO tester versions of the Christine Sling.  Her first make was this sweet floral version with natural cork accents and metal-look nylon zippers.  Then…Carrie went to the other side of the spectrum for a dark and sleek version of the bag using some webbed matte vinyl and incredible red accents. She used seatbelt webbing for the strap giving the whole look some chic vibes!  You can find out her patterns and finished bags for sale at www.carriedwithyou.com.

Maggie (@ms.maggiemakes) is an incredible bag-maker and I love her use of different fabric patterns and color.  Her version of the Christine Sling did not disappoint my expectations at all!  She used this great pink mirror-effect vinyl along with a mix of donut quilt cotton for her bag.  I love the way she using upholstery trim for the piping instead of the “plain” stuff I used.  It makes her bag SO much fun!  Follow her instagram to see her makes…many are for sale too 😉

Mallory (@malloryhillmakes) is a local friend and also my copy-editor.  She makes incredible bags and clothes, which makes her invaluable with technical knowledge.  Her boho version of the Christine is just perfect for everyday!  The leather accents and piping, help to give more depth and framing to the bag.  It will make a statement with any outfit!  You can follow her blog at www.malloryhill.com.

Robbin (@sewfarmquilter) is the newest team member of the testing group.  I have been following her since my quilting days and was so happy to know she wanted to test the Christine! Her version of the bag is very classy and demure on the outside, but pure party on the inside.  I’m a sucker for a wild bag lining (since RTW ones are always boring!) and this one is perfect.  If you can see, Robbin scalloped the edges of her leather accents to add more texture and appeal.  It is such a great look!  Check out all of Robbin’s makes on her instagram.


I’ve said it before and I’ll say it again, but NOTHING is more heart-warming than it is to see my patterns sewn up by all of YOU!  For a full-range of different takes on the Christine Sling, check out the hashtag, #christinesling, on Instagram.  You know I follow it 😉 and LOVE being tagged in all of your makes.

These pictures are so inspirational and I hope you are able to get some ideas when you make your Christine Sling.  Pattern available here.


Happy Sewing,

Cristy