Review Fibre Mood Agatha Dress with Rayon

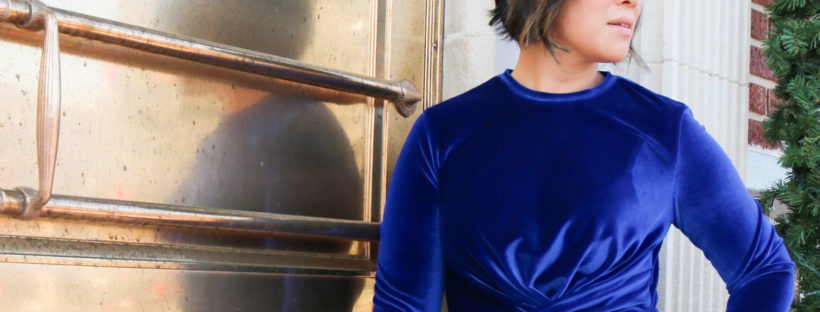
Over the summer, I was in a rush to make this Fibre Mood Agatha dress for the first wedding of 2021 and I completely forgot to write it up until now.  Let’s be honest though…most of my blogging was set aside while managing my family during the pandemic!  I was still sewing to save my mental state and am trying to catch up now while I have a little extra time 🙂

With the warmer weather approaching and vaccines coming out, I knew this was going to be one of the very first “big” social events for the family.  After a year of just sweatsuits and leggings, I really wanted to make something special and use up some fabric in my stash.  If there was any perspective gained from the pandemic, it was to use up all the “good” fabric and not let it sit on the shelves!

PATTERN

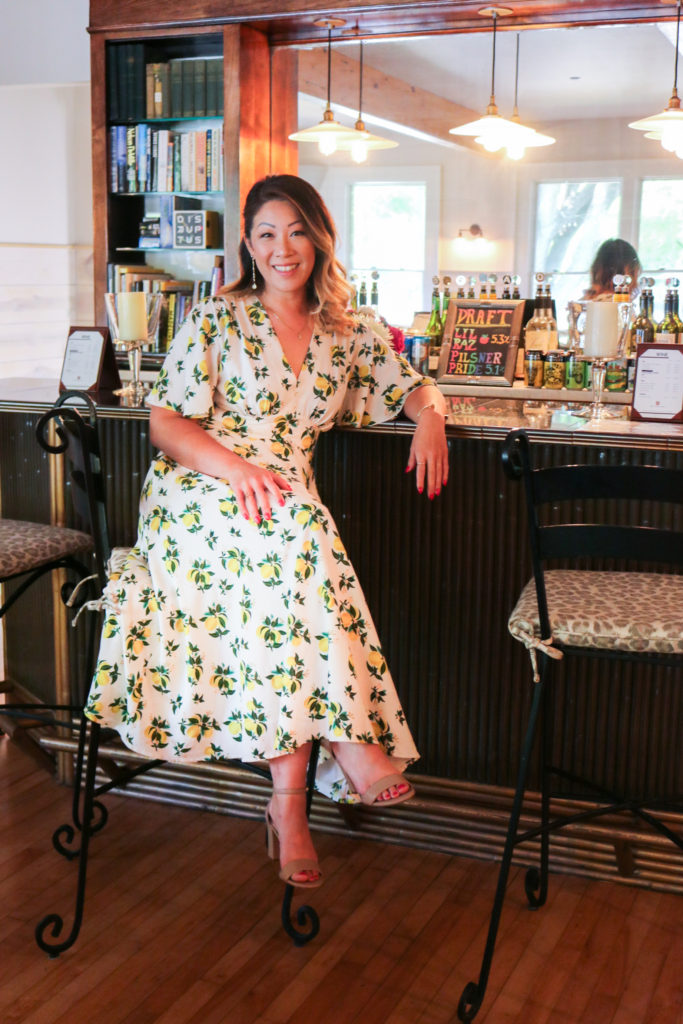
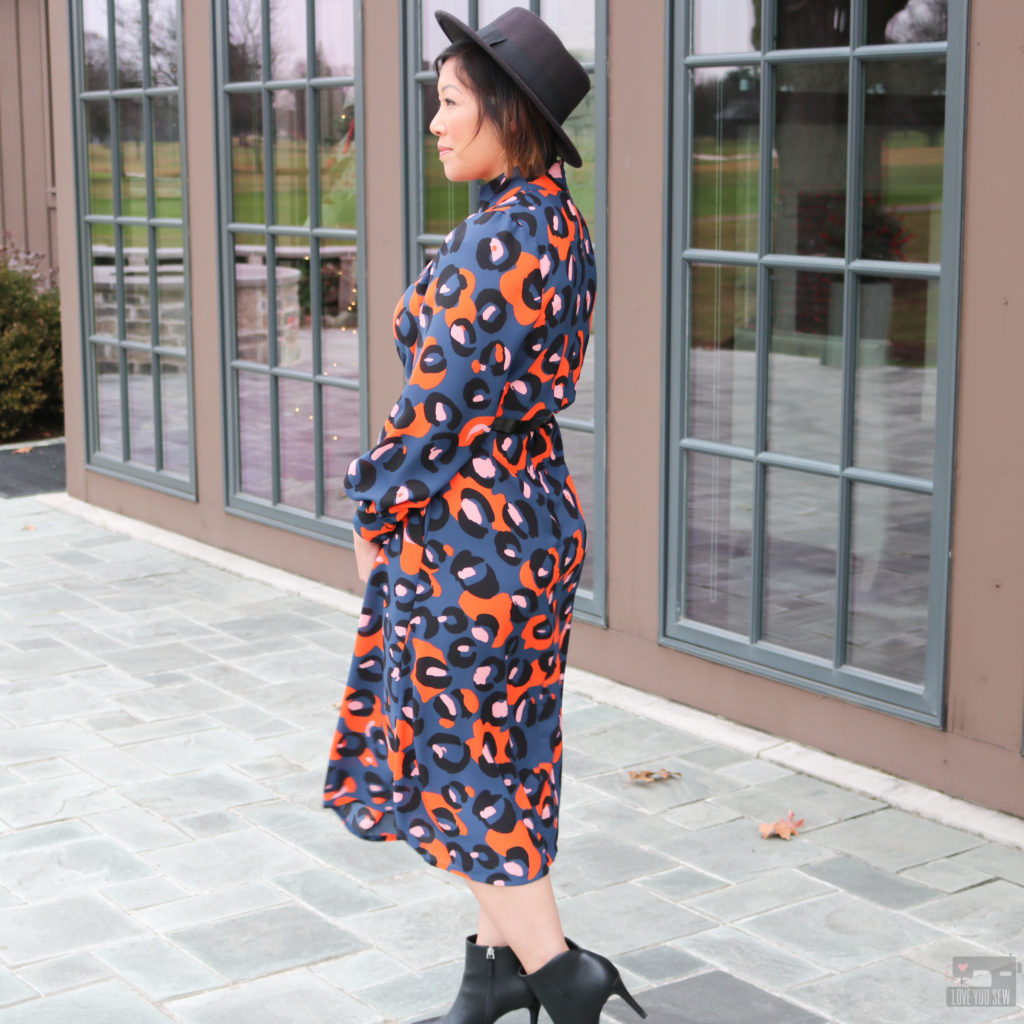
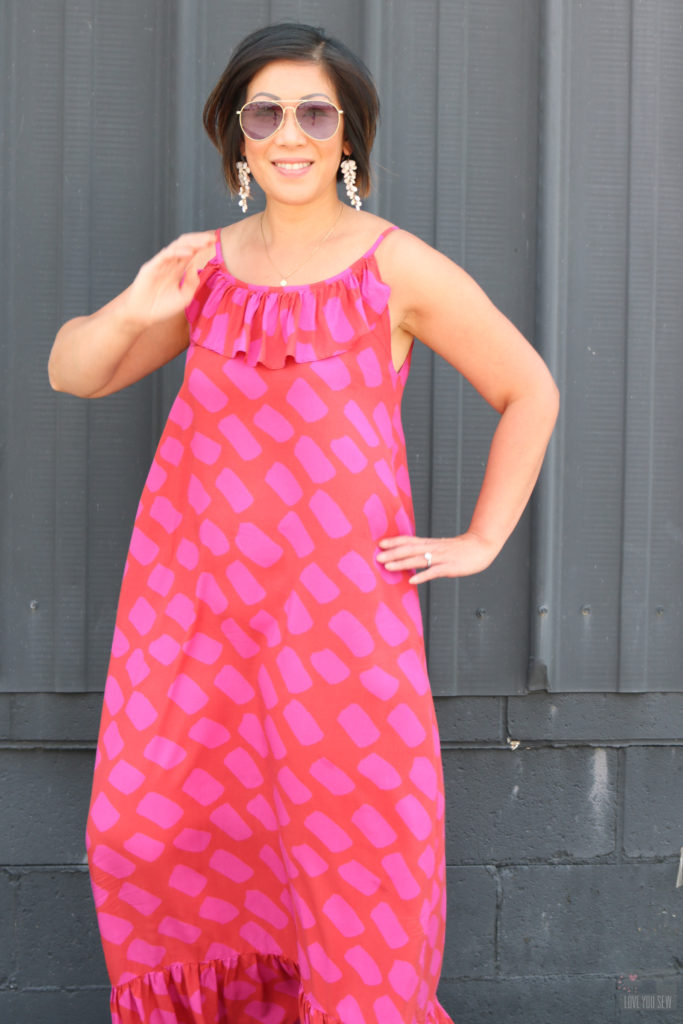
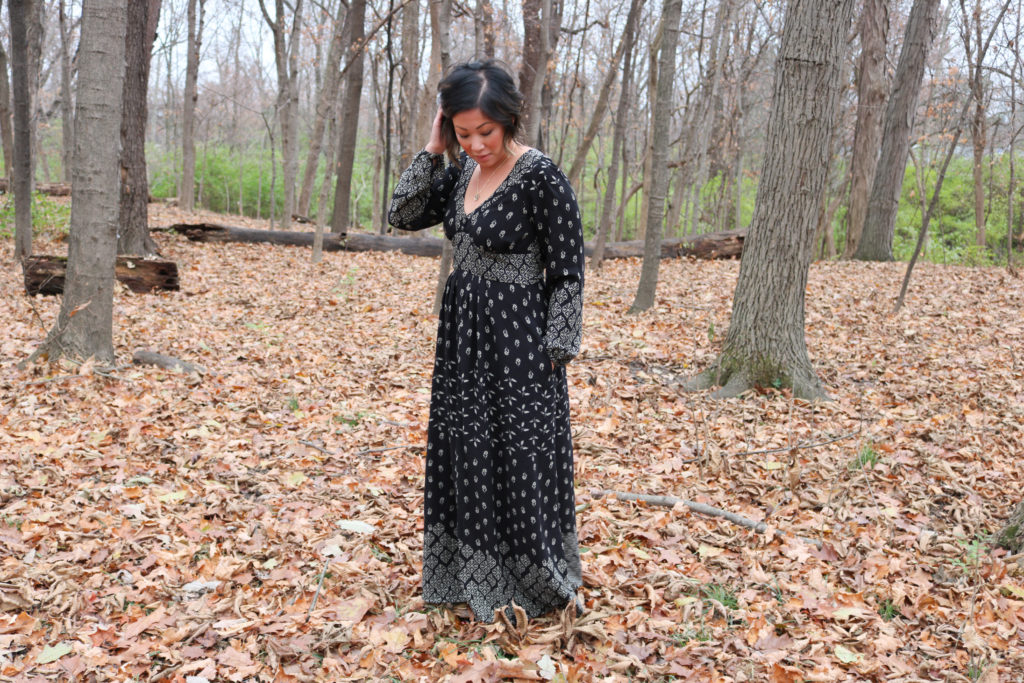
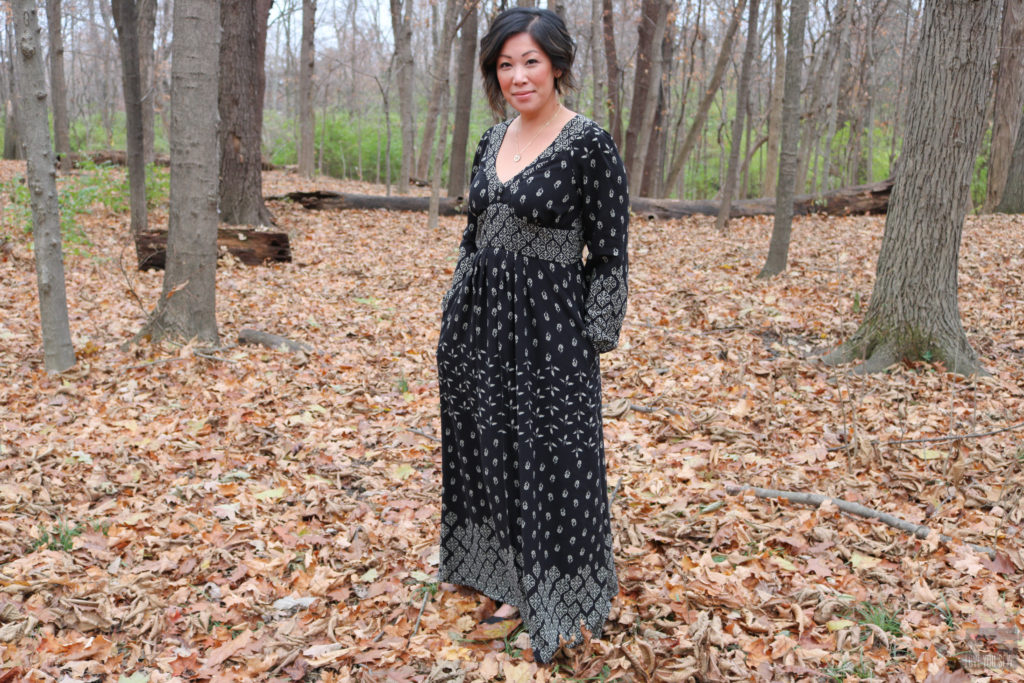
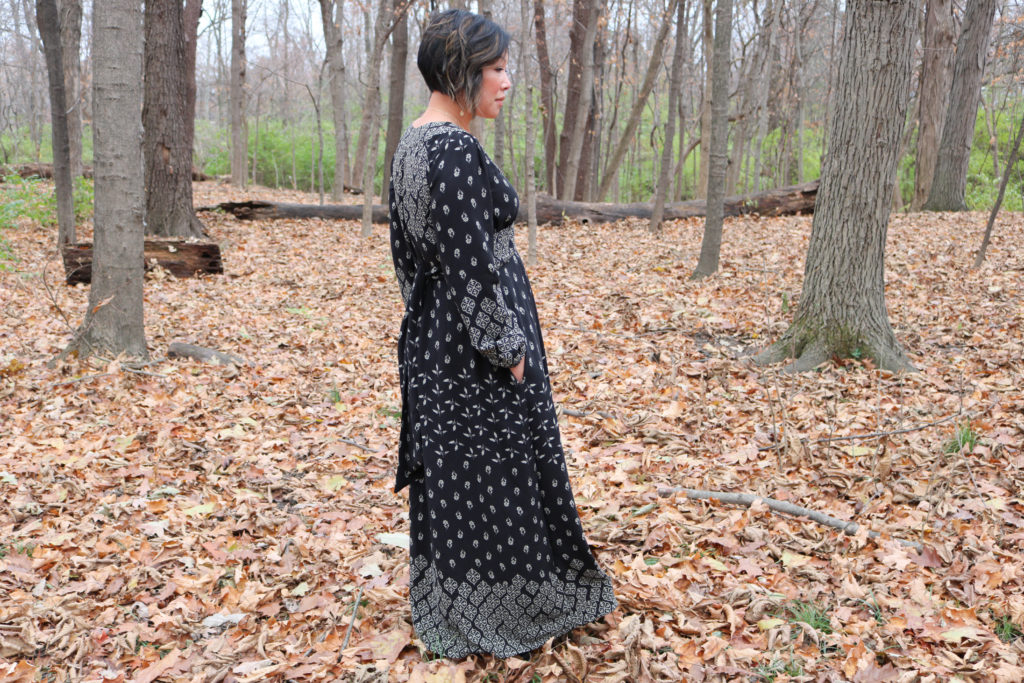
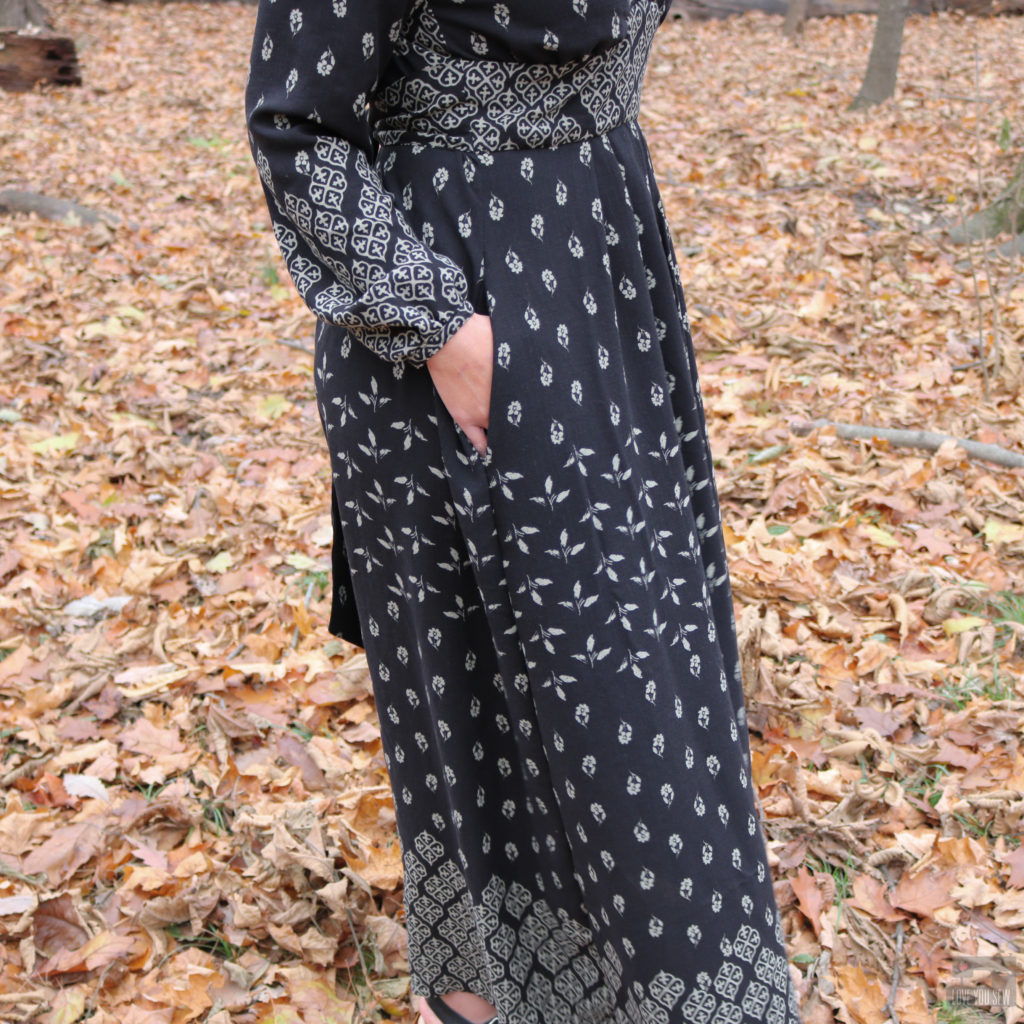
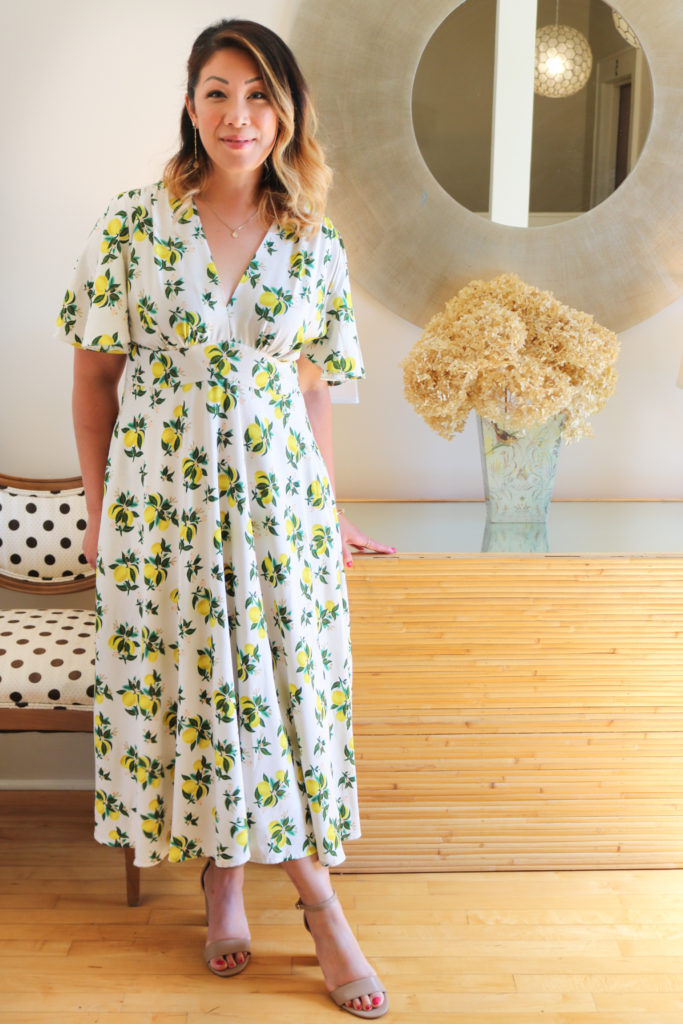
I’m not sure exactly where I saw this silhouette, but I wanted to make a flowy long dress with flutter sleeves for the midwest heat.  After a good bit of research at my typical spots – IG, Pinterest, and Google, I finally found the closest pattern to what I wanted.  And that pattern was the Fibre Mood Agatha…However, it was drafted for knit fabrics and of course, I wanted to use woven.  In the website description, FM says the pattern can be used for wovens, but I was pretty skeptical.  They mention that you “only” need a side zipper and I’m here to say I made a lot of extra adjustments to account for ZERO stretch.  Since I couldn’t find any other options, I still bought the pattern knowing I would have to muslin the bodice and be fully committed to a few days of fitting.

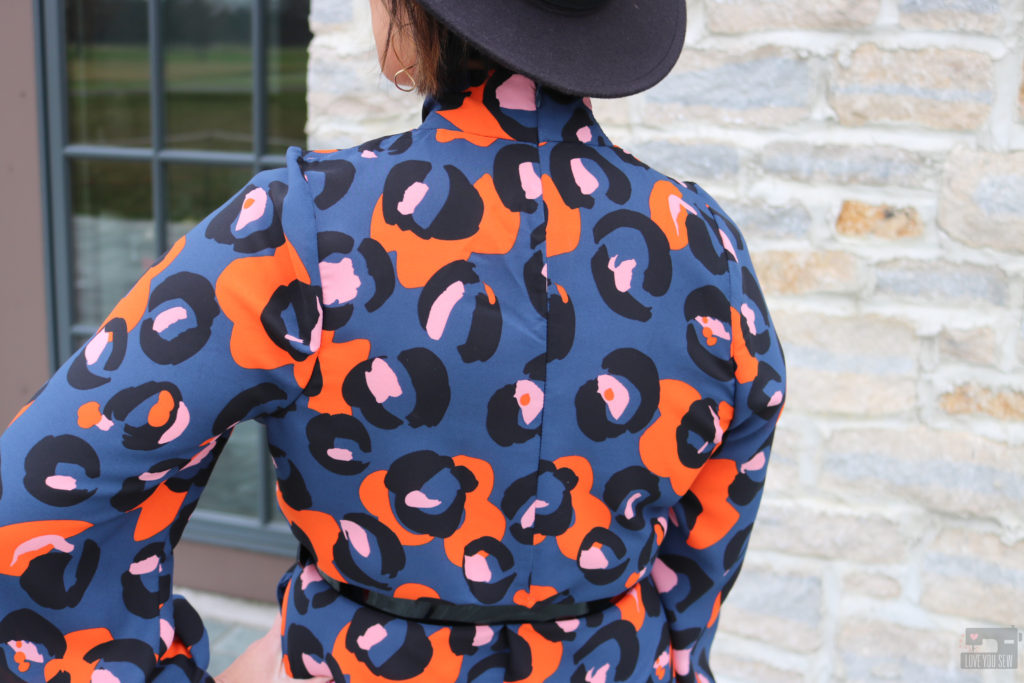
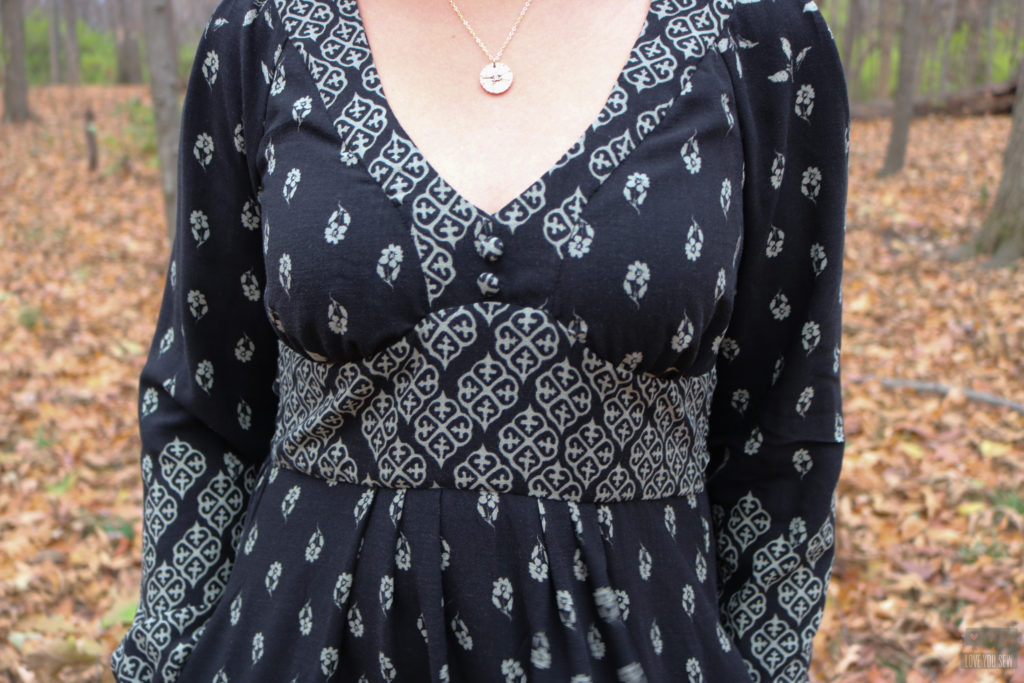
Although I measured a US 8, I cut a US 10 knowing that everything would have to be adjusted later on.  It gave me a base point to start without going too high and throwing off other fit (like the shoulders and sleeves.)  With the muslin, the armscyes are very generous, so I didn’t need to make the sleeves.  I just had to sew the bodice and waistbands together.  Even after cutting a larger size, I still needed 7/8″ added onto the front and back of the waistbands.  Then I slashed the back bodice in three spots (dividing the back evenly) to account for the new waistbands and created a new back bodice piece.

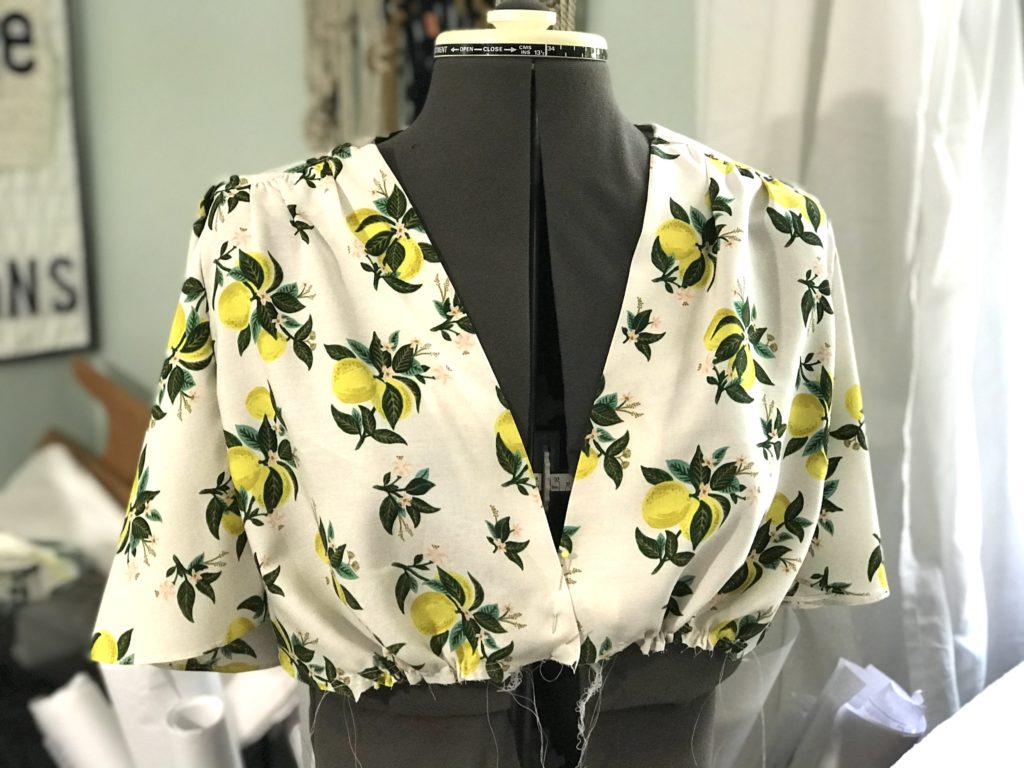
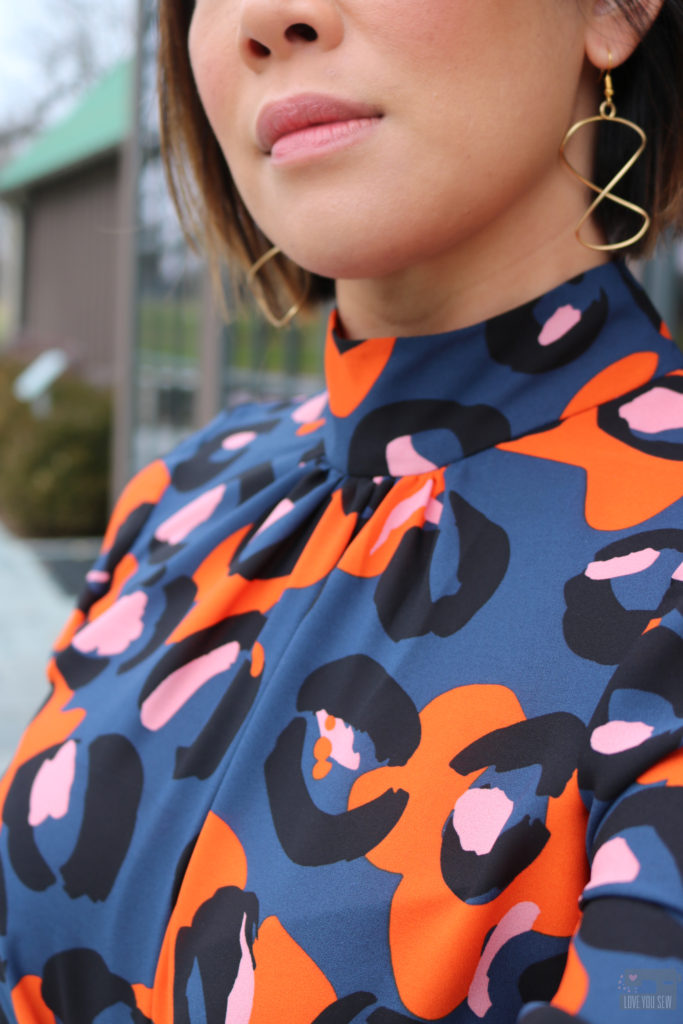
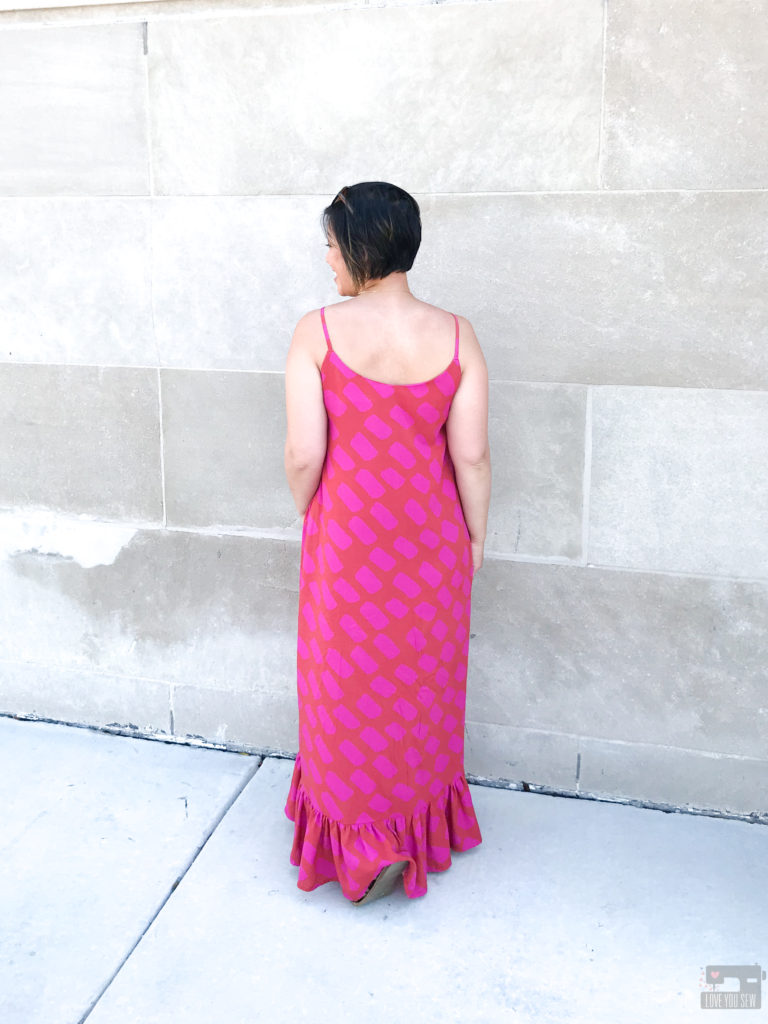
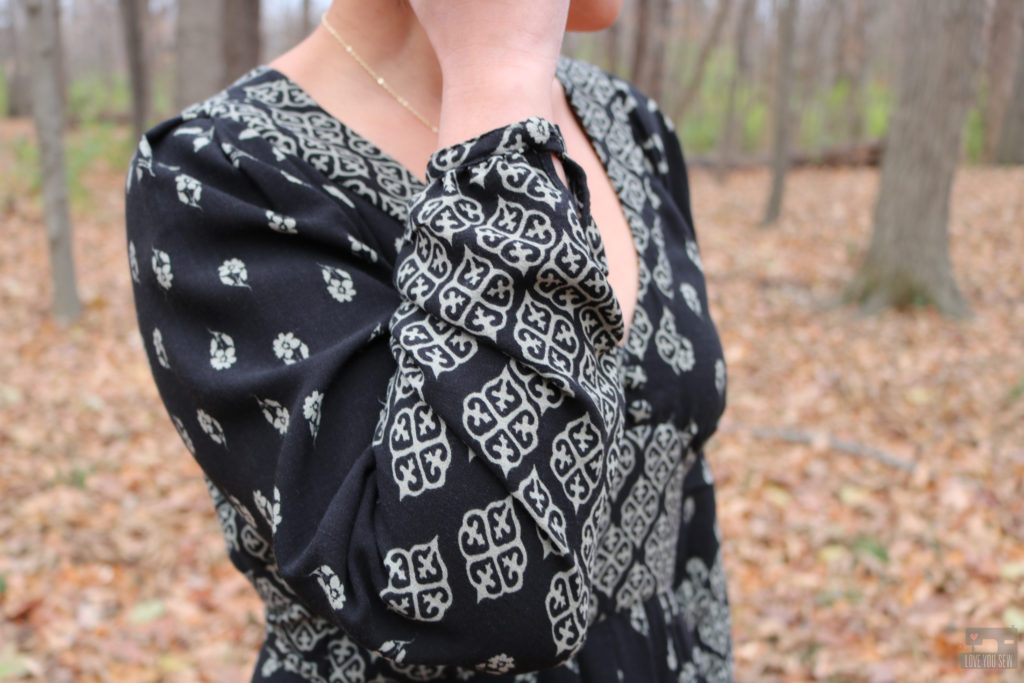
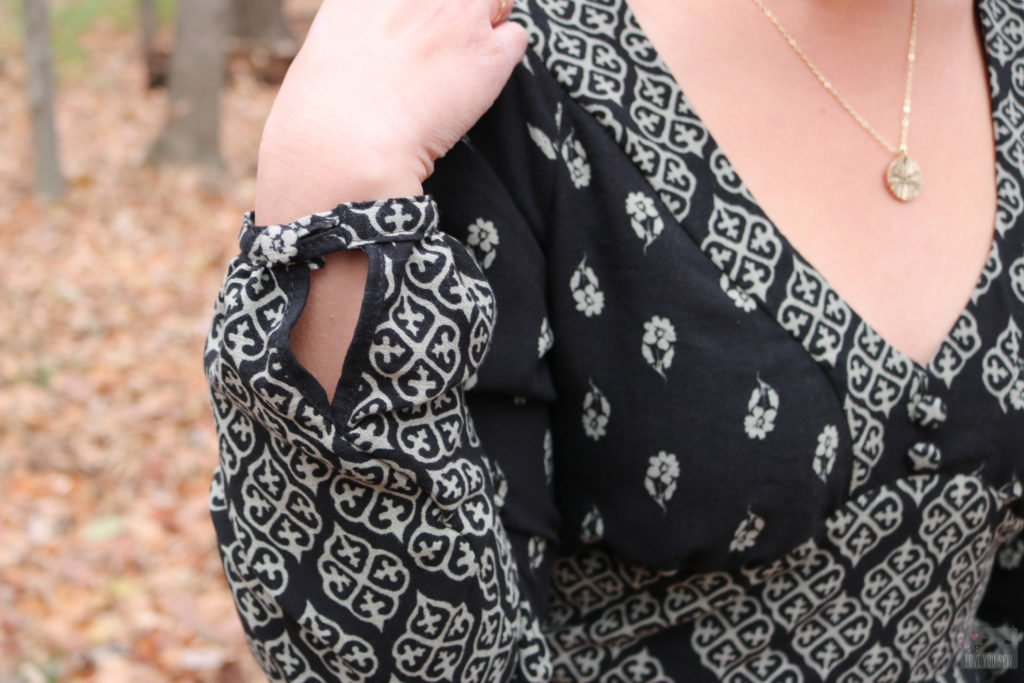
With the help of hashtags, I found Jessica R. (@mom.maker.model) who had made a few woven Agathas.  She had some good tips and mentioned she had to add about 2″ to the length of the bodice (towards the side of the bust) to make room for the ladies (I am a B-cup and you would have to add more for any size larger.)  Since the bust is gathered, I didn’t have to add more width…but just evenly spread the gathers along the new front waistband.  I had to play with the gathers and the added volume a little bit until I found the fit I liked.  The V-neck is pretty deep and I ended up overlapping the front bodice pieces by 3/4″ for a little extra modesty. With the added length of both the waistbands, I then widened the skirt opening to match.  *The pattern doesn’t mention stay-stitching the waist opening of the circle skirt, but I would HIGHLY recommend it so your skirt doesn’t stretch while making this dress.

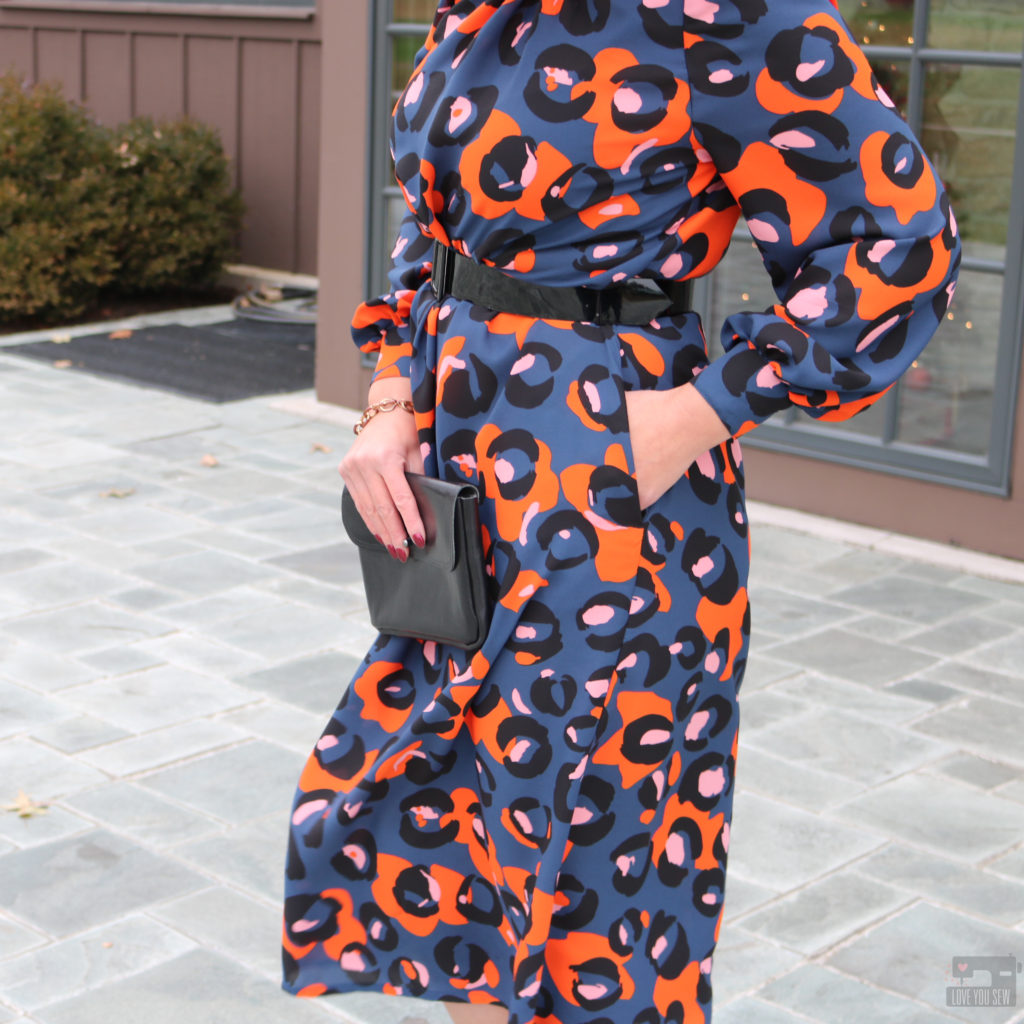
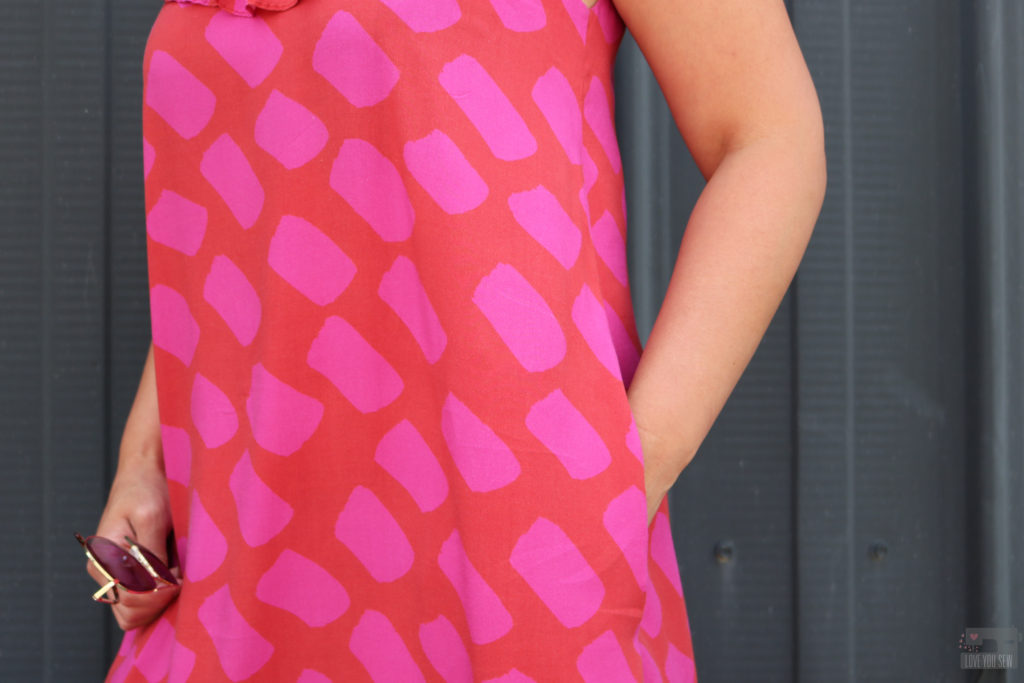
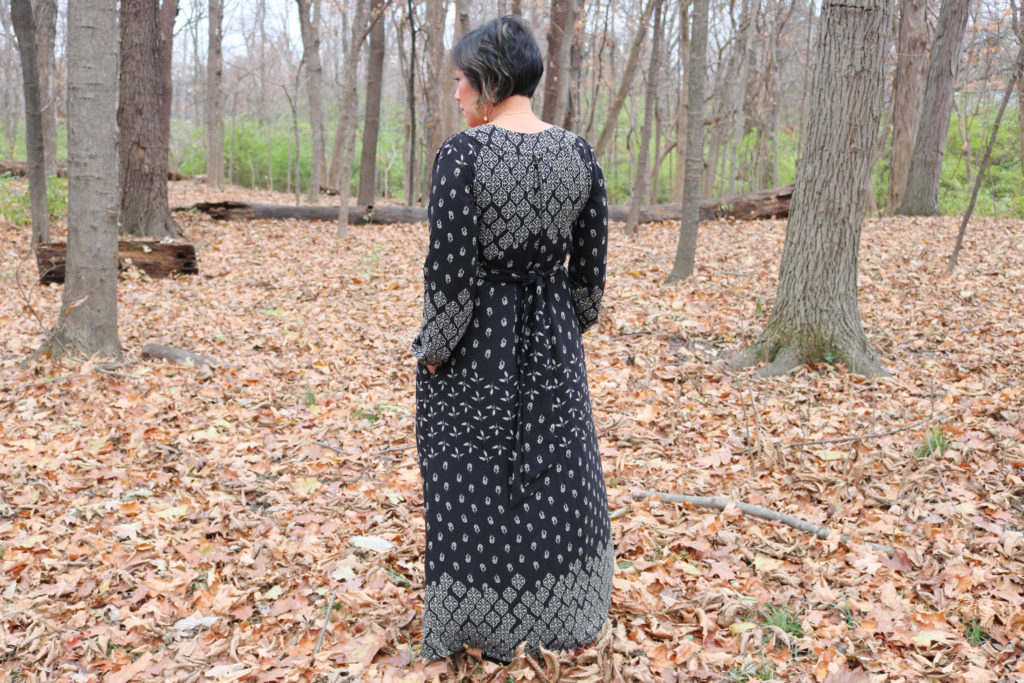
For Jessica, she didn’t need to add a zipper, but I definitely had to in order to get the dress over my head! This was such a mental challenge for me because not only was I adding in an invisible zipper, but with the light colored fashion fabric I was using, I also had to account for a lining…and adding pockets!  I really set myself up for a challenge…eek!  I ended up sewing the invisible zipper to the fashion fabric and then hand-stitching the lining into place.

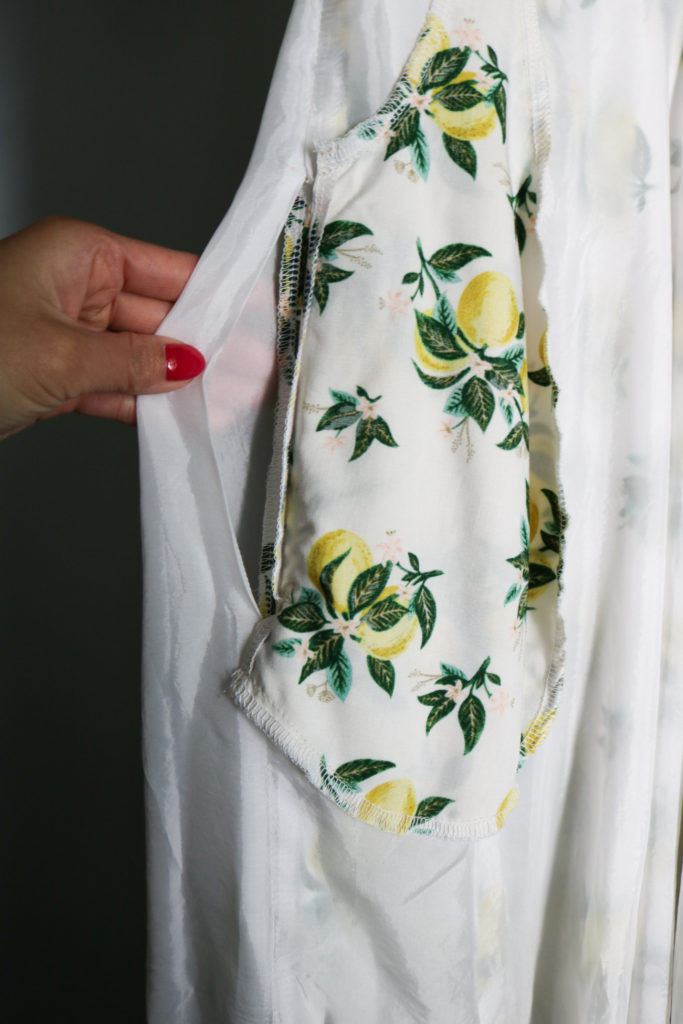
While adding in pockets is normally not a huge issue (but all designers should add them to all patterns anyways!) I, again, had to account for a slight sheerness of this fabric.  The pockets had to actually go behind the lining so they wouldn’t be seen through the front of the dress.  I know some of you are wondering why I didn’t use the lining as the pockets.  But with the slash style, I wanted to use the same fashion fabric to blend the pockets right into the dress whether my hands are using them or not.  To account for this interesting issue, I left openings in the side seams of my lining so the pockets could pop back.  I’ve never seen something like this in a pattern and was proud of my MacGyver sewing idea!

FABRIC

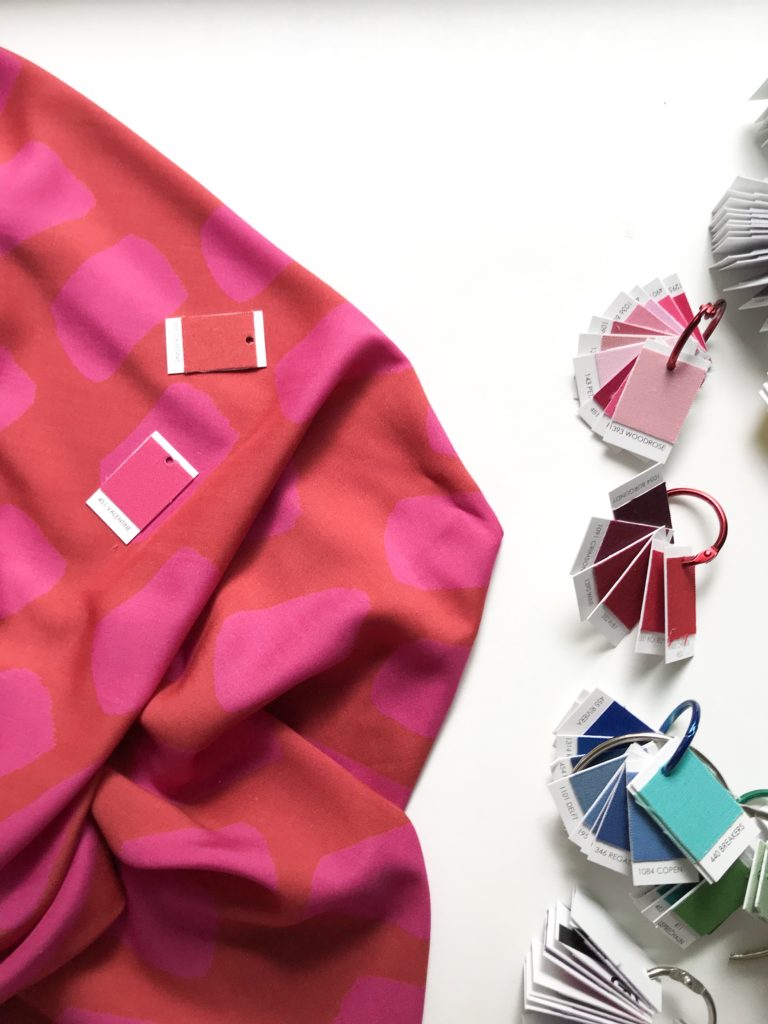
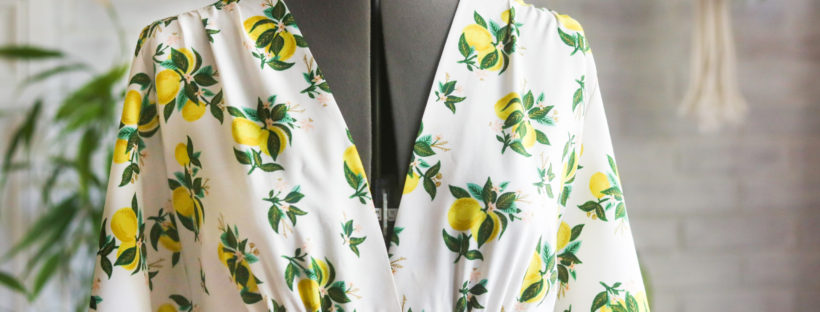
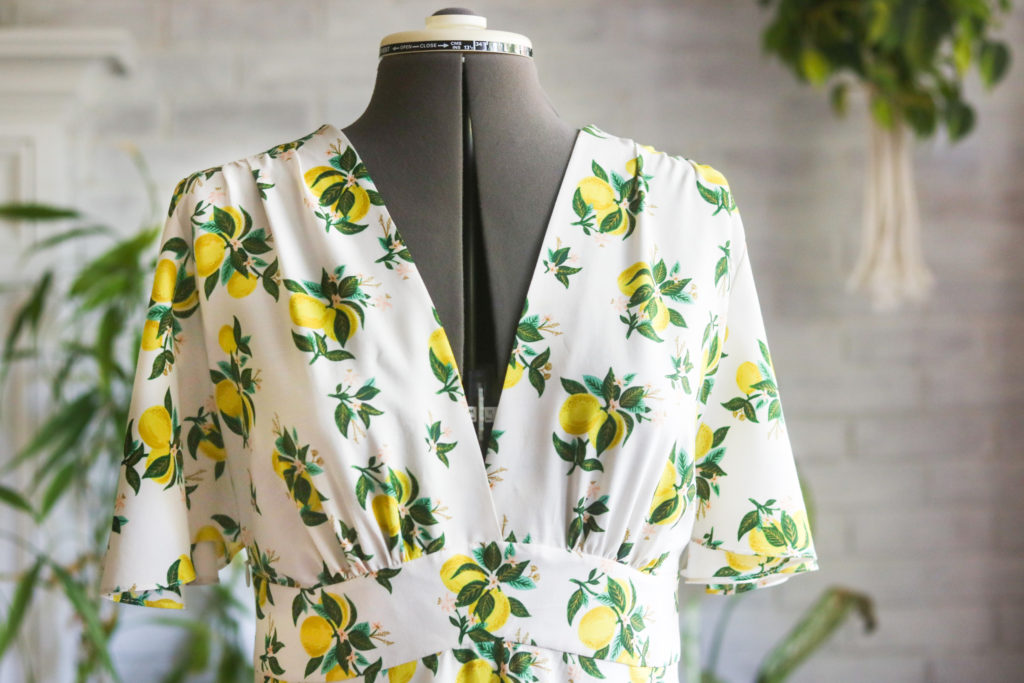
I had this Rifle Paper Co. Citrus Blossom rayon challis in my stash for a good year.  I’m normally not a yellow person, but these prints are always SO beautiful and I definitely needed the color in my wardrobe.  When this collection first came out, I bought enough fabric for a shirt or maybe a short dress….but then I came back to it just a month or so later and bought more.  I’m so glad I did because this circle skirt style uses a lot of fabric!

With rayon challis, it is a light and breathable fabric. I love it for the summer since it has a soft cool hand and drapes well. However, it can be slippery and pretty shifty when sewing.  So I use my fine pins and end up using twice as many as I would with a quilt cotton.  My machine is pretty hardworking, so I also have to switch down to a 70/10 needle when working with rayon.

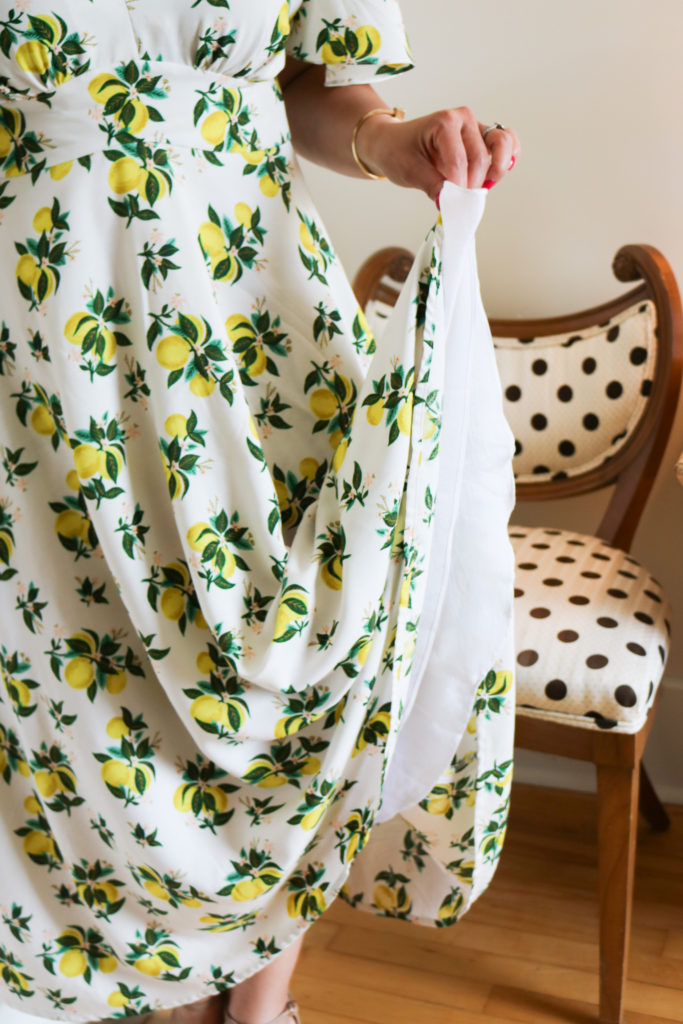
As I mentioned earlier, I had to use a Bemberg rayon lining in the skirt to keep the dress from being see-through. I cut the lining the same shape as the skirt, but cut off an extra 2″ off the hem so it wouldn’t been seen as I wore the dress.  While I was at it, I also added a lining to the waistband (along with light-weight interfacing) to keep it more structured for a lean look.  Luckily, this was also in my stash and it’s definitely a good fabric to have around to line lighter fabrics.

Overall, this was probably one of my most laborious makes with the added steps of a muslin, adjusting for woven fabric, adding pockets and also adding a lining.  After the wedding and 6 additional months, I can still say that all of this work was WELL worth the effort and I have all of the adjustments ready for a future dress!  I’m so happy with the wearability of the FM Agatha.  While it’s light and flowy for warm weather, I love that my shoulders are covered for those shots of extreme air conditioning in the summer.  Keep a lookout for a new one in 2022!!!


Hugs and Stitches, friends!

Cristy


This post may contain affiliate links.  You can read about my Disclosures here.  While I am a Fibre Mood ambassador, this pattern and the fabric was purchased by me and not part of any promotion.

Pattern Review || Fibre Mood Holly Dress

Things got pretty busy around the holidays, so it’s about time I get back to the blog.  I can’t believe it’s March already and I’m just getting around to reviewing the Fibre Mood Holly Dress I made back in November!  We are in the midst of Covid-19 self-quarantine and blogging a bit is helping me deal with the current environment along with feeling some kind of accomplishment for the day.  I hope this post brings some distraction to all of you at this unbelievable time in our world.

With the 2019 fashion trends bringing “prairie” style along with bold statement sleeves, I was on the hunt for a pattern that was still modern and not full “Laura Ingalls Wilder.”  Then I happen to see a version of the Fibre Mood Holly Dress on Instagram and knew it was for me!  I loved the clean high collar, full sleeves with button placket and the perfect midi length!

Pattern

I had never made a Fibre Mood pattern before.  The company is a European based sewing magazine (available in several different languages) which also sells their digital patterns a la cart here.  When I purchased this pattern in November of 2019, there are a few things to note about the pattern:

  • It  was available only in A4 paper sizing
  • You had to add in your own seam allowances (SA)….to every single pattern piece.  Yikes!  I’m not used to doing that, since I’m accustomed to US patterns which includes the SA already.  But, I still wanted to make the dress badly and was willing to take the extra time
  • Since purchasing this pattern, Fibre Mood has started to add SA to their new pattern launches and has made their digital patterns available in US Letter and AO (copy shop) formats.  This pertains to only the new patterns being released in new magazines, but they might go back to old patterns.  I’m crossing my fingers!

The nice thing about a pattern without SA, is that you can tissue-fit it without having to do all of the math (subtracting the seam allowances) to your body.  The down-side is this process is VERY time intensive…even with the double pencil trick!

Fabric

I fell in love with this Telio polyester crepe over the summer with leopard also making its resurgence as the hot print of the moment.  Since everyone and their mother is wearing animal print, I wanted to enjoy the trend but be a little different in this bold orange and blue combo.  I purchased a few yards with no plan in mind until I found the Holly Dress.  I paired this fabric with the pattern to really make the dress more modern to balance to the high neck and more traditional ballon sleeves.

The fabric is lightweight with fluid drape and needed to be cut with care due to it’s shiftiness.  I did not cut on the fold and opted to cut everything out as one layer of fabric.  This crepe is also semi-sheer so you would need a lining, but I opted to just wear a slip underneath the dress afterwards.

Construction

I measured between a 38 and a 40, but opted for the 40 since I needed the clearance over my hips.  Although I made a straight 40, next time I will widen the shoulder and possibly add a little length to the sleeve….which is surprising because I am 5’3″ and usually have to narrow the shoulders with American patterns.  Other modifications included:

  • Omitted belt for a solid RTW one – I knew I wanted to tone down the pattern just a little bit to eventuate the waist and not be completely lost in the print.
  • Used basting stitches to help set in the sleeve (they were not part of the instructions.)
  • Swapped out the 24″ invisible zipper for a 16″ which I had on hand – There was still plenty of clearance to get the dress on and off

  • Hacked in pockets using the Derby Dress pattern pieces – This is my go-to pattern piece when I want in-seam pockets.

  • Narrowed the neckband by 1″ in total by taking out (2) 1/2″ wedges where the band meets the shoulder seams.

  • Made fabric covered buttons for an elevated look using a kit similar to this.

Final Thoughts

Overall, I really love this dress.  The fabric and pattern were a perfect pairing for my style and wardrobe needs.  I’ve worn it out for date nights with my husband and can’t wait to bring it into spring!  I would definitely make this pattern again, just with a slight widening of the shoulders and maybe a different length just for some variety.

What do you think about this dress style?  Are you into leopard print too?


Hugs and Stitches,

Cristy


This post may contain affiliates links.  You can read my full disclosure here.  I bought the fabric and pattern on my own.  But after making this garment, have since become a member of the Fibre Mood ambassador team.

Derby Dress by Love You Sew

Derby Dress: Maxi Hack

Derby Dress Maxi Hack by Love You Sew

I was so excited when D&H Fabrics approached me to collaborate with their exclusive fabric collection with Katie Kortman.  I was asked to make something using one of the three available prints and I knew I would have to make a statement maxi dress using the Dash fabric with the Derby Dress pattern by Christine Haynes.  Katie’s designs are always so colorful and dramatic.  I wanted to make a garment that’s also fun, bold, yet approachable – like the designer, herself!

The Derby Dress (aff link) pattern has been in my library for awhile now.  I’m a sucker for the classic feminine styles which Christine has in her patterns.  I made the knee-length version a few years ago with a rayon challis and it’s still on rotation in my closet.  So I knew a full maxi version would get the same wear…if not more!

Fabric

After checking out the available prints at D&H Fabrics, I fell in love with the vibrant pink and red Dash.  There was just something about these analogous colors that pulled me in.  I admit my garment fabric game is a bit neutral (aka boring) so it felt good to step out of my comfort zone a bit…especially for summer!  If you follow Katie on IG, you know she has her own personal movement to get more of us sewists to use fun color combos.  I SO appreciate the extra fun inspiration and color push 😉

This gorgeous print is made of a 56″ wide lightweight rayon poplin which is incredibly soft with a soft hand and beautiful drape. The tight poplin weave makes the fabric easier to handle than a rayon challis which is much more slippery. With this more delicate fabric, I like to use a smaller universal needle sized 75/11 or 70/10.

The fabric design is printed directly on a white basecloth and washes very well. Most of these pictures were taken after three washes and yes, even with delicate tumble-dry.  (I wash my handmade garments along with my RTW.)  The colors remain saturated and I even sweat through this for hours in 90* heat.

Pattern & Modifications

As I mentioned above, I’ve made this Derby Dress by Christine Haynes before and love the flirty ruffle feature — plus it has pockets!  I actually use this pocket pattern as my go-to for any dresses which need an in-seam pocket.  It’s just a nice shape and perfect size for my hands.  I’ve used these pockets on my Sylvie seen here, and my Alix dress found here.

The front of the Derby is drafted with 3 separate panels for princess seams and the back has 4 panels for additional shaping.  This is great for a solid fabric or a busy print, but I didn’t want to disrupt the dashes in this fabric design.  I definitely did not have enough fabric for all of the pattern matching either…nor the time! So, I used a RTW maxi dress from Target (aff link) I have to work out the width and length of the dress.

I laid the RTW dress over the fabric on the fold and used the facing of the Derby to cut the top of the dress (of course, adding in seam allowances.)  The Derby uses two different facings for the front and back, but I took the easy route and made my front and back pieces identical since all of the panel seams we eliminated.   I then cut out two of the front facings on their own to match the front and back of the Derby.  The straps were later shortened to account for these changes to the neckline.

With the dress lengthened out to a maxi, I also extended the length of the neckline ruffle by 1″ to balance the proportion.  I though the ruffle would be cute on the back as well, but it ended up being  a bit “too much.”  Sometimes you have to know when to edit, and the back looks much better with a clean line.  To play with the neck ruffle, I also added a 7 1/4″ (finished) x WOF ruffle to the bottom of the Derby to make it as close to the ground without touching as possible.  It adds to the flirty feel of the dress and adds some extra swing.

I LOVE how this maxi version of the Derby came out.  The print needed to become a statement dress and I can definitely tell you it turned a lot of heads at the airports!  The lightweight rayon poplin was just perfect with the dress pattern for all the great movement.  It’s the perfect summer dress for travel and pairs beautifully with my vintage denim jacket….so that means I can also extend the season on this make! Yay!!!

Derby Dress by Love You Sew

Project Summary


Are you a bold and colorful person or usually a bit more reserved and neutral like myself?    I have to admit that stepping out of my usual color scheme was a lot of fun and I’m reaching for this dress a lot more than I thought I would!  Try it out if you haven’t already!!!


Hugs and Stitches,

Cristy


The fabric for my dress was provided by D&H fabrics for advertising but I was not contracted to write a blog post.   As always, I like to share my makes and good fabric finds 🙂  There are affiliate links in this post and you can read up about my disclosures here.


M7429 Pine Crest Velvet by Love You Sew

Holiday Dressing with Stretch Velvet

Nothing says “Happy Holidays” more than some velvet. There is just something about this fabric that conjures up feelings of wintertime mixed with luxury…especially in deep royal blue. Luckily, it is also one of the hot fabrics of the minute with odes to the 90s still in full fashion swing.

Fabric

The nap of velvet gives the fabric its trademark characteristic. The soft texture lends some weight, which makes it a great fall/winter substrate. With the popularity of velvet, there are a lot of options currently out in the market. There are non-stretch and stretch varieties which is great based on what you would like to make…whether it be a structured blazer, tights or a dress.

I was able to get this gorgeous Royal Radiance Velvet Spandex from my friends over at Pine Crest Fabrics. When they asked if I wanted to try out one of their velvets, I just couldn’t say no (even with a month full of other sewing commitments.) I knew that this velvet would be special since Pine Crest is a company that specializes in high performance fabrics…and friends, this Royal Radiance did not disappoint. You can find similar fabrics at Fabric.com here.

What makes this fabric incredible is the base cloth. I’ve made a few garments which you can read about here, using other Pine Crest athletic fabrics and I knew the velvet’s “wrong side” would be silky smooth…and it was! The 4-way 10% Spandex stretch made it ideal for a form-fitting dress and it has great recovery – so the dress keeps its shape. Even with the heavier weight of this fabric, it remained cool and breathable which is key when wearing this fabric out to a party.

Velvet Tips

  • Pay attention to the nap. Make sure it feels smooth running down the garment and cut pattern pieces with this in mind…because you know you will want to pet yourself!
  • If you do need to iron, use a towel as a pressing cloth to avoid crushing the pile. (There was hardly any wrinkling with my dress, so I luckily didn’t have to press often.)
  • There is a little mess cutting into velvet. Run a sticky roller on the velvet immediately after your cuts to keep the fuzz at bay.
  • Use a stretch or jersey needle with stretch velvet.

The Pattern

For my holiday dress, I used McCall’s #M7429. Variation B was exactly what I wanted for my stretch velvet. I wanted something more form-fitting, but NOT body-con. (I am not a skin-tight kinda gal.) This front knot and half-wrap design is perfect for camouflaging one of my trouble spots, but is also visually appealing. Only a solid fabric could really show off this design element and using my Royal Radiance just made it SO much better.

No lie…I was definitely tripped up by the knot. I was able to get pretty far with the limited illustrations and instructions known with the Big 4 pattern companies. Luckily, I found this video by Brittany Jones to help guide me through.

These Big 4 patterns also tend to allow more ease into their recommended sizes, so I was a bit concerned on what size to cut. I went with the pattern’s recommendation and feel like I could have probably gone down one size because there is quite a bit of fabric hanging under my arms and into the bust. The shoulders could be cut in 1″ on each side as well. Other modifications I made:

  • Graded out one size in hips down to the hem, including the back pieces
  • Narrowed the sleeves 1″ (folded) at the wrist and graded to the elbow
  • Shorted sleeves by an additional 1″
  • Increased hem by 1.25″
  • Deepened the neckline by an additional 1/4″
  • Tacked the wrap skirt into the knot with a few hand-stitches to keep it straight

What do you think about velvet for this holiday season? There’s still time to make this dress for Christmas or New Year’s!

Happy Holidays!

Cristy


*Fabric for this post was provided by Pinecrest Fabrics. As always, all thoughts and opinions are my own.

Fall Sewing: Alix Dress in Télio Rayon Slub

After making a number of practical everyday garments likes jeans and sweatshirts, it feels good to make something that’s a little extra special.  I’ve been dying to make a Boho maxi dress for the days I want some statement style but still have a light relaxed feel.  Then Télio asked me to collaborate and I already adore their fashion-forward garment fabrics.  How could I refuse an opportunity after seeing this gorgeous border print?  The fabric along with By Hand London’s Alix dress pattern were going to be THE perfect match!

Fabric

The first time I used Télio fabric was here.  I was impressed with the high quality and how the fabric washes well.  So, it’s no wonder I fell in love with this Télio Kahlo Rayon (#39801) for its gorgeous double-border print.  Look how the three different patterns are layered to give an impression of a tiered dress without having to actually sew one!  It gives so much visual interest and I was able to play with the design with my fussy cuts of the dress pattern.

The fabric is 100% rayon with an incredible slub texture.  The feel of the natural fiber knobs adds to the character of the Alix Dress and Boho vibe.  As with all rayon, the fabric is still lightweight with beautiful drape and movement.  It is also completely opaque.  After adding linings to my last few makes, I’m happy to leave that step out!

Pattern

Initially when I chose this fabric, I wanted to make a long shirtdress.  But when I received it, I knew I wanted something else to show off this print.  After going through dozens of other patterns, I remembered how the Alix Dress caught my eye awhile back.  I’ve sewn up the Holly Trousers before and By Hand London writes up a great pattern.

I really love this dress silhouette.  It’s relaxed all over with a beautiful tie-back to show off the waist.  This allows a nice shape without having me look like I’m drowning in fabric….especially, when I’m petite.  The tie-back also allows for weight fluctuations, which is VERY much appreciated in a handmade wardrobe.

One of the features that drew me into this pattern were the peasant sleeves.  I have heavy arms and usually have to make a bicep adjustment with woven patterns, so the ease in the sleeves looked pretty attractive.  I ended up not having to make any adjustments to the sleeve pattern.  The darts at the top of the shoulder allow full range of motion.

However, I still did hack into the sleeve to change out the elastic casings.  I wanted a clean look and went for a slim button cuff with a 2″ long placket made with 1/4″ bias tape.  Since the cuff is only 1/2″ wide, I didn’t want to make a buttonhole and opted for a loop with my fabric covered button.  This a small detail, but I love being able to make my own custom buttons.

The other change I made to the Alix dress is the addition of pockets….because all dresses need pockets!  Amirite?  I used the in-seam pocket pattern from Christine Hayne’s Derby Dress (it’s my go-to pocket) and marked them about 4″ down from the top of the skirt.  If you ever wonder if you should add pockets, do it!  You won’t regret the extra work 🙂

Since I was working with a border print, I was limited to the 56″ wof and had to cut off 5.5″ from the skirt just to fit the pattern piece onto the fabric.  I was worried this would have to turn into an ankle or midi-length dress, but it was worth the sacrifice to show off the design.  For once, I was thankful for being 5’3″ because the dress turned out to be just long enough!  I created a 1 1/2″ hem and it just hits the top of my foot.  Phew!

There were two choices to either make a dart or gather the fabric under the bust.  I opted for the gathers and made sure to push them more toward the center of each breast.  This helped eliminate any sagging fabric around the sides into the bodice.

It maybe hard to see (which is good,) but I also added two fabric covered buttons to the front yoke.  My fussy cutting into the border left me with too much negative space right at the bottom of the V-neck.  Unfortunately, I didn’t have much fabric left and couldn’t cut out another piece.  So I made due with what I had and added the buttons to balance out the print a bit more.  Do you think it works?

I’m in LOVE with this make and it’s the perfect relaxed statement dress.  I can wear it with clogs (shown here,) flat booties and then sandals in the spring.  I’m thinking this may come with me to Thanksgiving….

Project Summary:


Happy Sewing Friends!

Cristy


Fabric was provided by Télio Fashion Fabrics for this blog post.  Pattern was purchased by myself and as always, all opinions are my own.  There maybe affiliate links in the post.