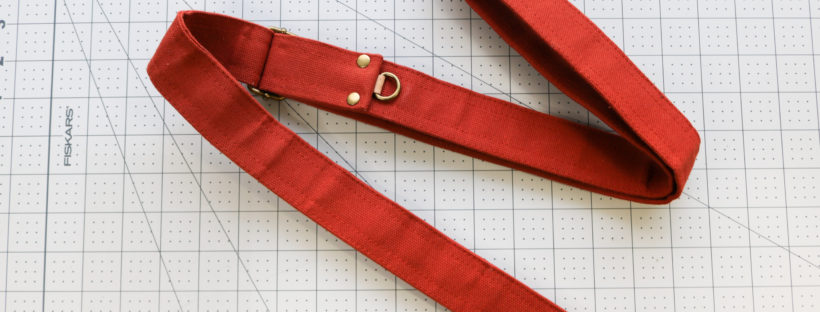
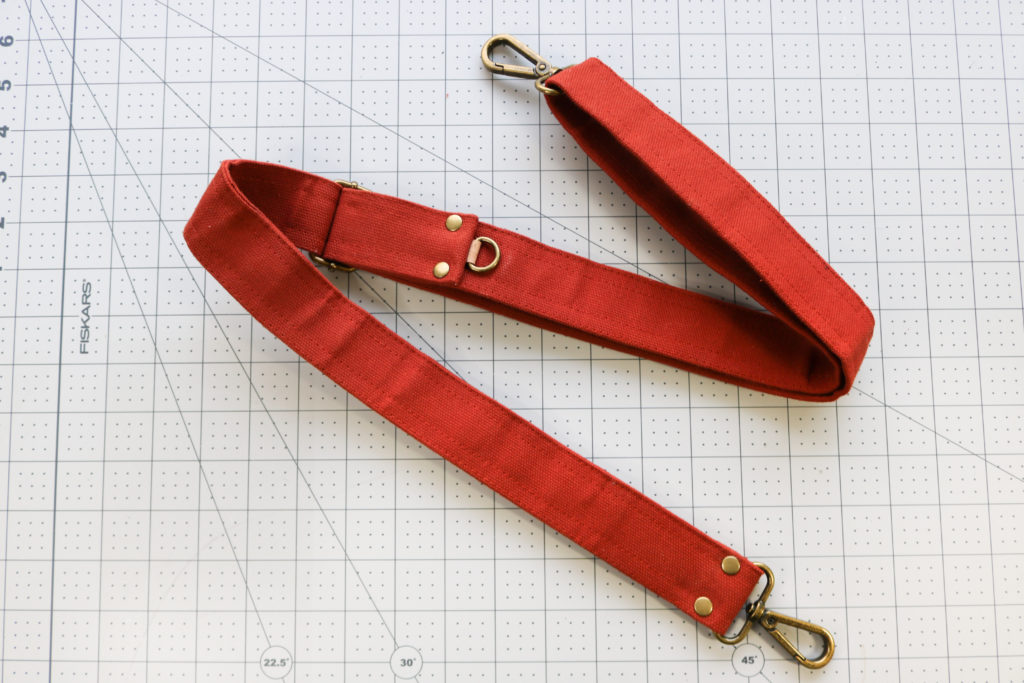
Welcome Back to the Erin Backpack Sew Along! We are now on Part 2: Making the Strap and Key Fob. If you missed any of the prior blog posts, you can find them below:
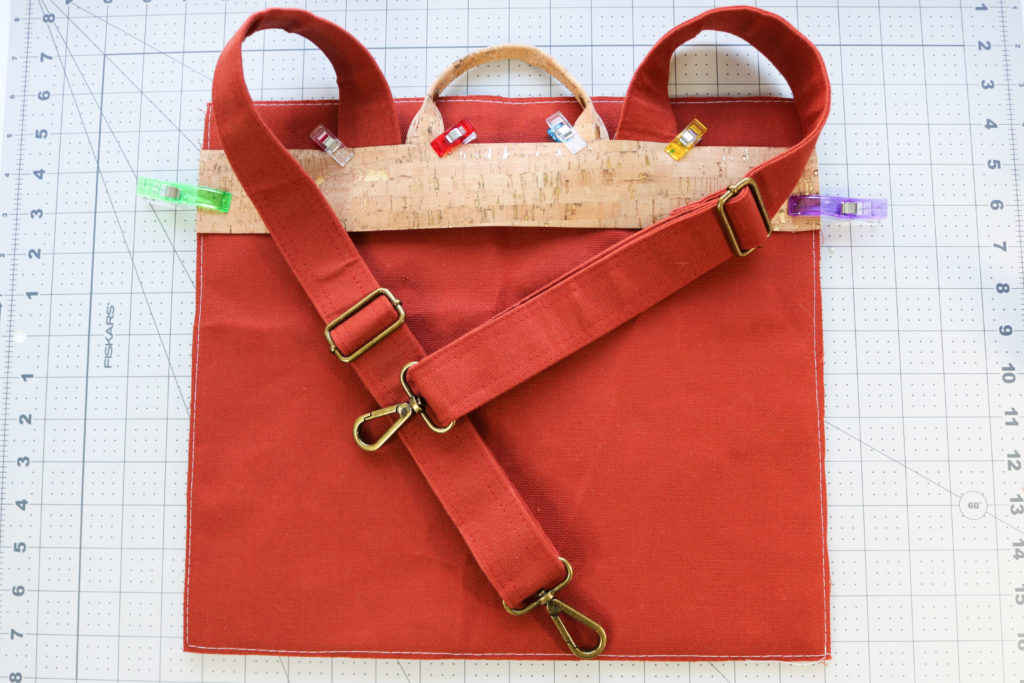
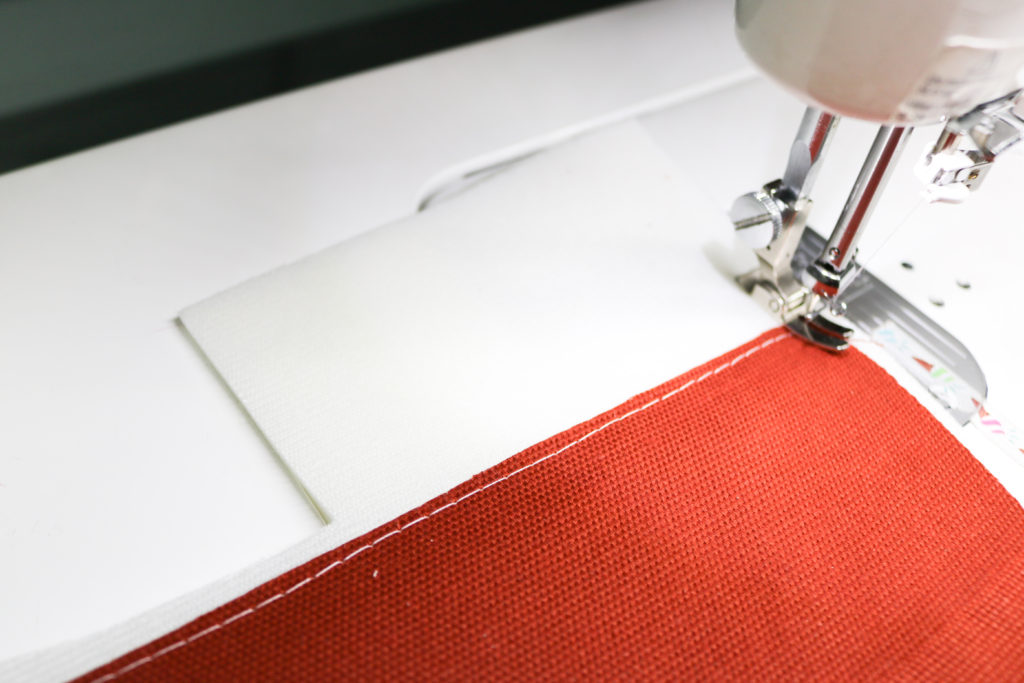
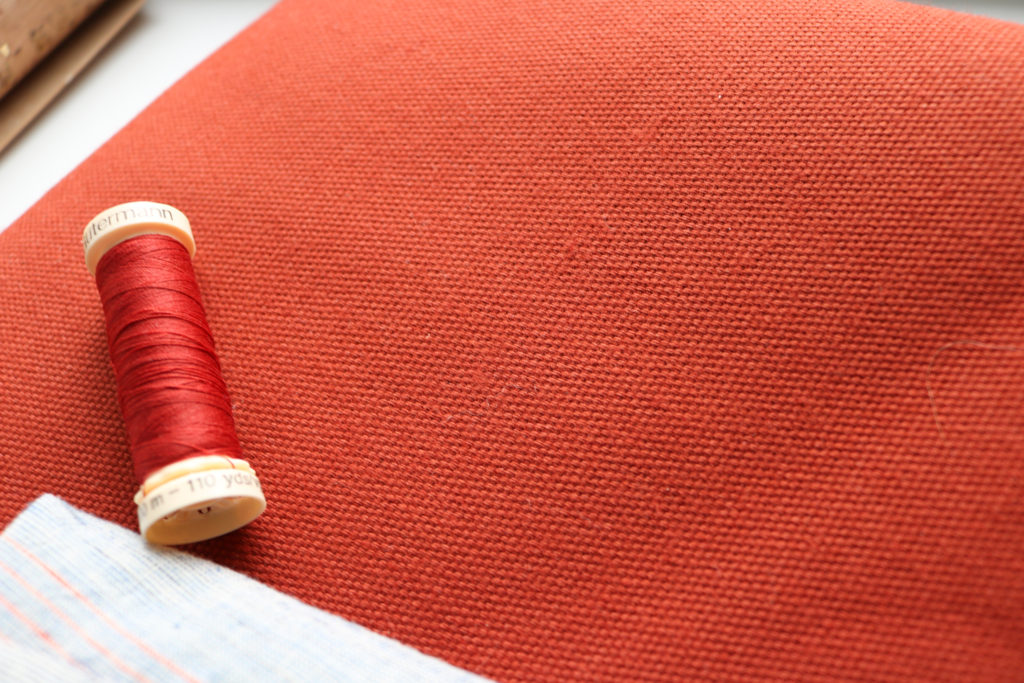
For the Sew Along, I have this great Expedition Dry Oilskin Canvas that is 61″ wide. So, I’m happily skipping steps 9-10 to piece the strap together. Again, since this is a treated canvas, I cannot use heat and fuse woven interfacing to it. At 9 oz in weight, it’s okay on it’s own!
[Steps – ] Click into the video above to watch the entire Strap making process. As you watch, please note the following:
Adding nylon webbing is a great way to add strength to a strap, especially if you cannot interface it (like with laminates and waxed canvas.) I show the option in the video, but do not add it to my project due to the thickness of my fabric already.
If you are worried about bulk at the end of your straps, one of my bag testers recommends this technique –>
Use Fray Check to help seal the ends. I like to add the seam sealant, let it dry and then come back to trim it.
If you need additional help setting Rivets manually, go to this post.
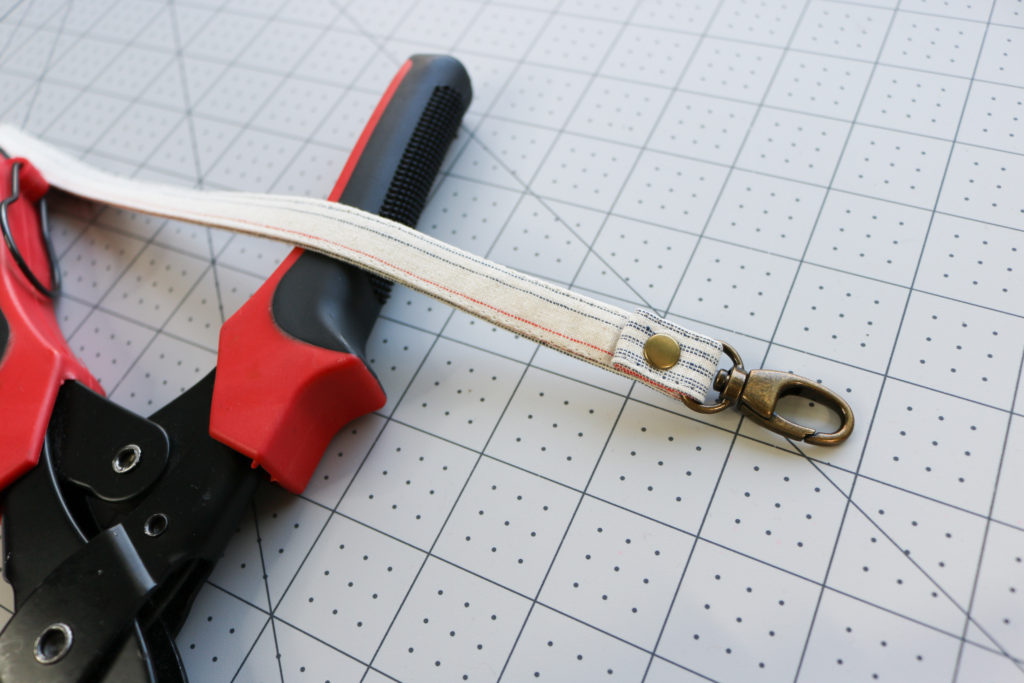
MAKE THE KEY FOB
With the Dry Oilskin canvas being so thick, it would create such a big folded knob relative to the 1/2″ Swivel Clasp. So, for this the sew along, I used the lining fabric instead.
[Steps 18-20] Click into the video above for the entire Key Fob making process.
If you need additional help setting Rivets manually, go to this post.
Hope you are doing well with this short Part 2! Drop any questions you may have in the comments! Now I’ll see you next week for the Erin Sew Along Part 3: Making the Back Panel.
Hugs and Stitches,
Cristy
This post may contain affiliate links. For my full Disclosures, read here.
Welcome to Part 1 of the Erin Sew Along: Cutting, Interfacing and Hardware Prep. If you have missed out on the previous posts, please read them first before proceeding:
If you have done your pre-work, let’s get started! Please remember that this Sew Along is SUPPLEMENTAL to the actual pattern instructions. You will receive extra tips and tricks on the blog, but make sure you read through all pattern steps FIRST!
CUTTING FABRIC
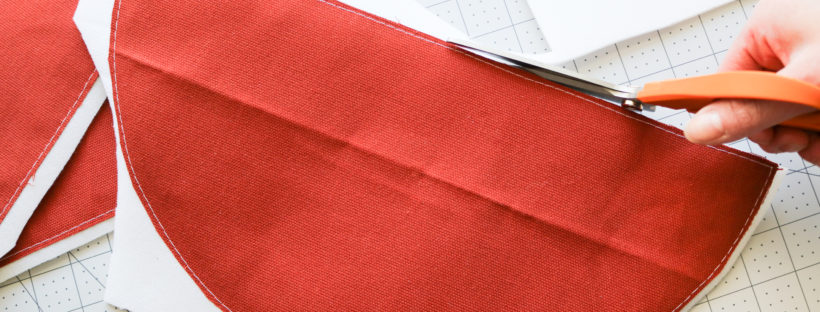
[Step 1] I don’t know about you, but this is probably the most tedious part of the process to me. With more complicated bags comes a lot more parts and pattern pieces.
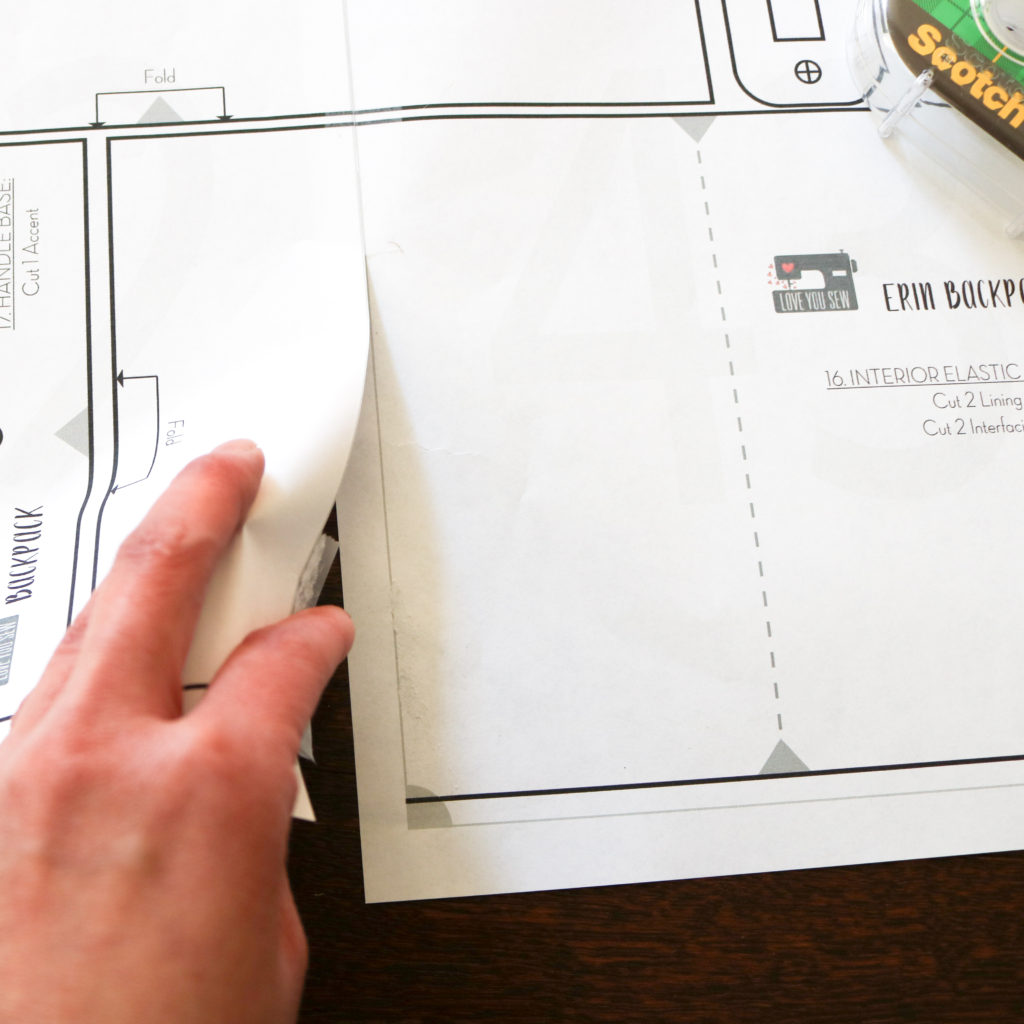
The Erin Backpack comes with 24 different pattern templates for you to cut out and help keep track of your bag parts with a pin or clip. Make sure to assemble the PDF pattern by lining up the GRAY lines, but cut your templates on the BLACK. The patten templates are laid out to minimize the amount of paper used.
For all of you who love a rotary cutter and ruler (myself included!) there is also Measure and Mark table as part of the instructions.
There is also a flat lay of all the pattern pieces to help you visualize everything that needs to be cut. I like to use the flat-lay to double-check that I have everything needed to get started.
***Please note the only paper template missing is the Strap. (For a large rectangle, it takes up a lot of paper and after taking a survey of bag-makers, they would rather have the measurements than to waste the paper and so I tend to take this course.) However, there IS a square placeholder with the templates you can use to help keep track of the fabric!
If you are looking to match fabric designs, it’s best to line everything at the base of the Main and Lining pieces. The Fronts are slightly shorter than the back pieces to accommodate the zipper width.
For those looking for the hack to add permanent back straps to the Erin, head here for the additional materials. I will be adding them to my bag, but will still reference the original parts of the bag if you still want the convertible back strap options.
INTERFACING
[Step 2] The majority of the fusing will be to the Lining pieces. Because of that, I like to do this first and block fuse as much as I can — This is when you interface the fabric first and then go back to cut out the pieces, reducing time spent cutting. The downside is that you may end up with more fused fabric than what’s needed, but I keep everything to make pouches later on. You will fuse the following with woven interfacing:
Front and Back Lining
Top and Bottom Lining
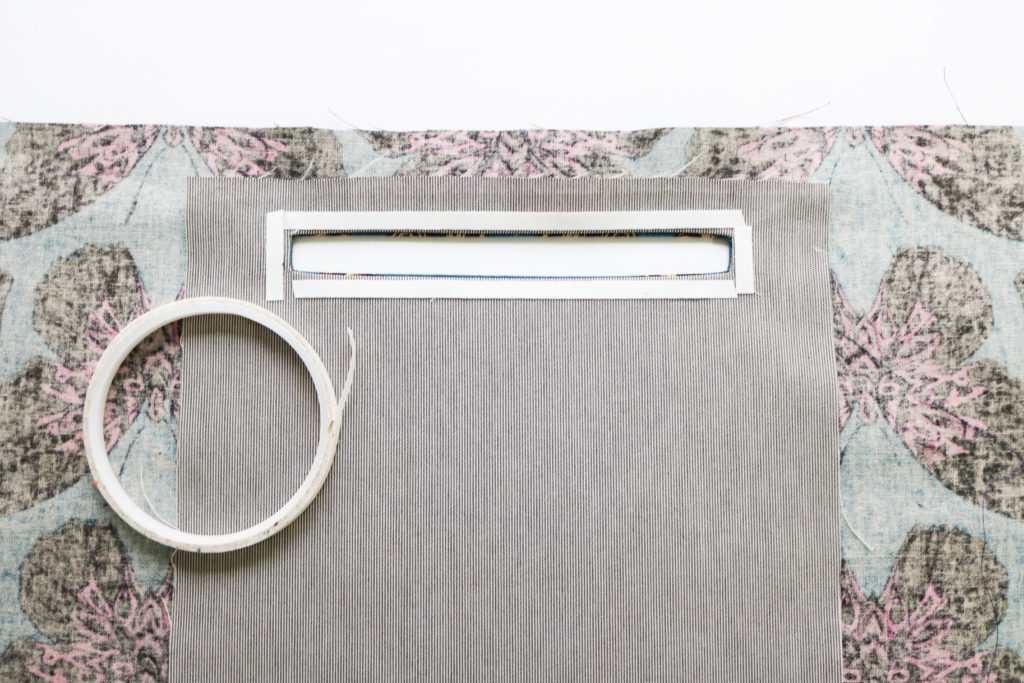
Front Welt Pocket
Front Elastic Pockets (but only on the half which faces the inside after being folded)*
Pop-put Pocket Main* + Lining
Back Slip Pocket Main* + Lining
Interior Welt Pocket
Interior Slip Pocket
Interior Elastic Pockets
Key Fob
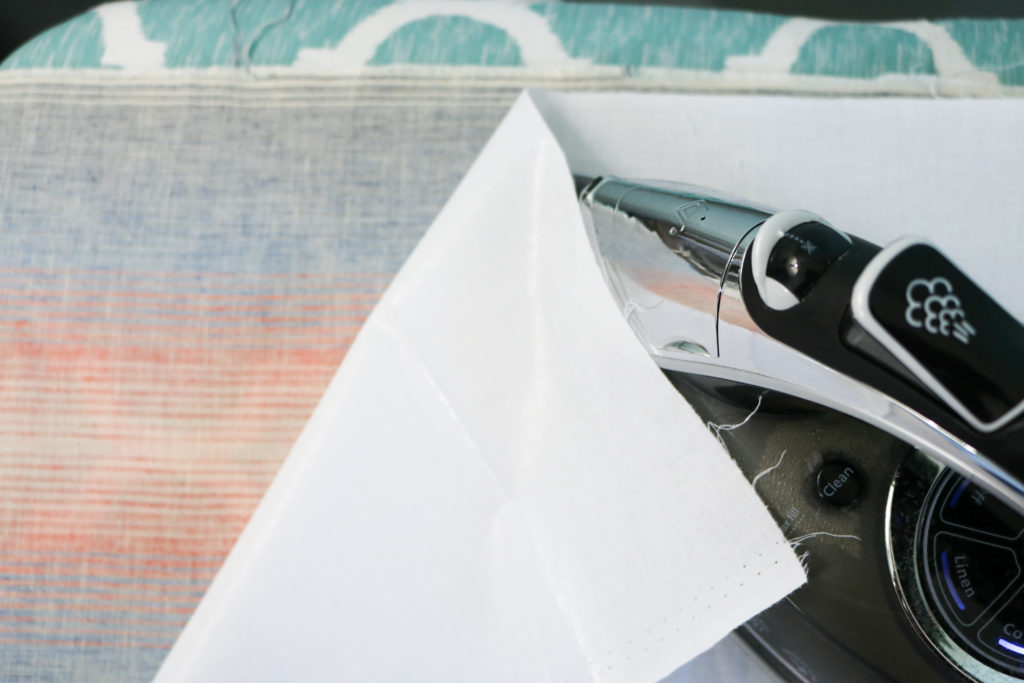
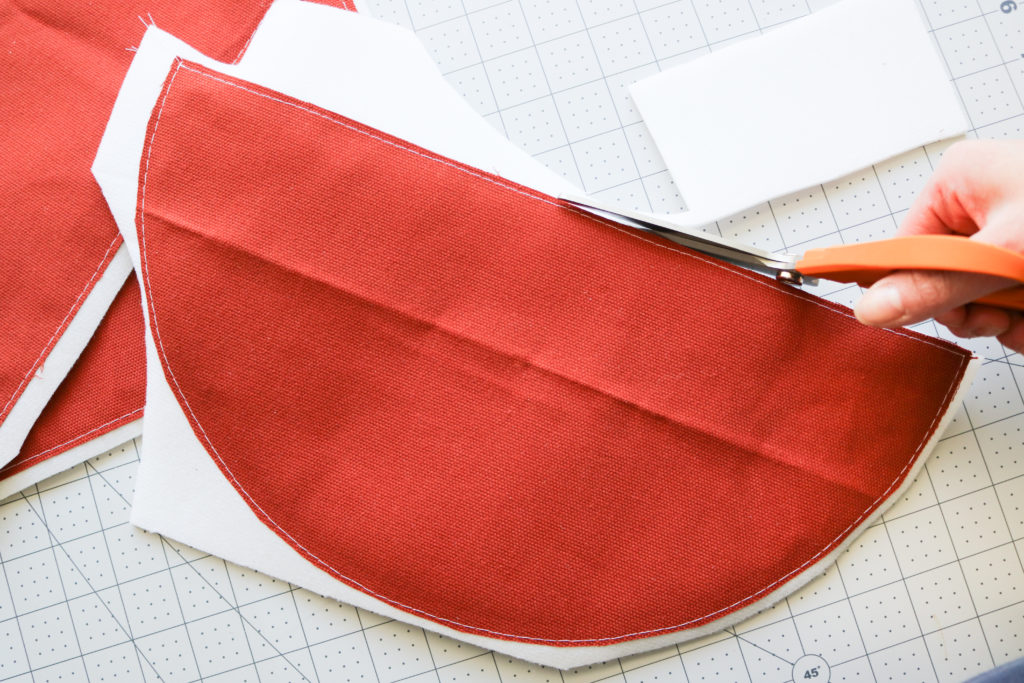
I am using a treated canvas and per manufacturer’s instructions, I cannot iron it and can only finger-press seams into place. With the fabric being so heavy at 9 oz, I’m skipping the woven interfacing on the parts marked with an (*). So if you are using vinyl or a waxed canvas, consider the same changes. If you are looking more a more structured bag and can’t iron the fabric, then consider a sew-in interfacing instead of the the fusible. Additionally, If you want to use the Back Slip Pocket to hold a tablet or small laptop, consider adding foam to the main fabric.
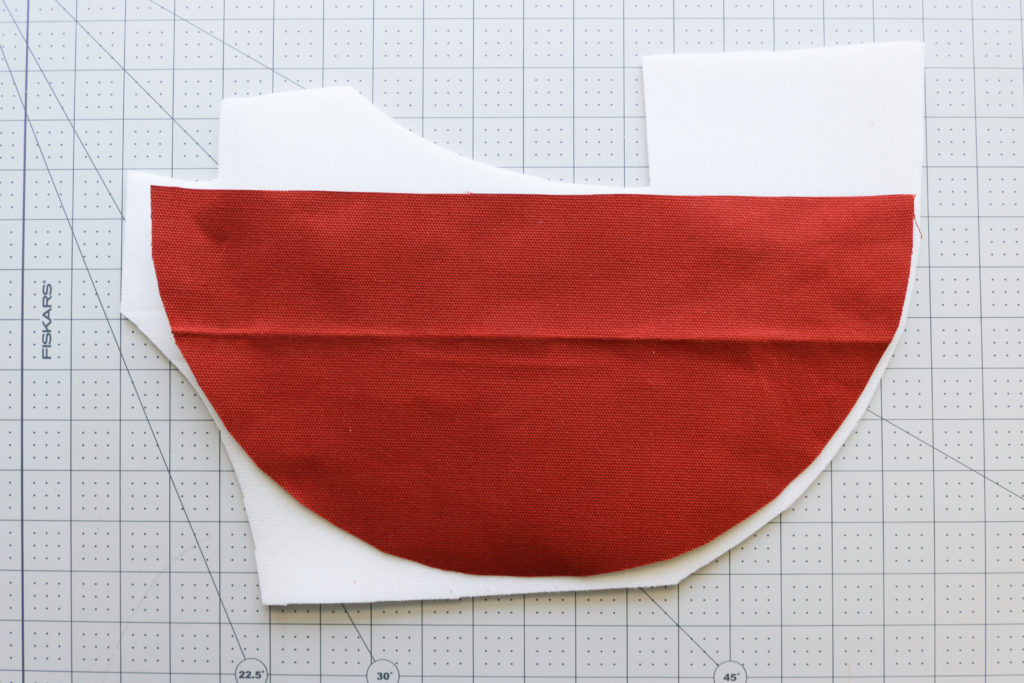
[Step 3] When it comes to basting the Main fabric onto the (non-fusible) foam, I like to use a larger piece of foam, baste, and THEN come back to trim it. If you have never basted before, it is a technique of securing fabric together with thread (either by hand or machine.) I crank my machine up to the longest stitch length (6mm) and will baste the pieces together. You will baste:
Top + Bottom
Back Panel
SKIP the Front Panel for now – The Front Welt Pocket needs to be sewn in BEFORE the foam is basted in.
As you baste every several stitches, smooth the fabric outward so it is nice and taut against the foam.
Once finished basting, you can trim the excess foam away from each piece of the bag and set aside.
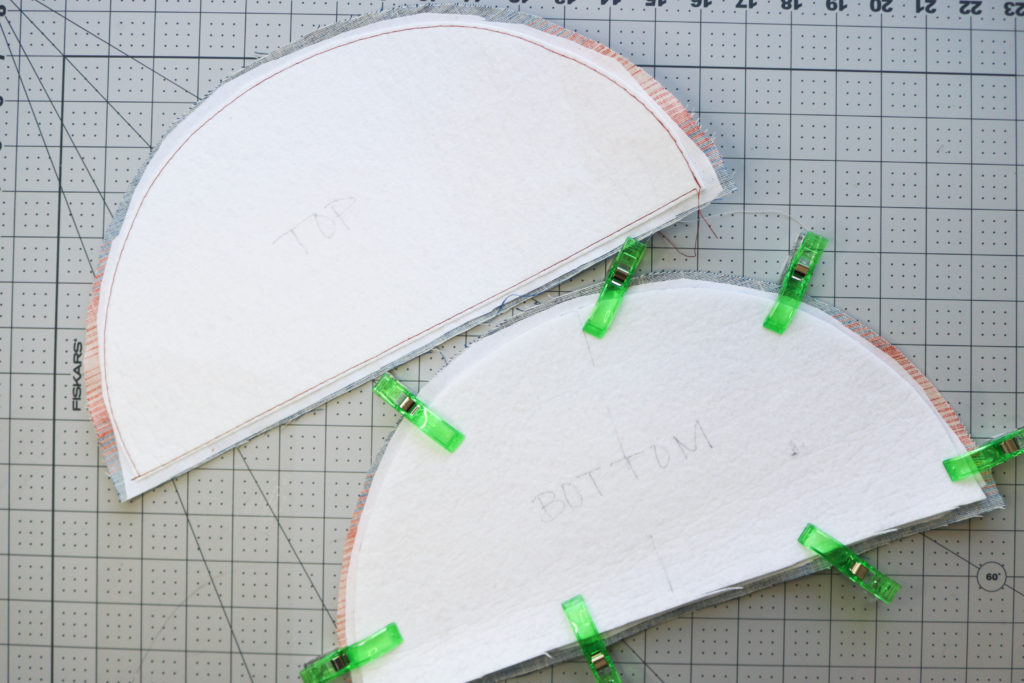
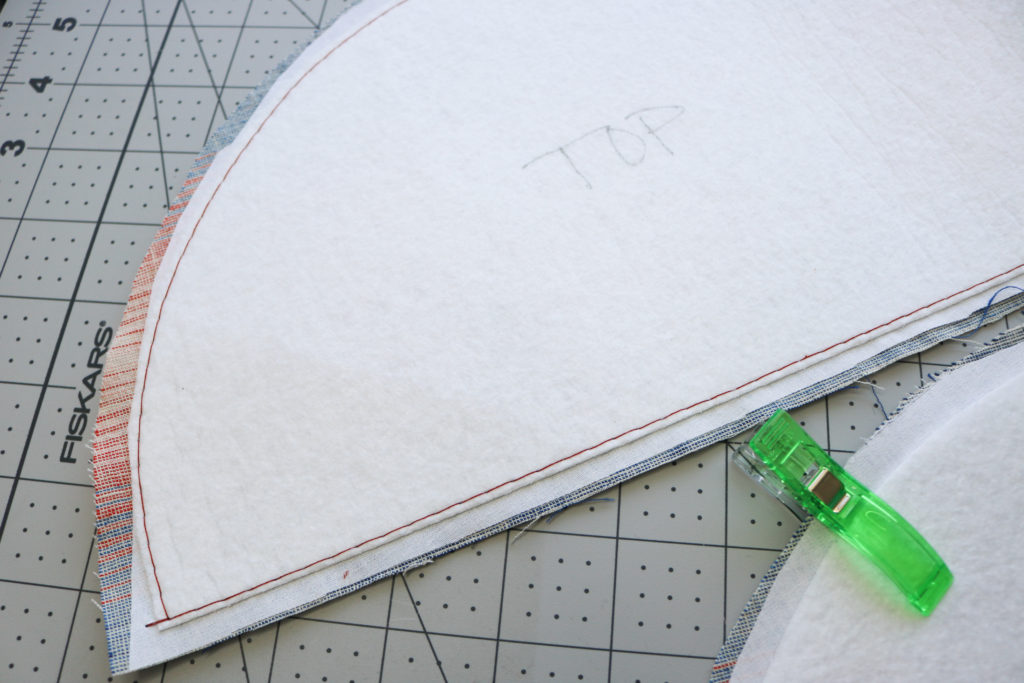
[Step 4] Now it’s time to grab the Top + Bottom LINING Pieces. I like to label the firm interfacing to make sure I don’t mix up the pieces since each one will be sewn in differently. The Bottom firm interfacing is attached with regular stitching whereas the Top is basted in — since the stitching will be removed later for a clean finish. *If you are using a laminate for the lining, I would skip the basting (You don’t want to create permanent holes in the top lining when we remove stitching later) and either lightly glue the firm interfacing into place or consider permanently sewing it into place like the bottom.
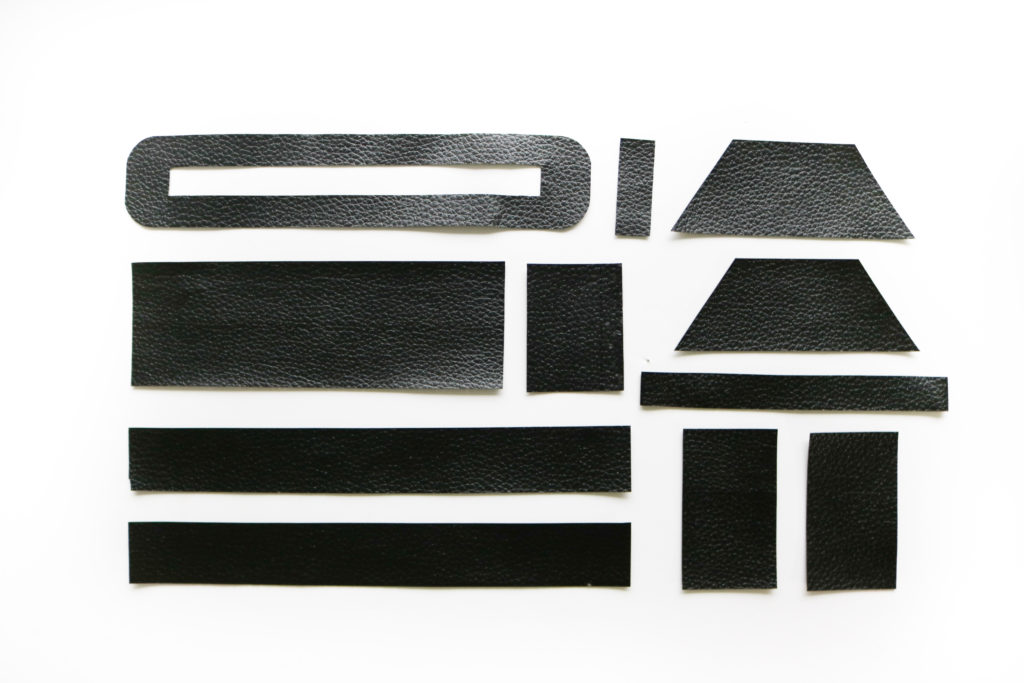
CUTTING ACCENT FABRIC
You should have the following pattern pieces with the accent fabric:
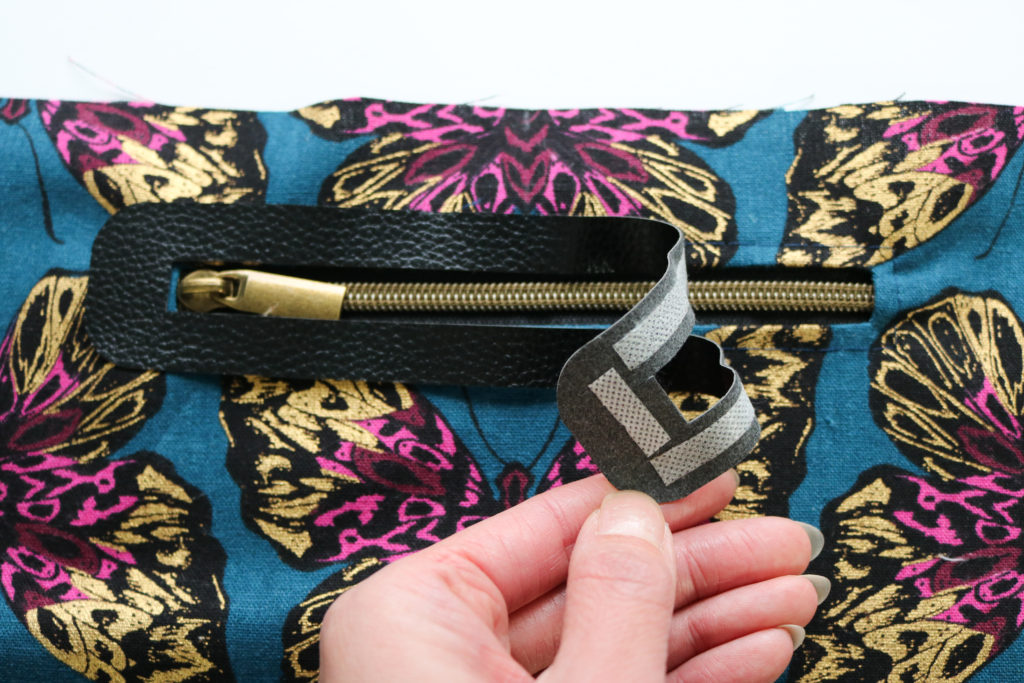
Zipper Plate
D-Ring Tab
Handle Base
Rectangle Ring Tab
Back Strap Tabs
Accessory Strap
Handle + optional*
Front Strap Tabs
*In the pattern, I cut (2) Handles for more strength. But you are welcome to make a double-fold or even a Rolled Handle like this one, depending on the thickness of your accent fabric.
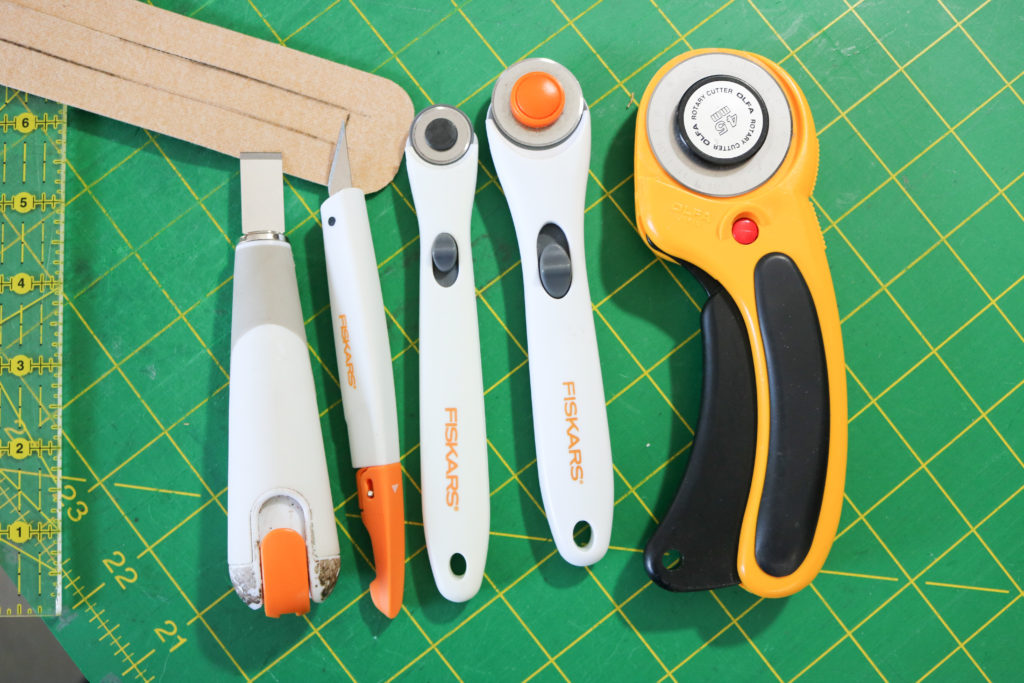
With all of the Accent Fabric, I like to use a rotary cutter (or craft knife in tighter spots) and ruler as much as possible to create nice straight lines. But it’s hard to get the same precision for curved lines.
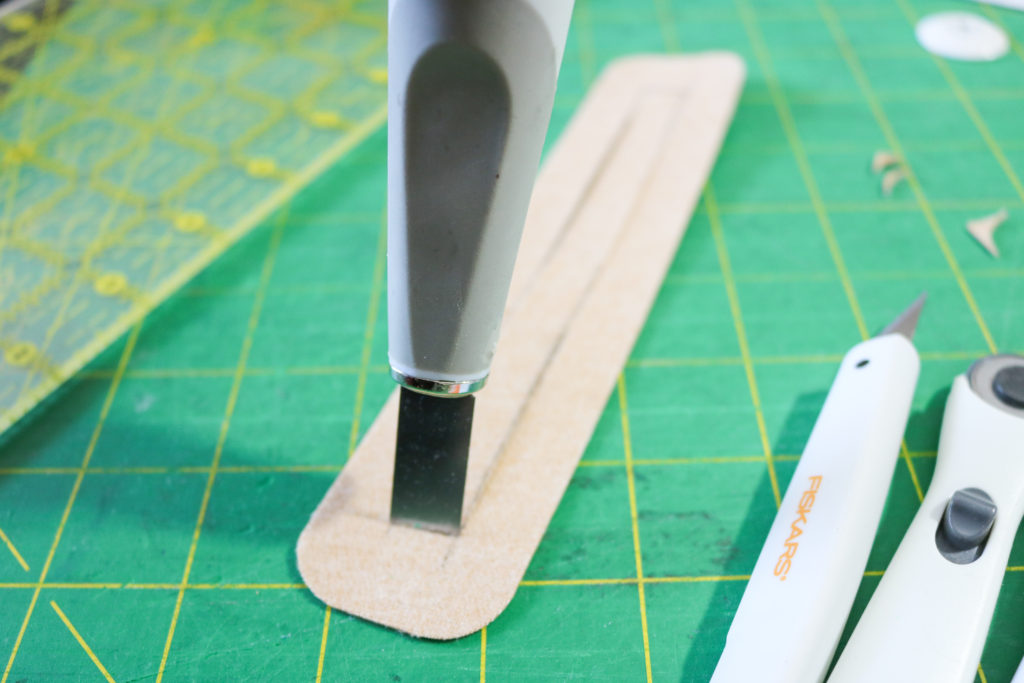
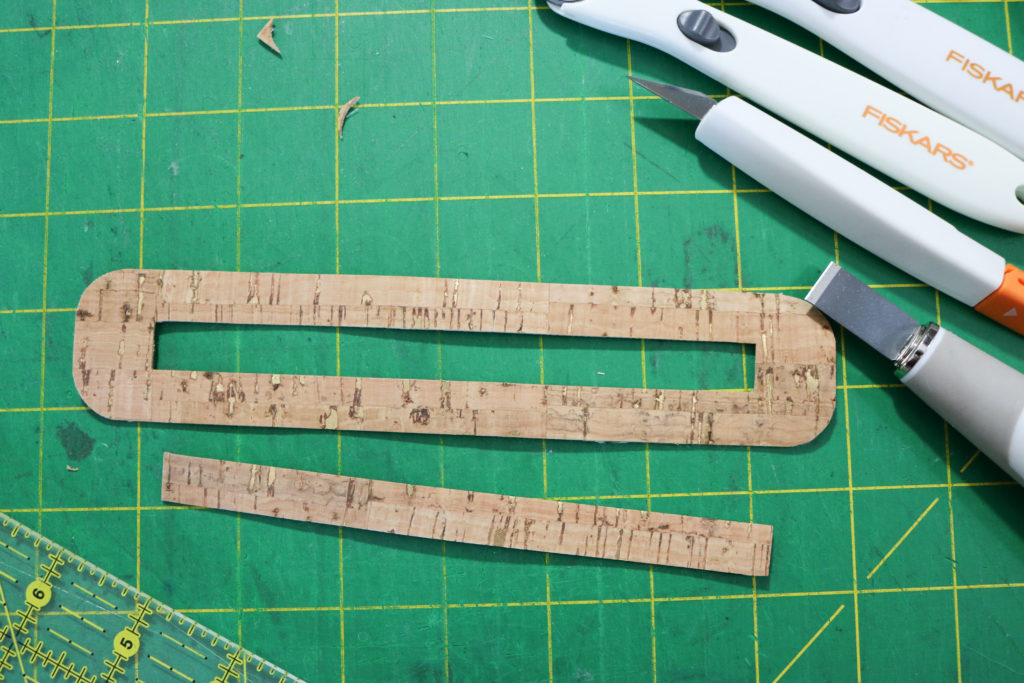
With the Zipper Plate, I’ll use any random round object like a metal washer (my preferred device, but of course, I couldn’t find it for this post..) or a thread spool around my house to use as a guide for my craft knife. This allows for a more uniform look at the corners. For the smoothest line, try to cut every curve in one motion and don’t forget to practice first!
Alternatively, if you don’t want to bother with curves and want to make things more simple, you can just cut the zipper plate as a full rectangle and then snip a uniform 45* right triangle off every corner like this Zipper Plate above.
Additionally, for all my zipper plate use, I love the 1/2″ flat blade in this knife kit. It’s the perfect size to cut into the plate and I love the variety of blade for all my crafting needs.
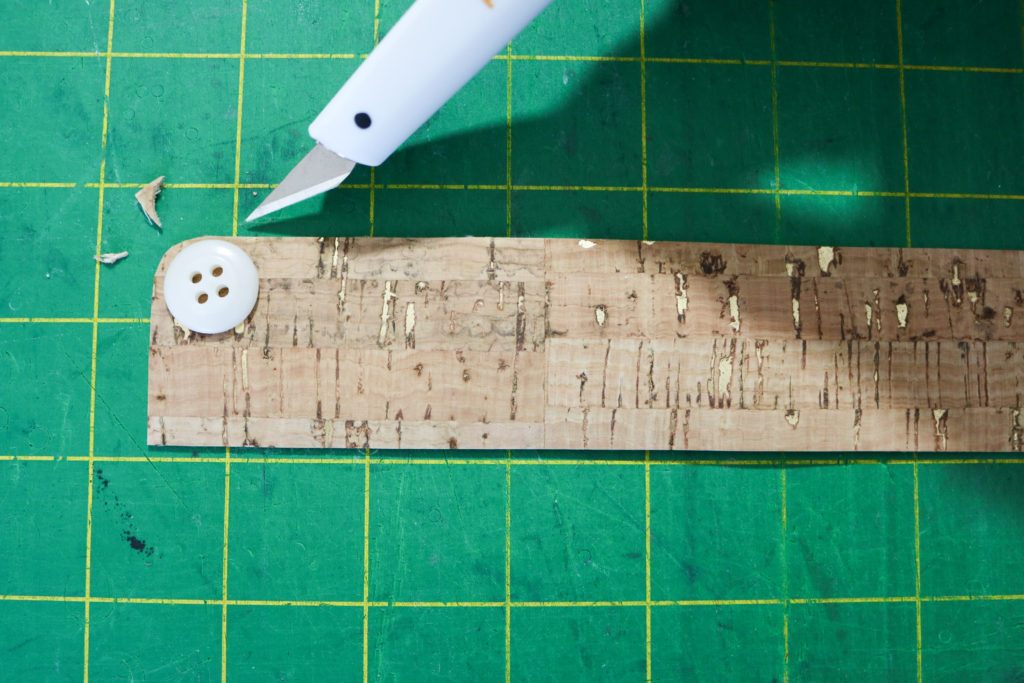
Once you are finished cutting through all the accent fabric, you can optionally seal the edges with your preferred method. The faux leather I used as part of the instructions has a felt backing, so it didn’t require any sealing. However, this cork I’m using for the sew along has a woven fabric backing and I do like to seal. You can do so by using a seam sealant like Fray Check or using Leather Paint like in this post (with video!)
Prep hardware
[Step 5-8] Click into the video above for the hardware prep, including how to sew the rings into place. Use a light uniform amount of glue to encase all the rings per instructions. You want enough to keep the tabs attached, but not so much that it will effect your sewing (needles can stick to the glue and throw off timing.)
Although in Step 7, it mentions to add rivets to the Back Strap Rings, I suggest you wait until the backpack is complete. This will make it easier to sew the tabs in place and you don’t have to worry about avoiding the rivets with your sewing machine.
Phew! That was a good bit of work just to prep the Erin Backpack. If you have any questions, please comment below. Next up, I’ll be post Part 2: Making the Strap and Key Fob, so stay tuned!
Hugs and Stitches,
Cristy
This post may contain affiliate links. Please read my Disclosures for all affiliate info.
Since all of my bag and accessory patterns are all digital, I have the luxury of unlimited pages and love the fact I can add more details into my instructions…but I know one photograph is not nearly enough for some of the more complicated steps. I was asked by YOU to provide a sew along and HAD to oblige! So if you already have some questions or comments, please post them below so I can address them during the month!
DETAILS
This sew along will be broken down into 6 parts as listed below and will be posted every Monday and Thursday throughout March, starting March 8th.
For some added fun, I have prizes for participating in this sew along on Instagram. Post any picture of your progress whether it be a fabric pull or the finished product and use the hashtags #loveyousewpatterns, #erinbackpack and #erinbackpacksewalong to be added into the pool of entries. I’ll randomly select a winner for $25 shop credit, a copy of all of my digital bag patterns, and a package of my favorite bag notions at the end of the month. It’s that simple! Don’t forget to tag me @loveyousew_ so I can see your makes along the way!
>> To get you going, you can grab the Erin Backpack pattern for 20% off and Hardware Kits for 15% off in my shop, here, all month long.
If you are ready for a little pre-work, you can checkout the introductory post of the Erin Backpack here and find lots of inspiration in the tester versions here.
Now let’s talk a little more in depth about fabric and supplies you need before we officially start next week!
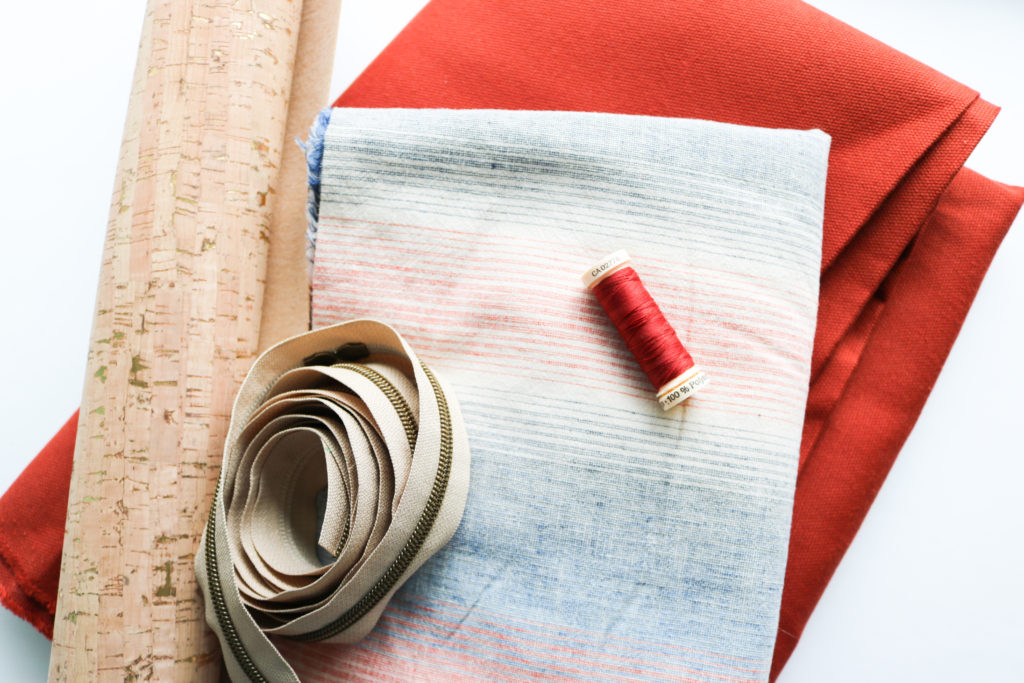
FABRIC
As you know, the selection of fabric is KEY with any bag. You have to look a little into the future to see how you really want to use your Erin Backpack. Will it be used outdoors, for home, or maybe for the family? The answers will help you decide what fabrics you want to use. Below are the fabric notes (as written in the instructions of the pattern – in blue italics) along with some extra guidance.
This pattern is written for bottom-weight fabrics such as canvas, duck cloth, and denim with weights of ~ 6 oz per square yard or more. — For large bags like the Erin Backpack, you want a heavier and more durable main fabric that can withstand some beating.The last thing you want to do is make a bag with fabric that ends up wearing away before you want to stop using it.For the sew along, I will be using a heavy and durable 9 oz Expedition dry oilskin canvas by Merchant and Mills.I chose this fabric for the weight and color, but also for its water resistant properties which is PERFECT for an everyday backpack.On the flip side of heavy duty fabrics, you also want to be cautious with selecting a fabric that maybe TOO thick for your personal home machine. (I sew with a semi-industrial Juki and am confident it can handle this fabric.) There are points in the construction where you will be dealing with several layers of fabric, interfacing and accent fabric all combined.Always test the layers BEFORE sewing the actual bag.
*As a side note, since I’m using a treated fabric, the manufacturer states I cannot use heat or iron this fabric and will be adjusting interfacing in the first part of the sew-along (which is fine given the weight of the fabric.) So if you are using something like a waxed canvas or a vinyl, you will have to make sure the weight balances out the fact that you will have to omit some interfacing.
The lining is based on quilt cotton and any other fabric with the same weight (~4 oz) can be used such as linen, chambray and twill.— Since the lining does not get nearly as much wear as the main fabric, you can have more fun with a tight woven quilt cotton.This would also be a great place to use a light laminate like these from Cloud 9.If you want the inside to be wipeable, this is a nice laminate that is easy to sew through.I have such a deep stash of fabrics from old projects that I will be using leftovers from a linen blend fabric I used on a dress years ago….But doesn’t it look great with the canvas?!?
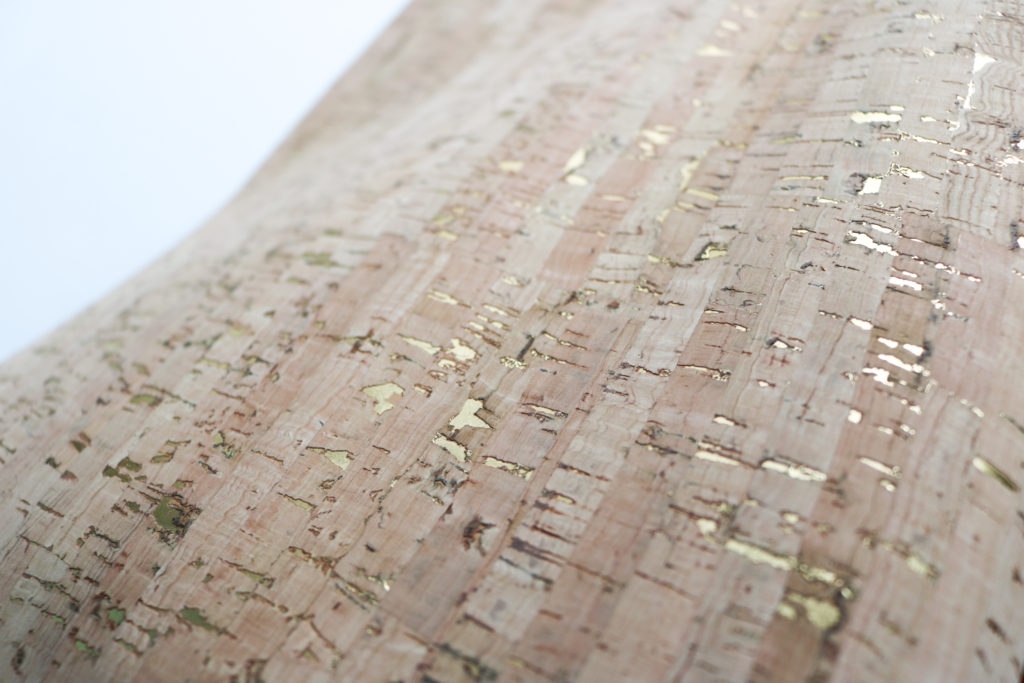
The accent fabric is intended to be left with a raw edge, allowing you to use leather, suede, vinyl, cork or another non-fraying substrate. This allows you to add some high-end details to elevate your bag. The Erin Backpack assumes the use of thicker 2-3 mm accent fabric. *If you use a thinner accent substrate like some corks or a lambskin leather, you may want to cut two handles for a sturdier finish. For this bag, I’ll be using some gold flecked cork fabric from Sew Sweetness and will show you how to finish this substrate, as well as how to reinforce some areas.
If you are looking for other sources of faux leather/vinyl Big Z Fabric’s has a nice selection and I’ve used the Terracotta DuroLast vinyl in a Megan Bucket Bag, here. This brand is great for a beginners with a more basic home machine because it’s thinner and MUCH easier to sew through. The pebbled finish makes it look like real leather too! Sew Sweetness also carries thinner faux leather as well…including the black I used for the pattern photography.
INTERFACING
The interfacing mix is based on these suggested fabrics and the foam is crucial to holding the structure, while still being pliable.
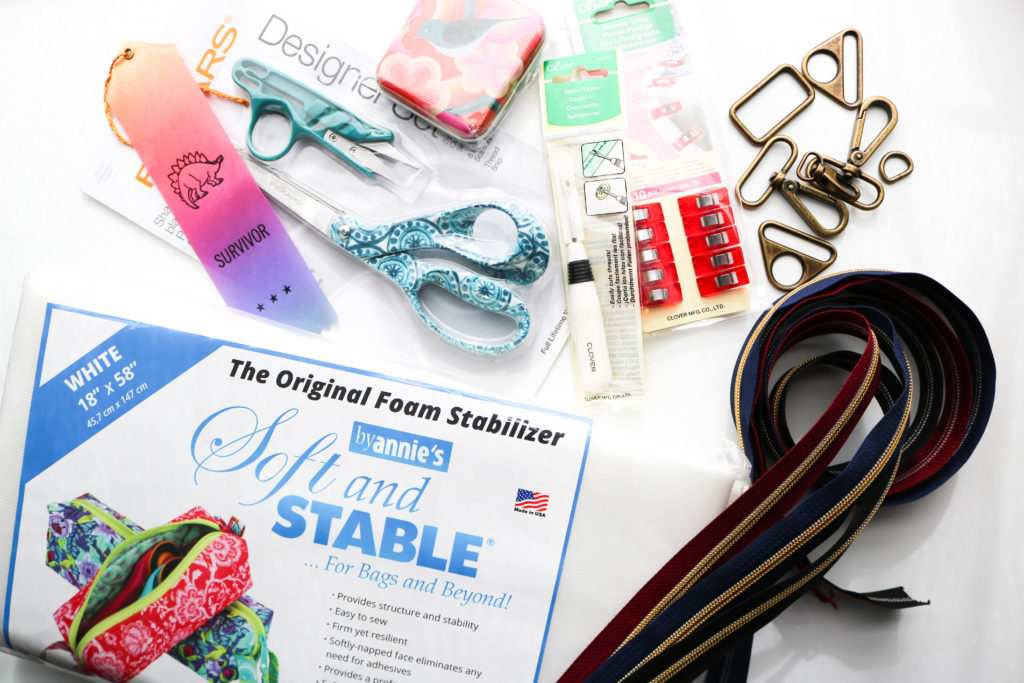
Please make sure you are using a non-fusible foam to avoid wrinkles on the main fabric as the bag wears.By Annie’s Soft and Stable is my preferred foam which is denser and thus, provides more structure than Pellon foam.You can grab it in my shop here.But if you can only get Pellon, it works well too.
For woven interfacing, I generally use 60” wide Pellon Shapeflex SF101, but I just tried out Barb’s Bags Interfacing (which is great too…just have to see how it wears before a full endorsement) to block fuse (when you fuse the interfacing to the fabric first and then cut out the pattern pieces…but we’ll get into more of this next week!)It’s allows me to use the entire width of fabric, but you generally can only find 20″ WOF in stores….which IMO is more wasteful.
For the firm stabilizer, Pellon Peltex sew-in interfacing is a great choice. It provides a stronger base for both the lid and bottom of the backpack.
If you would like to use other types of fabrics, please test interfacing with fabric swatches to see what you like before cutting.
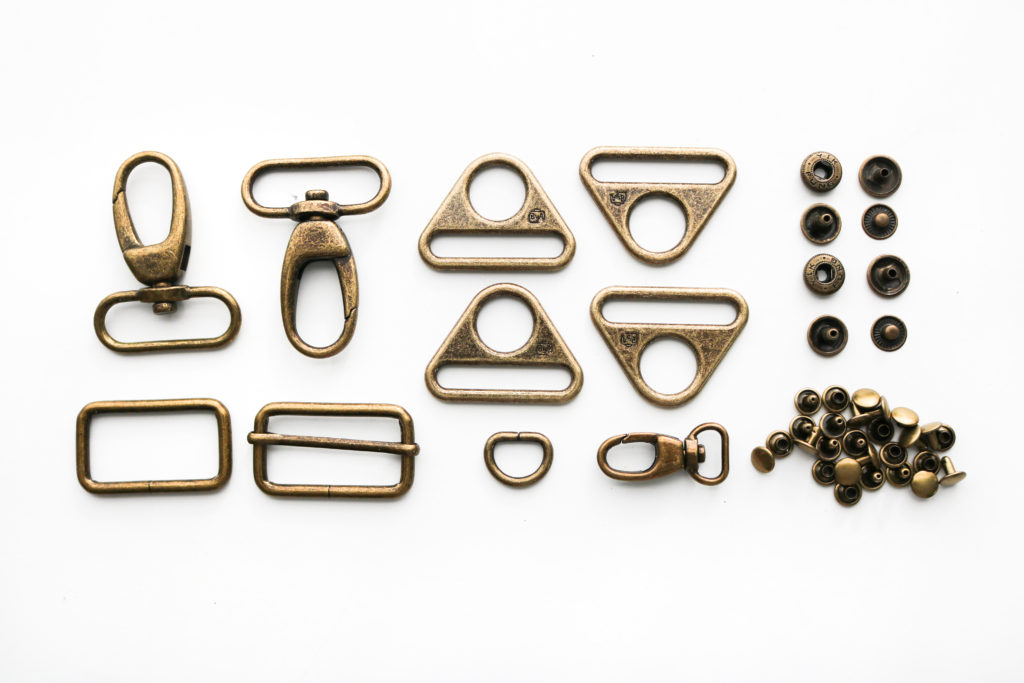
HARDWARE
With a full-size backpack of this nature, there is a good bit of hardware involved.This helps the bag look more polished and gives the ability to be be a convertible bag.I’ve sourced some amazing hardware from Emmaline Bags and By Annie’s as part of a full kit you can find here in my shop.
The kit includes:
(4) 1 1/2″ Triangle Rings
(2) 1 1/2″ Swivel Clasps
(1) 1 1/2″ Rectangle Ring
(1) 1 1/2″ Strap Slider
(1) 1/2″ Swivel Clasp
(1) 1/2″ D-Ring
(3) Sets of 12.5 mm Double-Cap Spring Snaps
(5) Sets of Medium Double-Cap Rivets (9mm cap x 8mm post)
(20) Sets of Small Double-Cap Rivets (8mm cap x 6mm post)
Will we be going through some hardware installation? Yes! I know this is a tricky part for many folks and you can refer back to the Intro post for some links to videos I already have.
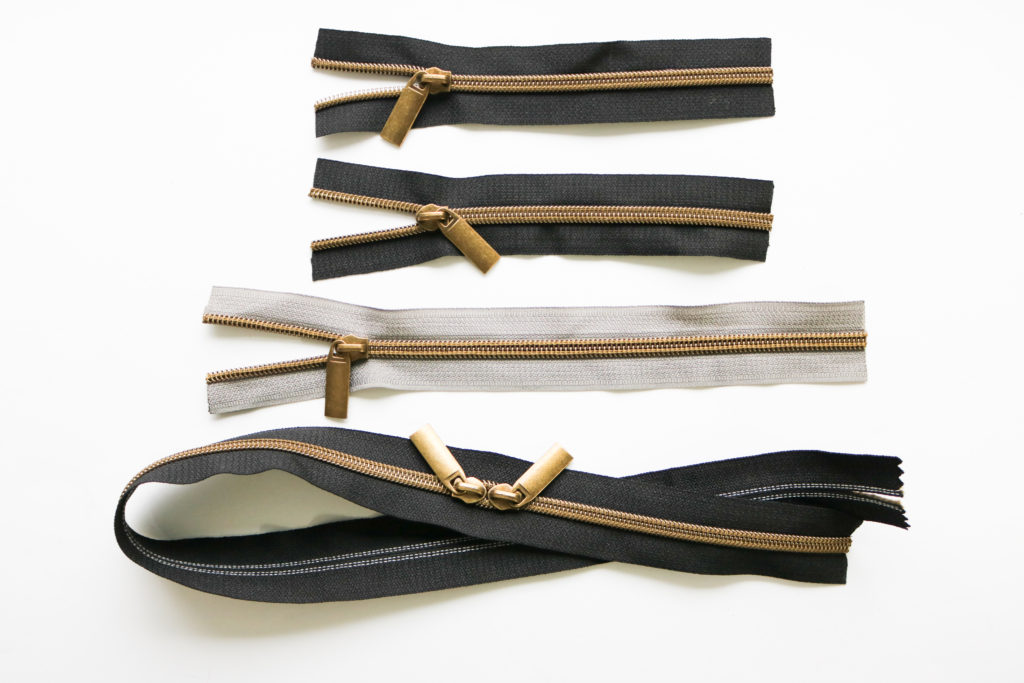
ZIPPERS
With four zippers in the Erin Backpack pattern using three different sizes, it’s a great idea to use zipper tape to cut exactly what you will need. I used metal zippers for a long time for their polished style, but have fallen in love with these nylon ones that look like metal! You can cut through them with craft scissors (don’t use your special fabric ones!) and sew right through them as well. There is no laborious effects to cut away teeth with these zippers! I love the ones from Emmaline Bags (if you are looking for basic colored tapes) and My Handmade Space for more variety in both tape color and teeth finishes.
Other Supplies
There are plenty of other supplies and notions I reference in the Erin Backpack pattern. For your ease, I’ve added them all onto an “Idea List” below through Amazon. It’s included my favorite glue, fabric punch, hardware setting tools, and also the interfacings mentioned above. I continue to add to all of my list as part of my Storefront all the time as I test out new products in my projects….so don’t forget to “like” it!
I hope this is enough information to get you started on the Erin Backpack. Again, please post any questions and/or comments below. I’ll be sewing along with you so that I can address any concerns along the way!
Happy Sewing!
Cristy
Please note, this post contains affiliate links. Please refer to my Disclosures for additional information.
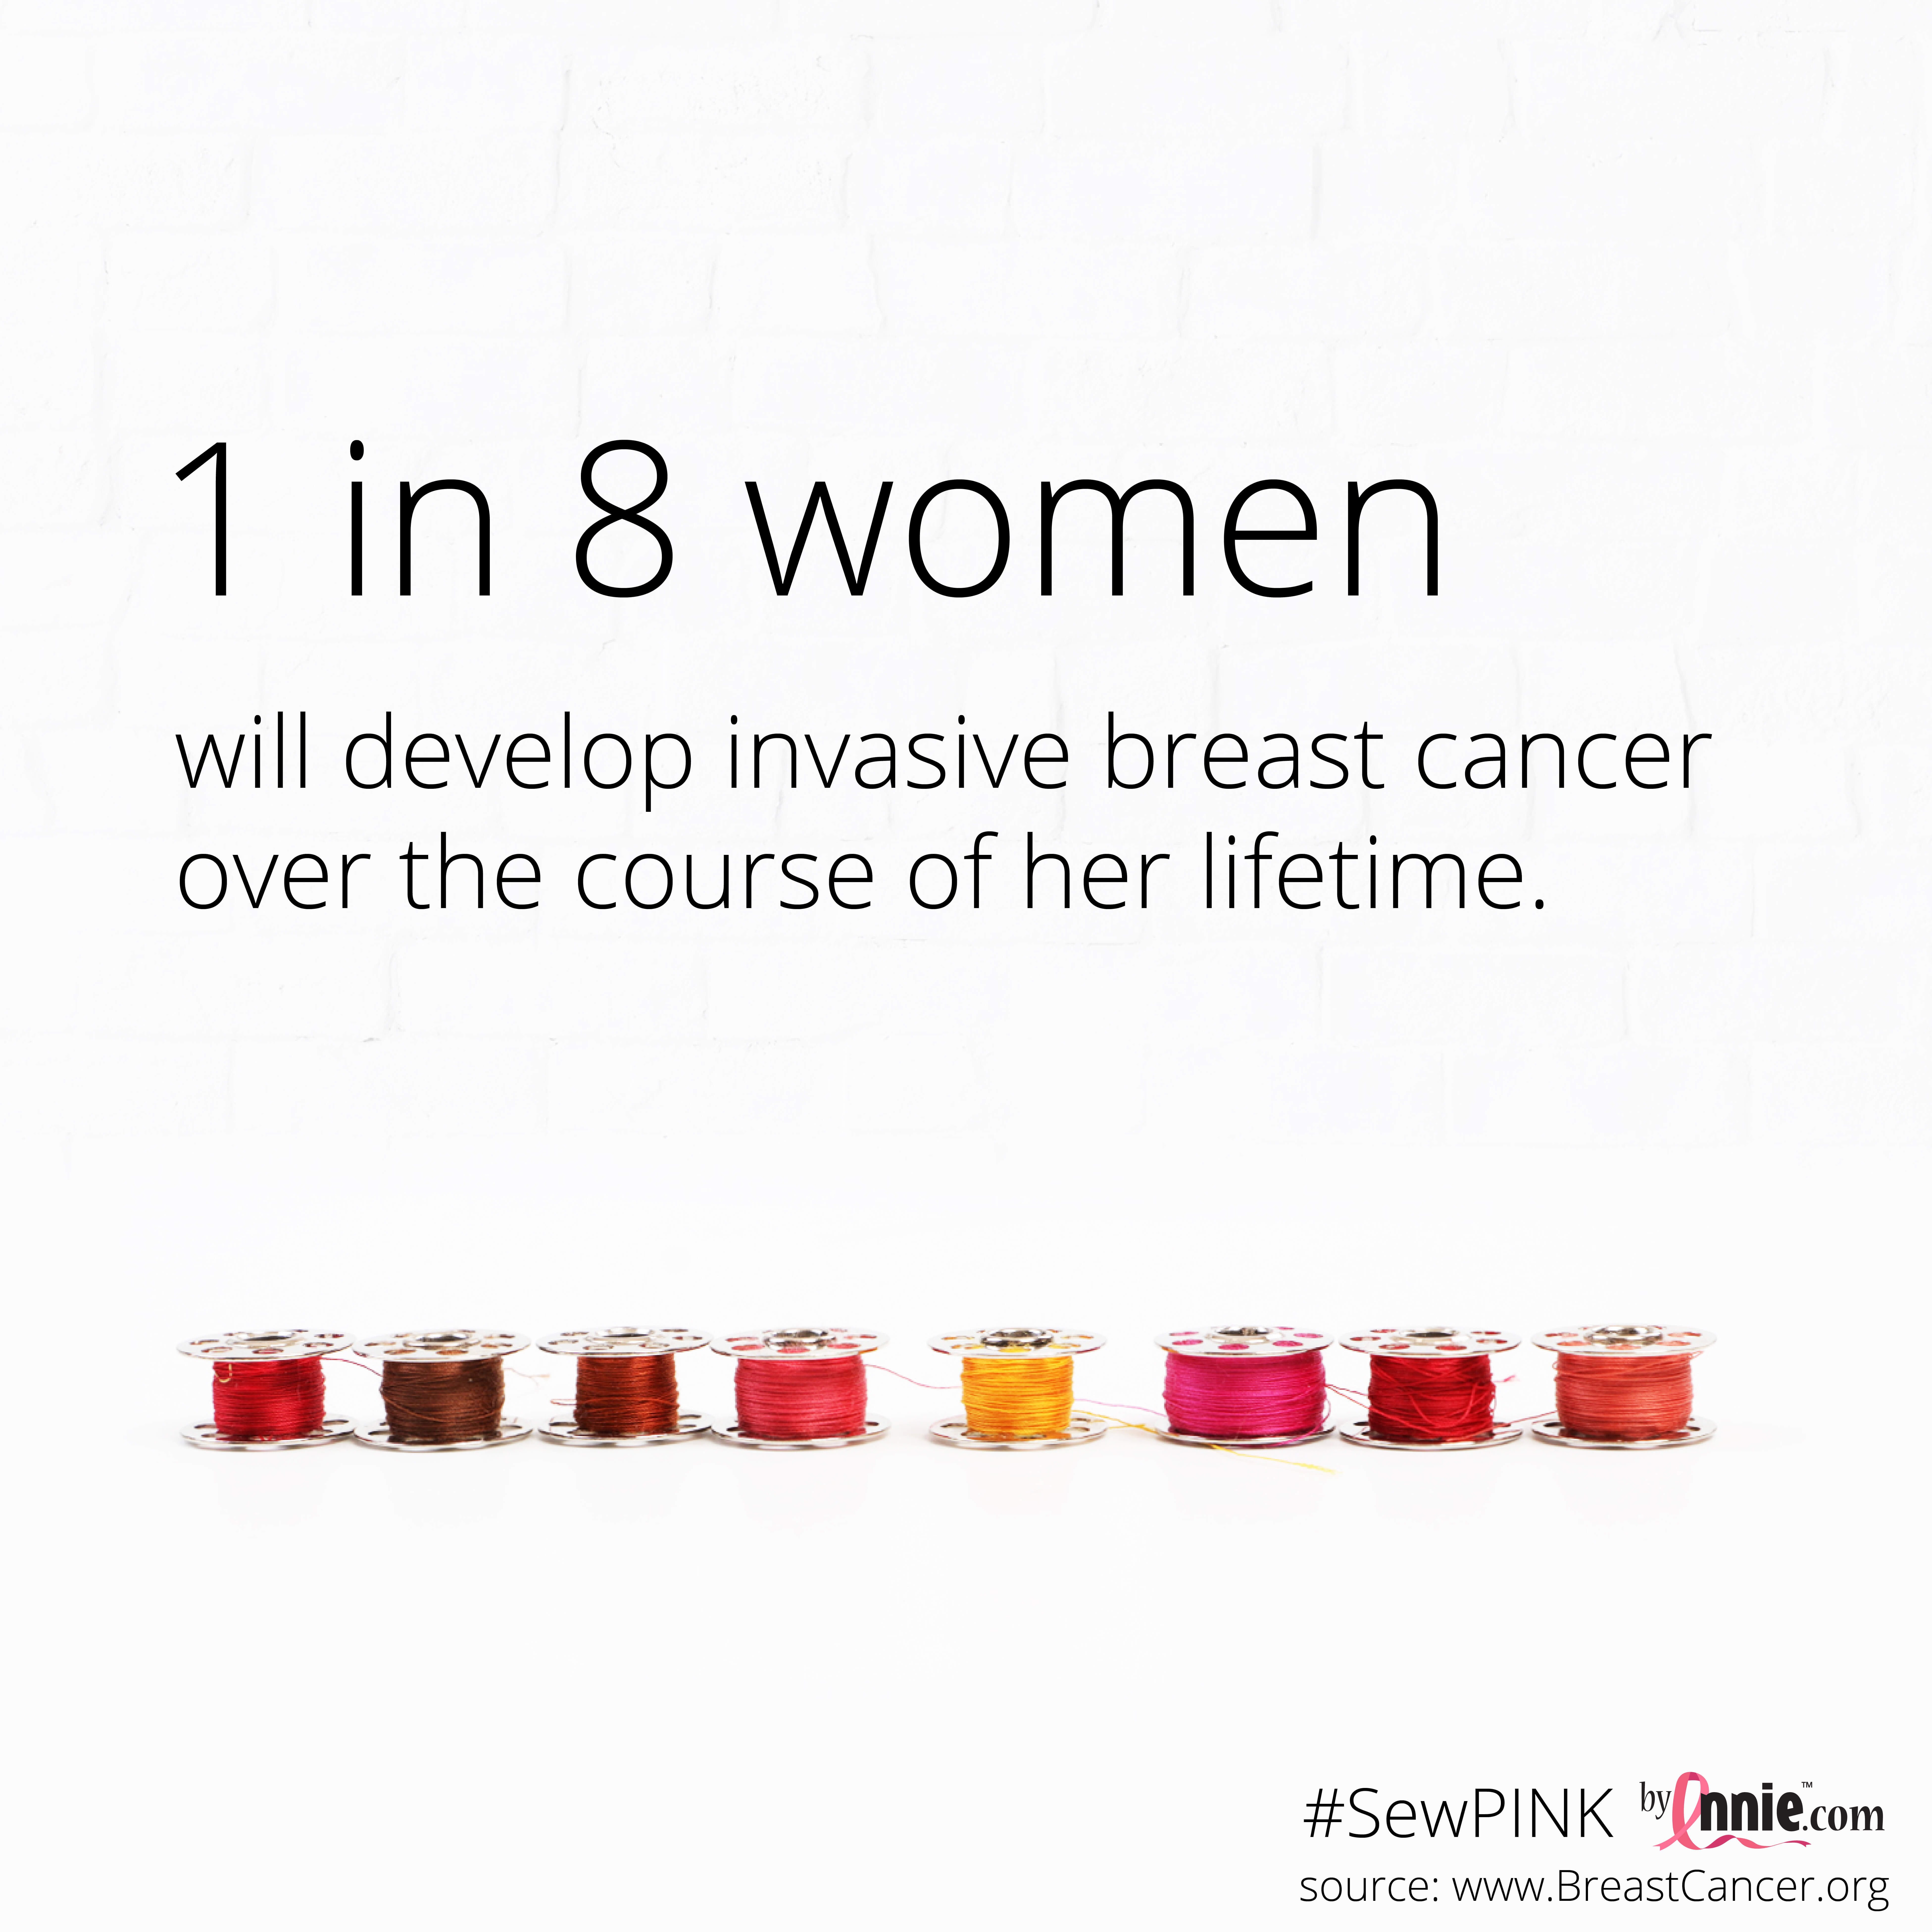
October is Breast Cancer Awareness Month, and with 3.5 million women in the US with a history of current and/or past treatment, we all have someone close to us who has been affected. Unfortunately, I’ve seen my aunt suffer and pass away from this disease and also continue to see more and more friends go through their own personal battles. It’s so difficult to see anyone suffer and knowing that I am personally at higher risk – as an aging woman. That is why I’m SO proud to be part of the By Annie #SewPink Initiative to bring more awareness to this cause.
The #SewPINK Blog Hop has been taking place all this month to raise awareness for breast cancer and breast cancer prevention. You can follow the hashtag on social media to follow along! By Annie’s is even running a photo contest here and released a great FREE pattern which you can find here. These are great ways to get involved and the pattern is a nice and easy sew with your friends and/or guild. On top of all of these activities, By Annie’s has graciously offered to provide a $30 shop credit to one of you!!!! (Details are below.)
Earlier this very year, my OB/GYN told me I’ve hit the age where I need to start getting mammograms. (‘Nothing like getting older, right?) 85% of new cases happen to those who have NO prior family history (due to genetic mutations) so early detection is key! (Source: www.breastcancer.org ) But just like everything else that has also happened this year, my appointment was put on hold. Getting the call to be part of the #SewPink Blog Hop really gave me the push to get a screening back on my schedule and I am so very grateful! I hope you do the same and check out available screenings below:
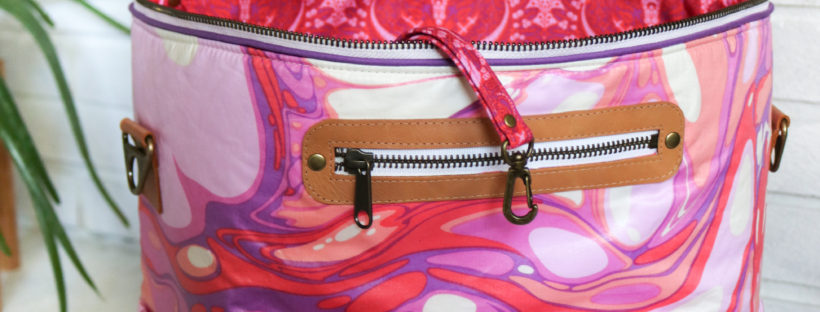
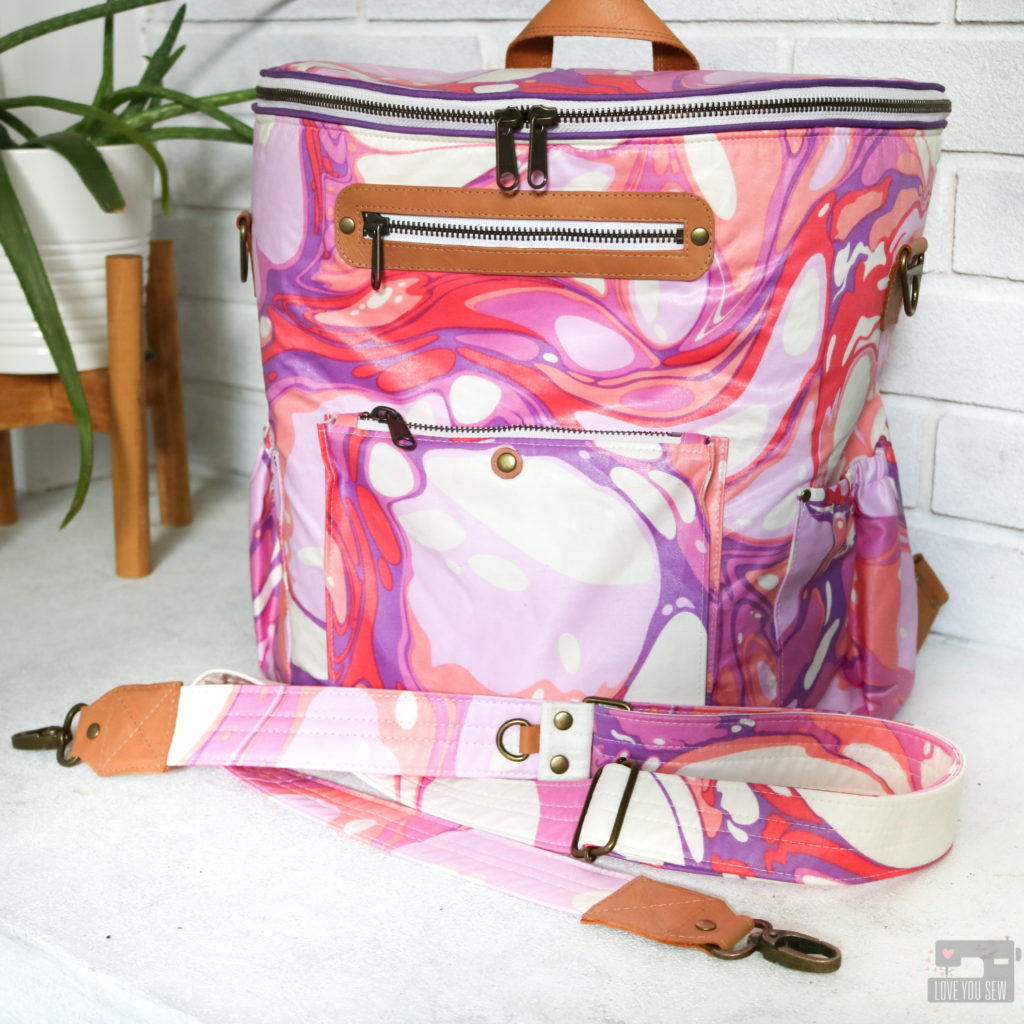
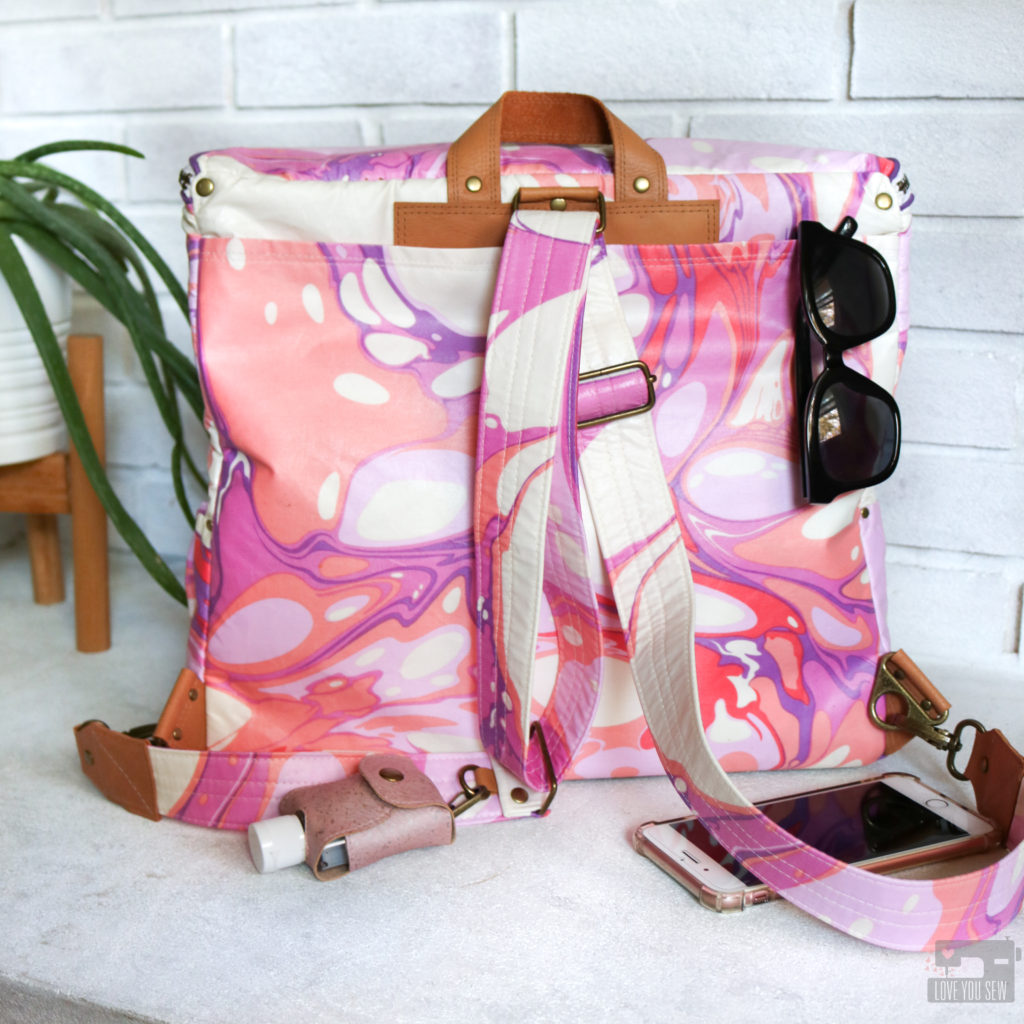
For my Blog Hop project, I made the (soon to be released) Erin Backpack. This is a design I’ve been working on and off again for over a year — OK, it’s been more off, then on but it will be released by end of year! This is a spacious backpack with a half moon design that also converts to an over-the-shoulder or crossbody bag. It is large enough to be used as a diaper bag or just for some day-tripping.
I wanted, of course, to make my backpack PINK! This is not a color I use often in my sewing and definitely not as a focused hue. So, I chose this great Tula Pink quilt cotton for it’s beautiful marbling of pinks and purples balanced on a natural background. The lining is also from the same collection and I just love that deeper shade of magenta with the swans. Who wouldn’t love some swans?!?
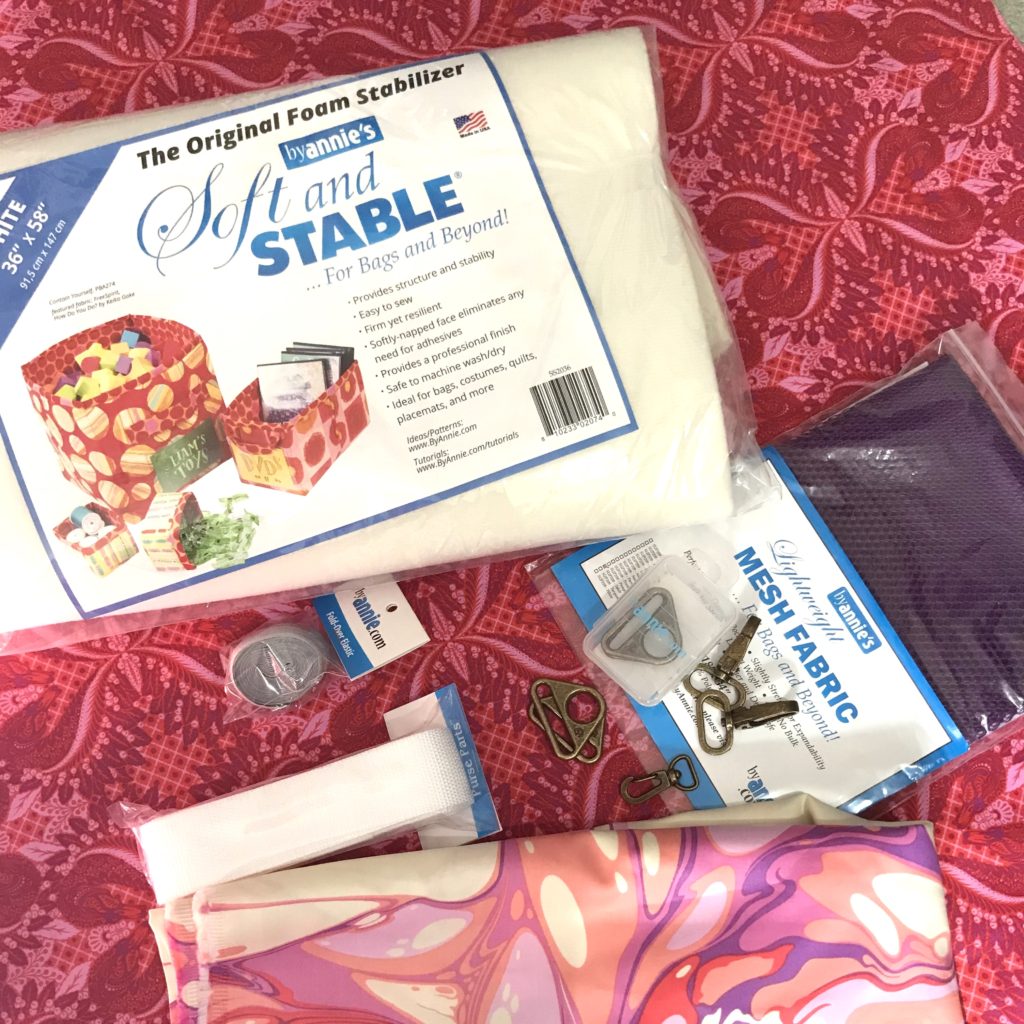
The structure of the Erin Backpack is based on By Annie’s amazing Soft and Stable product. I’ve been such big fan of this stabilizer for awhile and appreciate the firm shape it creates beyond other interfacing — especially when using a lighter substrate like quilting cotton as seen in this kid’s bag here and should bag seen here. Soft and Stable is also wonderful in how it provides great stability but is also soft and pliable. Most domestic machines can sew through this quite easily! The last thing I’ll gush about is how I love the loft of this product and how it could also provide so much great texture. I used it on my favorite duffle bag (EVER!) you can find here.
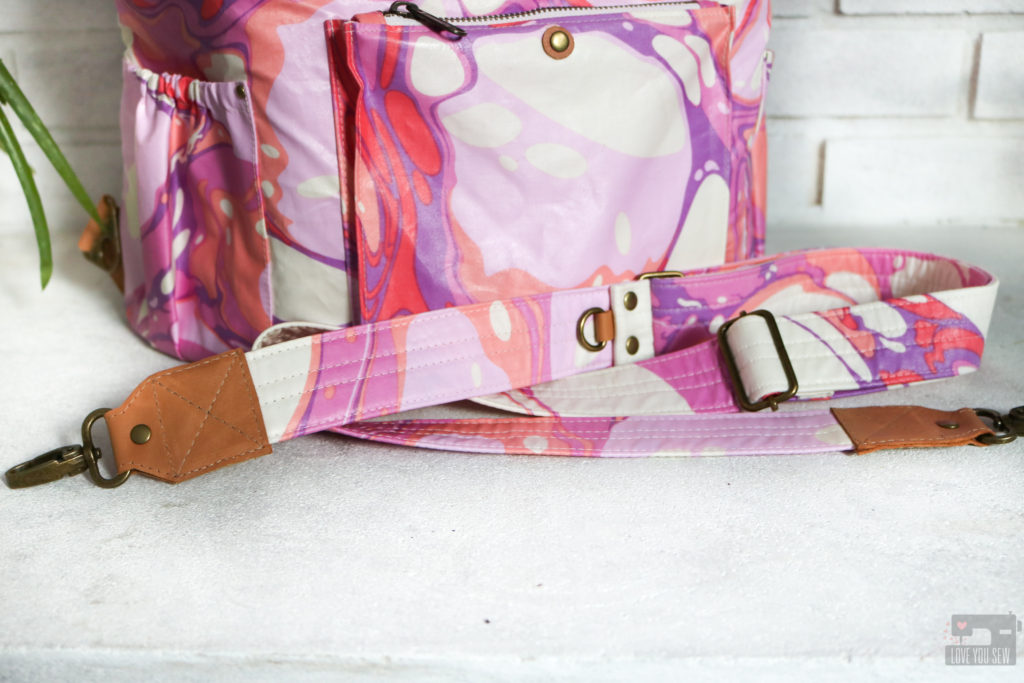
By Annie’s also has so many other great purse accessories. I knew I had to try out some of the hardware! The swivel clasps and triangle rings in the antique brass finish were perfect for my project. They went well with the leather details and balanced with the metal zippers. The hardware is nice and sturdy and definitely feels like it will hold up well over time.
For the strap, I use my Guitar Strap tutorial and FREE pattern templates you can find here. (You’ll notice I made a change for this strap to be adjustable…which is the addition of an extra rectangle ring.) Inside the strap, I also added By Annie’s 1.5″ wide Strapping to add more strength and heft when wearing this backpack. This is a nice large bag and I wanted to make sure the weight when filled up doesn’t make the straps dig into my shoulders.
Inside Erin, there is room for a large zippered welt pocket and 5 separate slip pockets. Since this bag can be used for virtually anything, I wanted the lining to serve as more organizational than just storage. This way, you can hold larger snacks water bottles, books and even craft projects inside!
But in a large backpack, it can be hard to see all the contents which is why the By Annie’s Lightweight Mesh is so wonderful. You can check out everything in your pockets at a glance and I love that there is a little stretch for anything you may want to carry. The top edge is finished with Foldover Elastic and was a breeze to sew with my coverstitch, but any zig-zag stitch would work as well.
I hope you enjoyed my PINK Erin Backpack for the blog hop. Its pairs perfectly with my rose gold phone and hacked Tiny Sophia Bag, don’t you think?
Contest
For your chance to win $30 shop credit to By Annie’s, please comment below. I’d love to hear your connection with breast cancer. If your own story is too personal, let me know how you like my project or share your own bag-making journey.
Giveaway will be open until 10/31/2020 and open internationally.
Message from By Annie’s: “The #SewPink Initiative was created by ByAnnie.com LLC to raise awareness for breast cancer throughout the year. Our efforts culminate in an annual blog hop during October’s Breast Cancer Awareness Month to promote self-care, awareness, early detection and support for those affected by breast cancer.”
Bag making products, as mentioned, were provided for this post By Annie’s as part of the Blog Hop. The Erin Backpack is my own design. All reviews and opinions are my own. For my full disclosures, you can read about them here.
This post was originally written for the Minerva Crafts blog in November, 2019. Additional edits have been made after real-life wear of the garment.
Intro
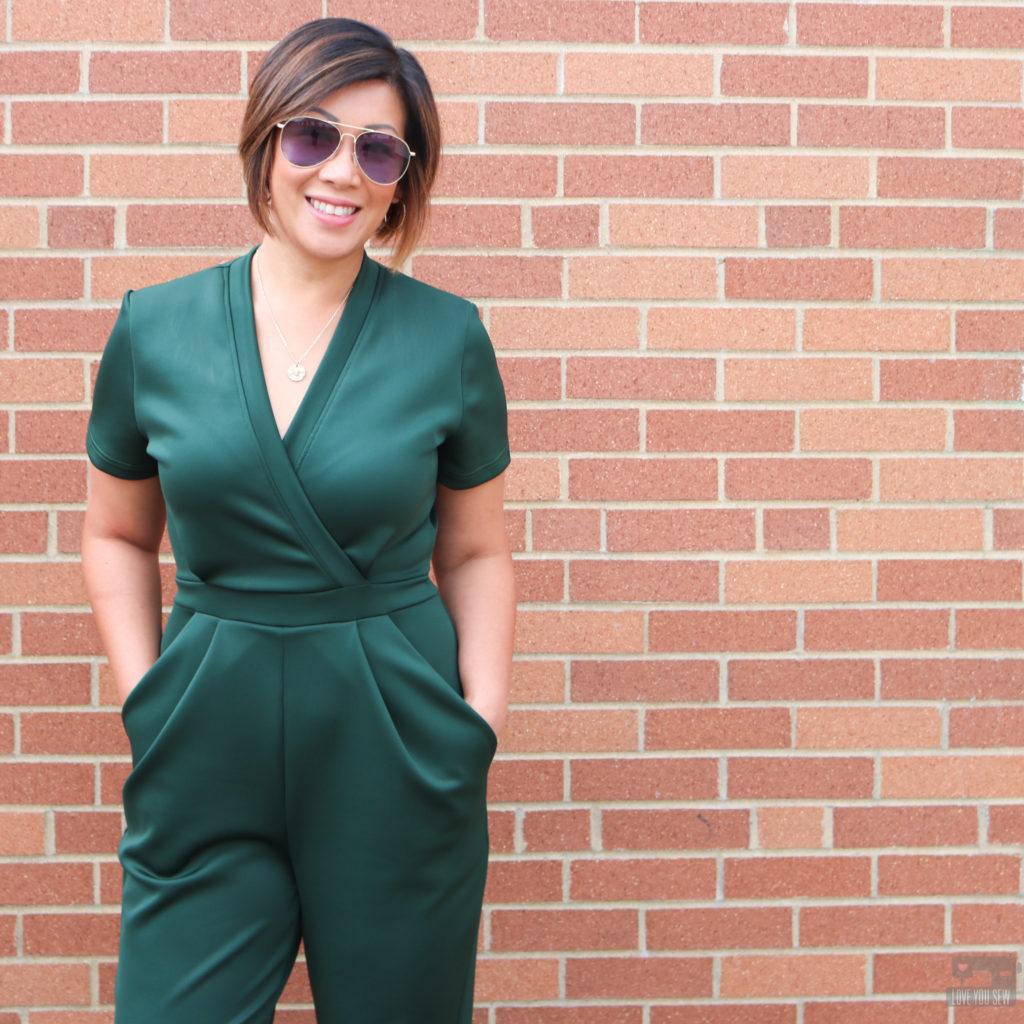
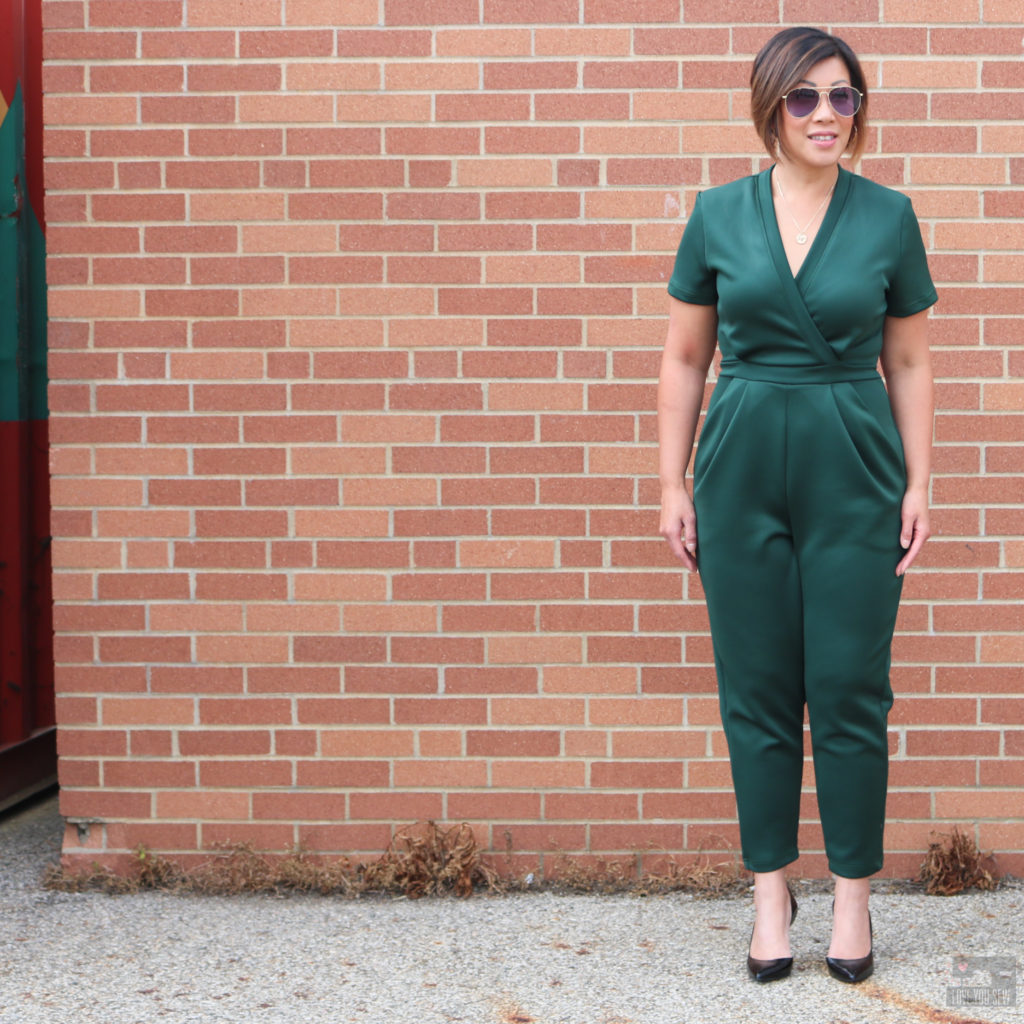
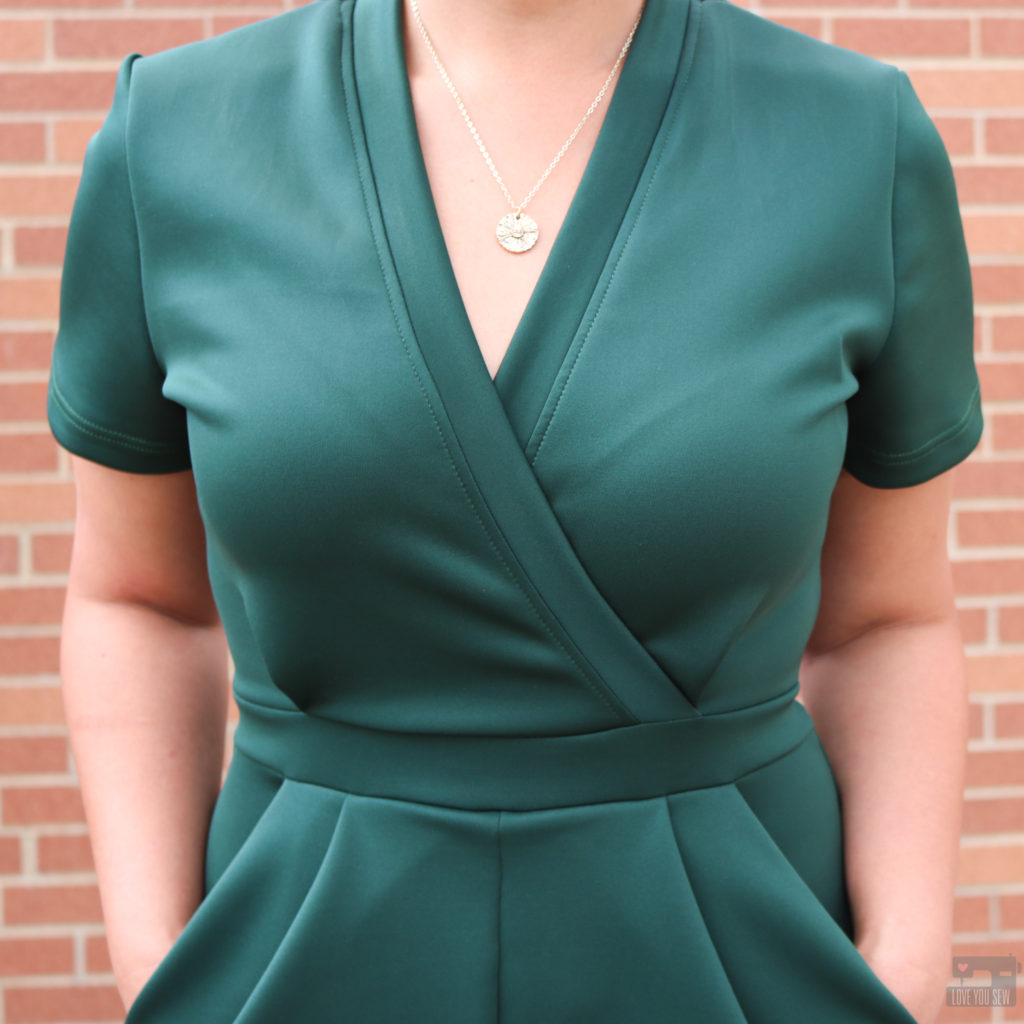
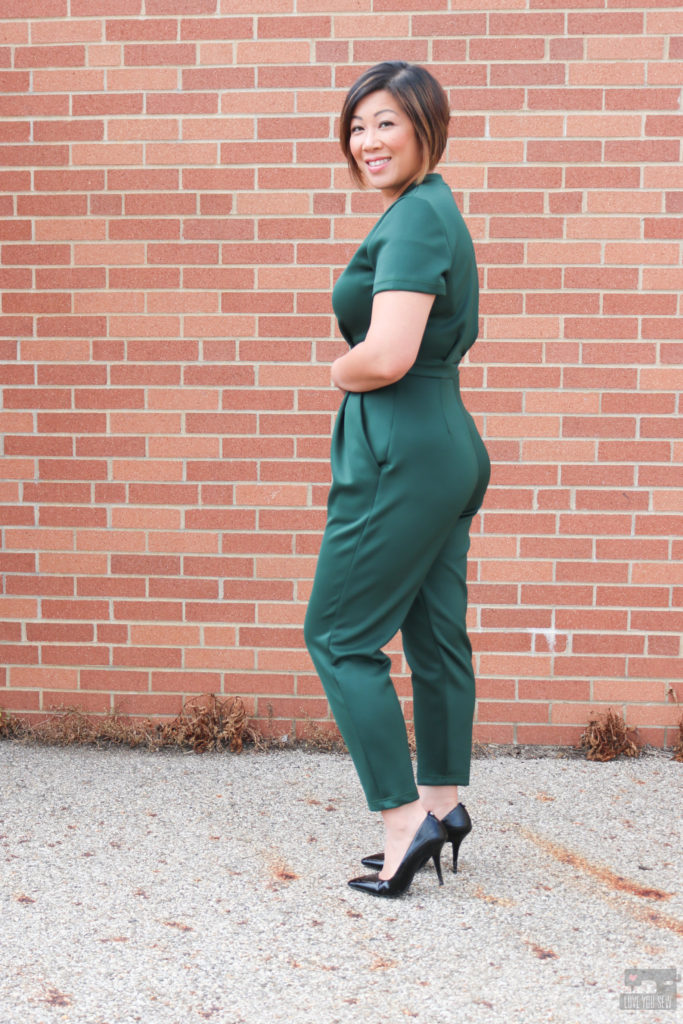
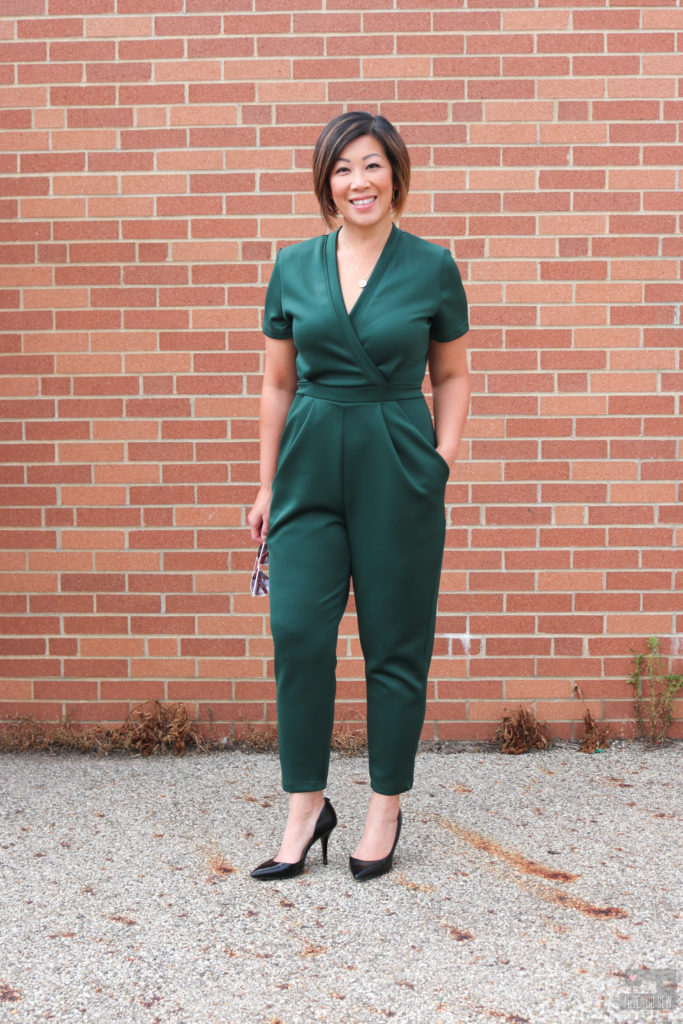
Hi, this is Cristy Stuhldreher from Love You Sew with my very first #MinervaMake as a blog contributor!!! I was SO excited to be invited to be part of such an extensive team of bloggers here and equally excited to play with so much beautiful fabric. My first find was this gorgeous Lady McElroy Luxury Plain Scuba Jersey Knit Fabric in Bottle Green. With autumn (my favorite season!) quickly coming to the States, I knew I would need to get ahead and make some transitional garments with the switch of temperatures that are bound to come. So, after I saw this scuba fabric I immediately thought of the Deer and Doe Sirocco Jumpsuit (like many other contributors already have!)
Fabric
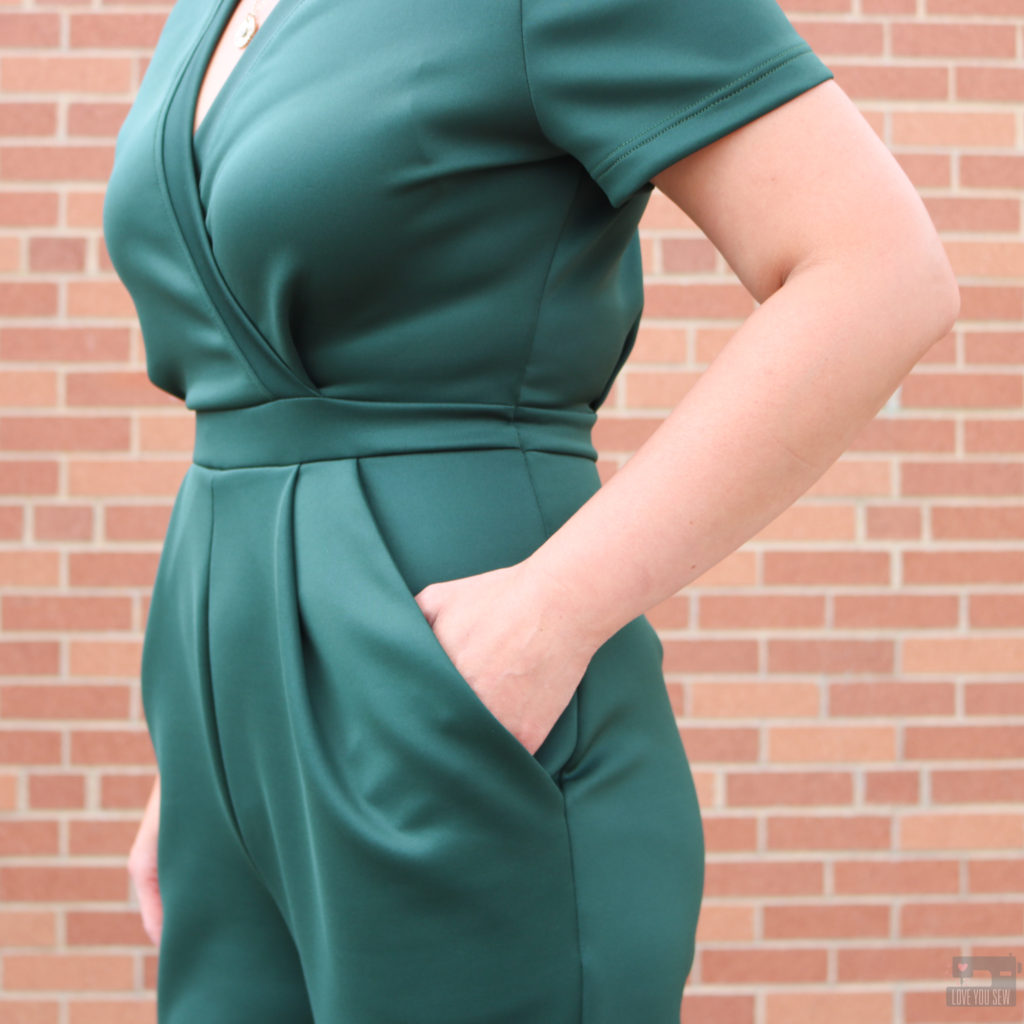
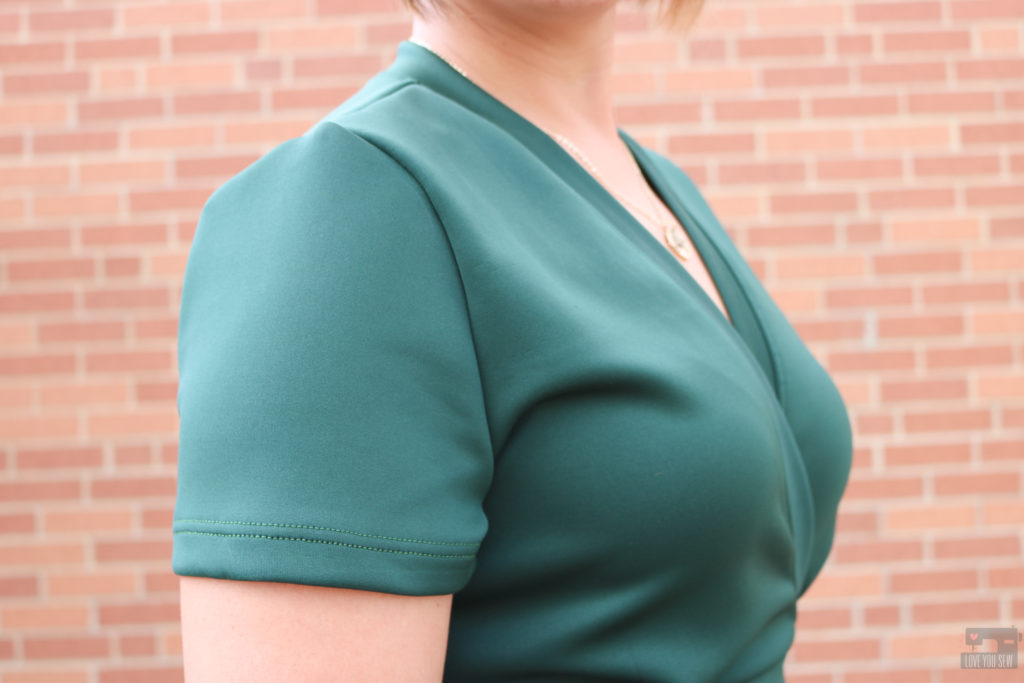
This Lady McElroy Luxury Plain Scuba Jersey Knit Fabric was such a great find! I’m a big fan of Ponte de Roma fabrics and knew I would love Scuba just the same since they are both heavy double-knits. They feel and act very similarly, but are made of different fibers. Scuba is generally poly and elastane whereas Ponte is generally viscose and elastane. This soft and smooth Scuba Jersey did not disappoint with its great stretch and nice body which is perfect for a jumpsuit when you don’t want every bodily imperfection to show through. It is also works SO well for a knit jumpsuit with amazing stretch and recovery. The last thing I would want after all of this hard work would be a saggy stretched out butt!
It’s always hard to tell how color will come out in person versus on a computer, so I was a bit nervous to see how the Bottle Green would be. It looked slightly more muted, like a deeper sage green on my screen. But I was actually delighted to see that the fabric was more of a deep rich gem tone – a solid “Hunter” green, in my opinion. With my olive skin and dark hair, I love a gem tone- especially for the colder months ahead! After a few washes, the color has stayed true to the first day it arrived on my doorstep – love that!
With this fabric being a double-knit, I would recommend using a ball-point needleand your stretchiest stitch found on your machine (zig-zag, triple-zig-zag, lightning bolt, etc.) I used a combination of my overlocker and coverstitch to allow my jumpsuit the greatest amount of stretch to fit larger hips.
Pattern
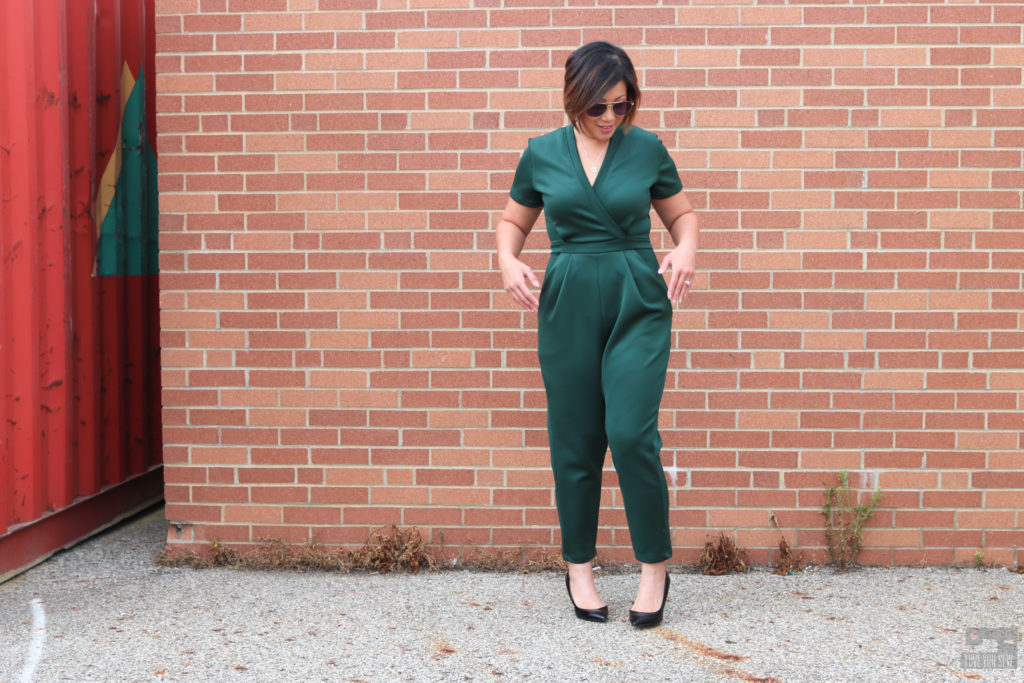
Jumpsuits still look to be on trend a little while longer, so I thought it was safe to make the Sirocco Jumpsuitfor the fall. With the short-sleeves and full pant legs (on View A) I figured this was a great garment to wear on the cooler nights downtown with or without needing a jacket.
The Sirocco is a unique pattern in that there are no ties or other fasteners used to get in and out of the garment. You slip in and out of it all through the faux wrap V-neckline. This might not pose a huge deal for most, but I have hips which are two sizes larger than my waist –which means I REALLY will need to stretch out the waist to maneuver around. This is the main reason I chose the heavy Scuba fabric to handle the severe stretching over my hips. As I was fitting the garment, I honestly thought I would have to put in a side zipper for my hips, but the Lady McElroy Luxury Plain Scuba Jersey Knit Fabricproved to have such amazing stretch and recovery that I didn’t need it! Honestly, I feel like I could wear this all day long…even after multiple bathroom breaks!
I made a few modifications for my SHORT 5’3″ frame with those aforementioned HIPS:
Made a 40 bodice and graded to a 42 in the hips and back to a 40 for the rest of the leg
Shortened bodice by 1/2″ and used a chainstitch (from my coverstitch) to secure the seam allowance down since the fabric is so lofty – This allows the lapped bodice to stay secure over your chest.
Shortened pant legs by 4″ initially (by just tissue fitting) and then took an additional 3 3/4″ when it was time to hem so that it would hit right above the ankle bone – Next time, I will shorten at the thigh and also from the ankle to get a better fit around the knee.
Extended the crotch length 3/4″ on both the front and back pant
Deepened the seat on the back pant by 3/8″
I wish I took out an 1″ out of the rise before cutting, but was able to take 1/2″ out of the overall inseam to narrow the legs and decrease the rise.
Took an additional 1″ out of the ankle and blended up to the knee for a slimmer leg
You can find my other makes on the Love You Sew Blog(here!) and more daily inspiration on Instagram @loveyousew_ .
Happy Sewing!
Cristy
Affiliate links are in this post. Check out my Disclosures here. Fabric was provided for review as part of the Minerva Maker Blog Team. All thoughts and opinions are my own.
We use cookies on our website to give you the most relevant experience on our website. By clicking “Accept,” you consent to the use of those cookies.
This website uses cookies to improve your experience while you navigate through the website. Out of these cookies, the cookies that are categorized as necessary are stored on your browser as they are essential for the working of basic functionalities of the website. We also use third-party cookies that help us analyze and understand how you use this website. These cookies will be stored in your browser only with your consent. You also have the option to opt-out of these cookies. But opting out of some of these cookies may have an effect on your browsing experience.
Necessary cookies are absolutely essential for the website to function properly. This category only includes cookies that ensures basic functionalities and security features of the website. These cookies do not store any personal information.
Any cookies that may not be particularly necessary for the website to function and is used specifically to collect user personal data via analytics, ads, other embedded contents are termed as non-necessary cookies. It is mandatory to procure user consent prior to running these cookies on your website.
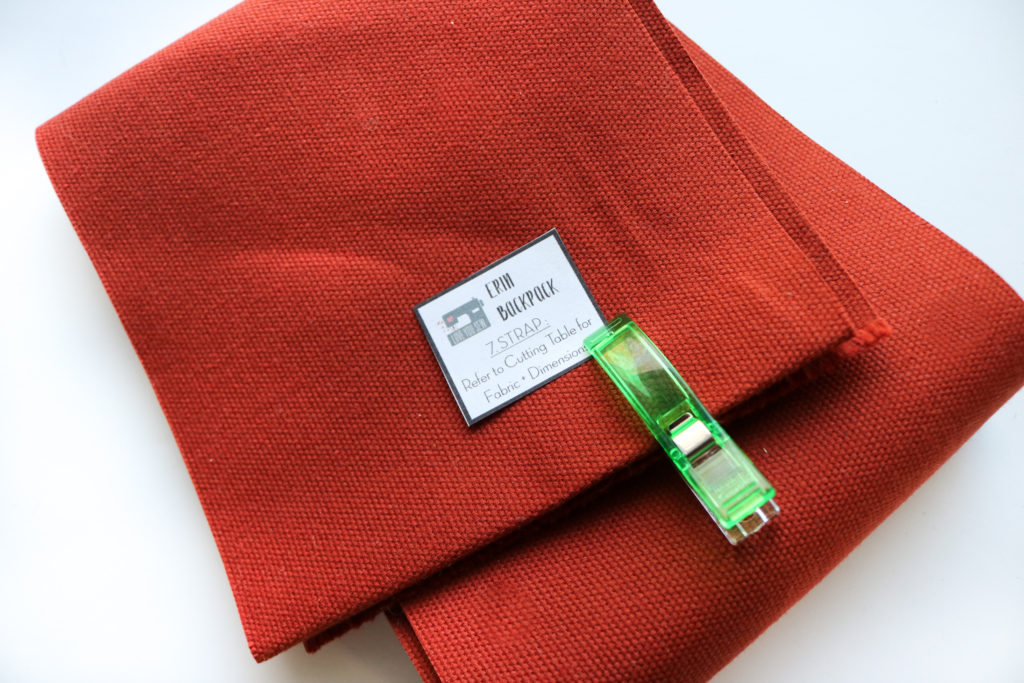 ***Please note the only paper template missing is the Strap. (For a large rectangle, it takes up a lot of paper and after taking a survey of bag-makers, they would rather have the measurements than to waste the paper and so I tend to take this course.) However, there IS a square placeholder with the templates you can use to help keep track of the fabric!