Tiny Sophia Bag HACK: Travel Sanitizer Holder

As the world goes on, we know washing hands and using sanitizer is LIFE right now. It is SO important to stay healthy and protect ourselves against all germs – pandemic or not!  Washing hands with soap is the preferred way to keep them clean, but when there isn’t a sink around hand sanitizer is a decent alternative. You can read more about the benefits of hand-washing here with the CDC.

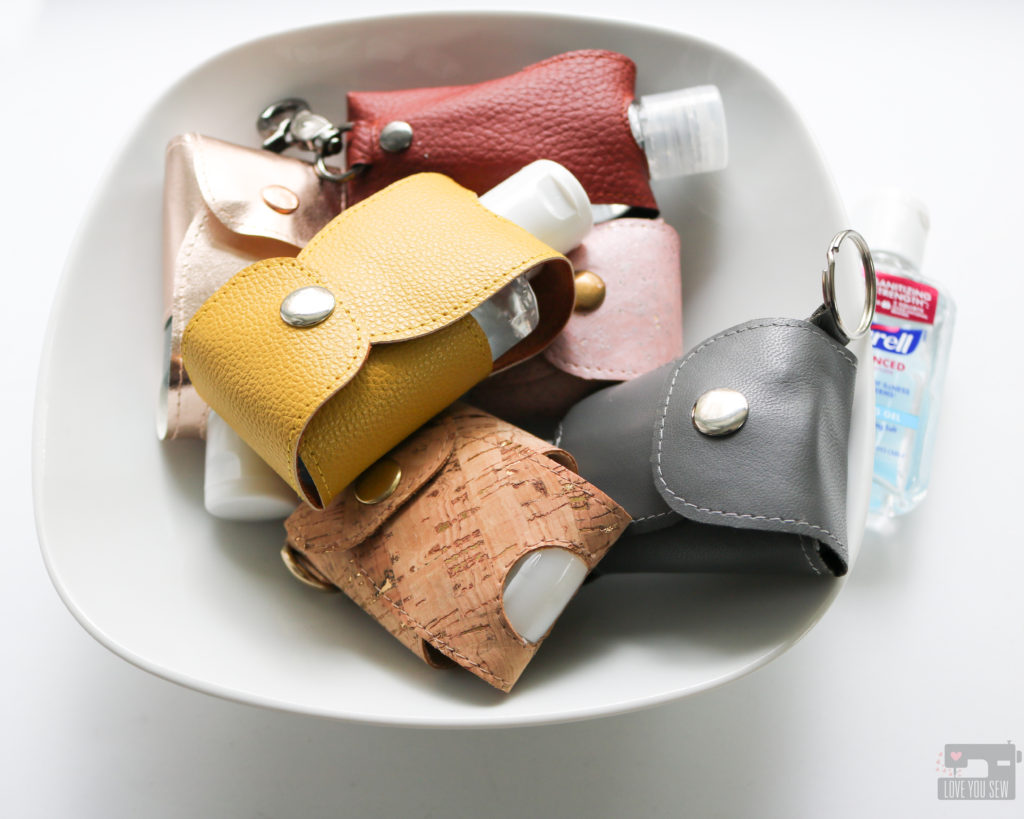
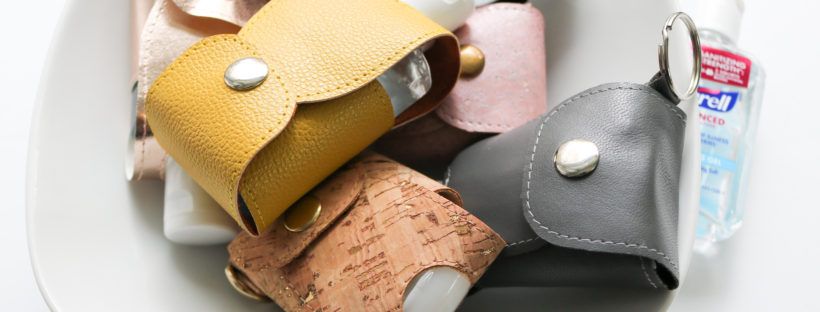
Like all of you, I want to keep my family safe and have sanitizer on them at all times – especially as school opened up for my kids. But of course, supplies have been (and still are) very bare.  Trying to find those manufactured jelly style travel sanitizer holders was just impossible. That’s when I took it upon myself to make cases for my kids and husband.

Different size travel bottles

It turns out that the Tiny Sophia Bag (read about it here) is the right width to hold most travel sanitizers! The height just needs to be adjusted and that’s where this hack was born. This hack will take you through the steps to transform your #tinypurse to a sanitizer holder for most 1-2 oz travel bottles.  I tried to find a variety of bottles to test so you can see how they fit and decided to create one version for bottles from 1-1.6 oz and then another version that can fit 2 oz bottles.  If you are using bottles different from any of those pictured, be sure to check the template against your sanitizer BEFORE cutting any material.

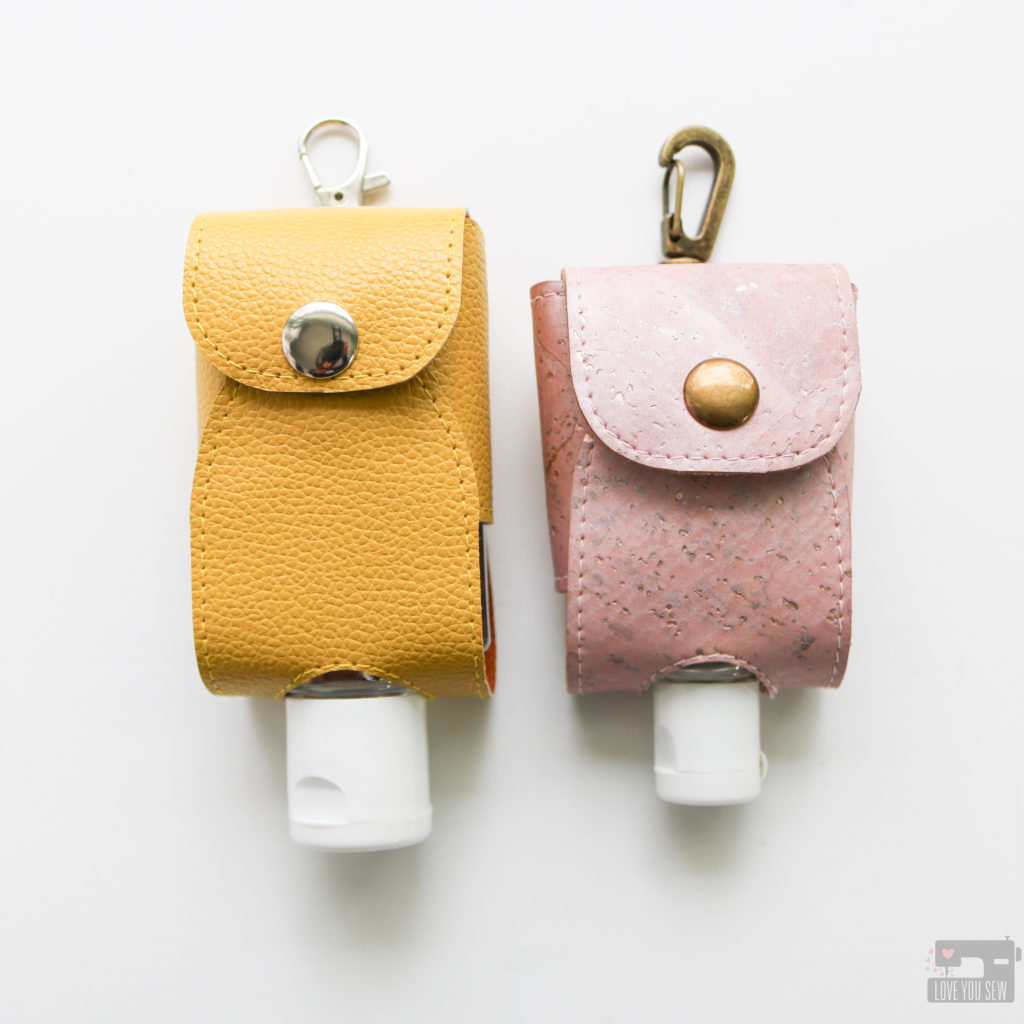
2 oz Holder vs 1 oz Holder


Materials Needed:

  • The Tiny Sophia Bag pattern – found here
  • Ruler
  • Extra paper
  • Marking Instrument
  • Clear Tape

Tutorial

***Please note there are adjustments depending on whether you are making a holder for a 1.0-1.6 oz. bottle versus a 2 oz. bottle.   Please read instructions carefully.

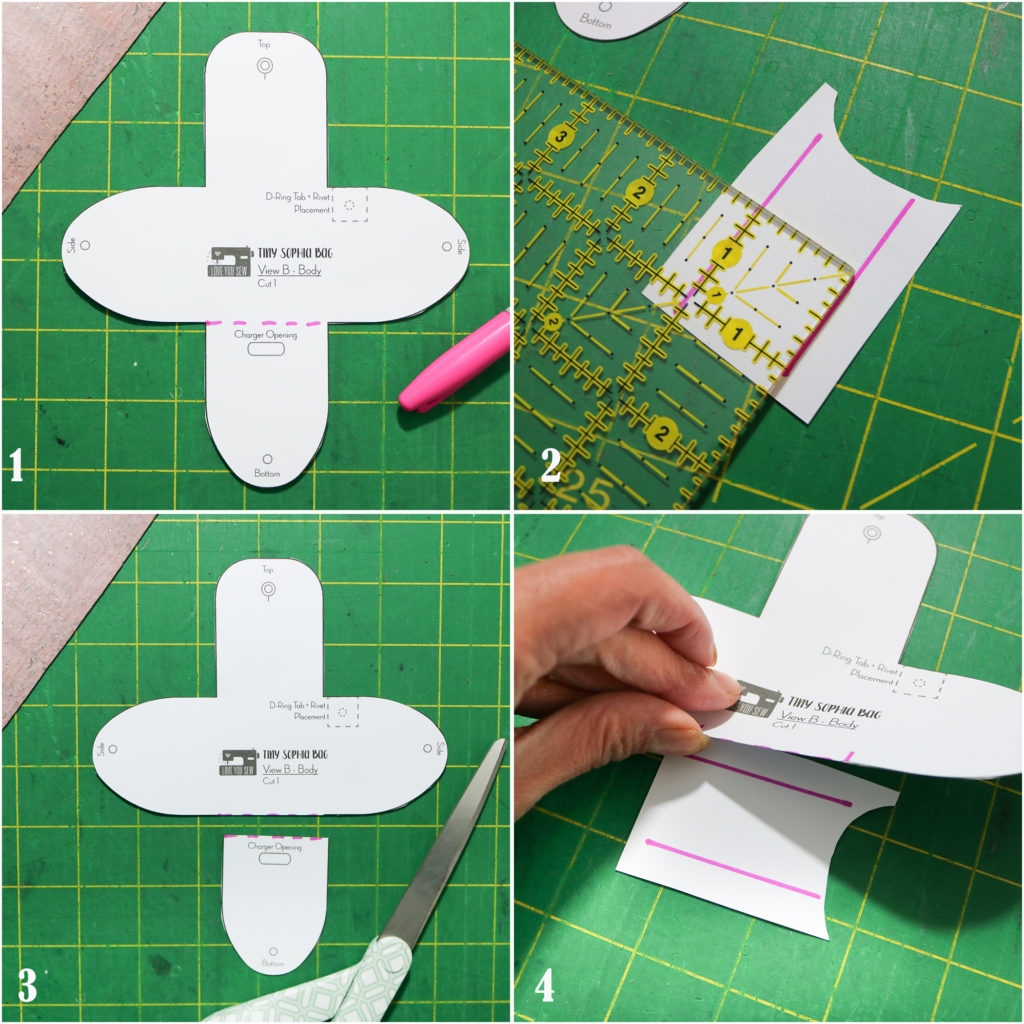
1. Cut the pattern template out per instructions. Mark the cut line along where the bottom flap meets the sides.

2. Take a scrap piece of paper (wider than the bottom flap) and mark a 1″ high extension for 1-1.6 oz. sanitizer bottles. *If you have a 2 oz. bottle, you will want to mark a 2″ high extension.

3. Cut the bottom flap off the bag template following your markings

4. Line up the top of the pattern along the extension and tape into place.

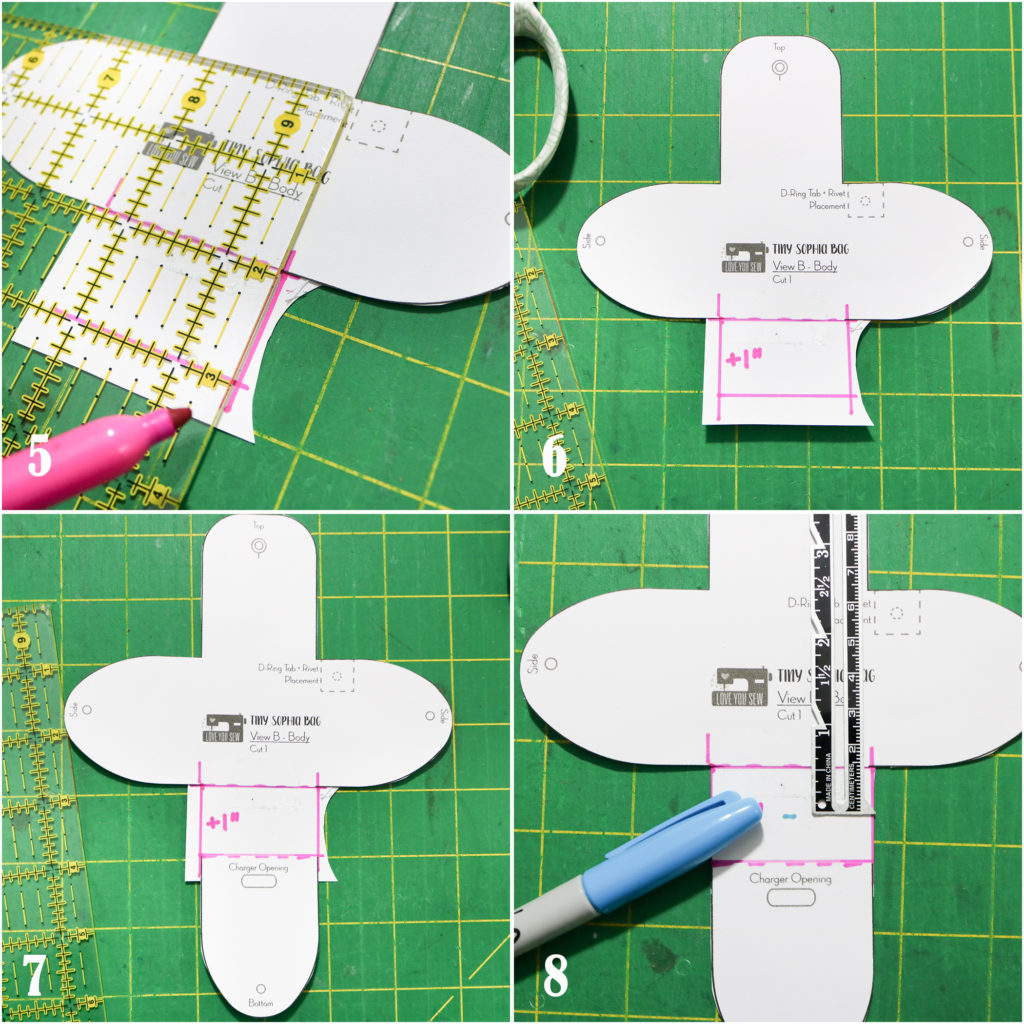
5. Take a ruler and mark the right side of the extension aligning it to the Top flap’s side edge.

6. Repeat on the left side of the extension.

7. Line up the bottom flap to the lower side of the extension making sure it matches the side markings.

8. Trim away the excess paper.  Mark a line 1/2″ from the top of the extension. *If you are making a 2 oz. bottle holder, mark a line 1″ from the top of the extension.

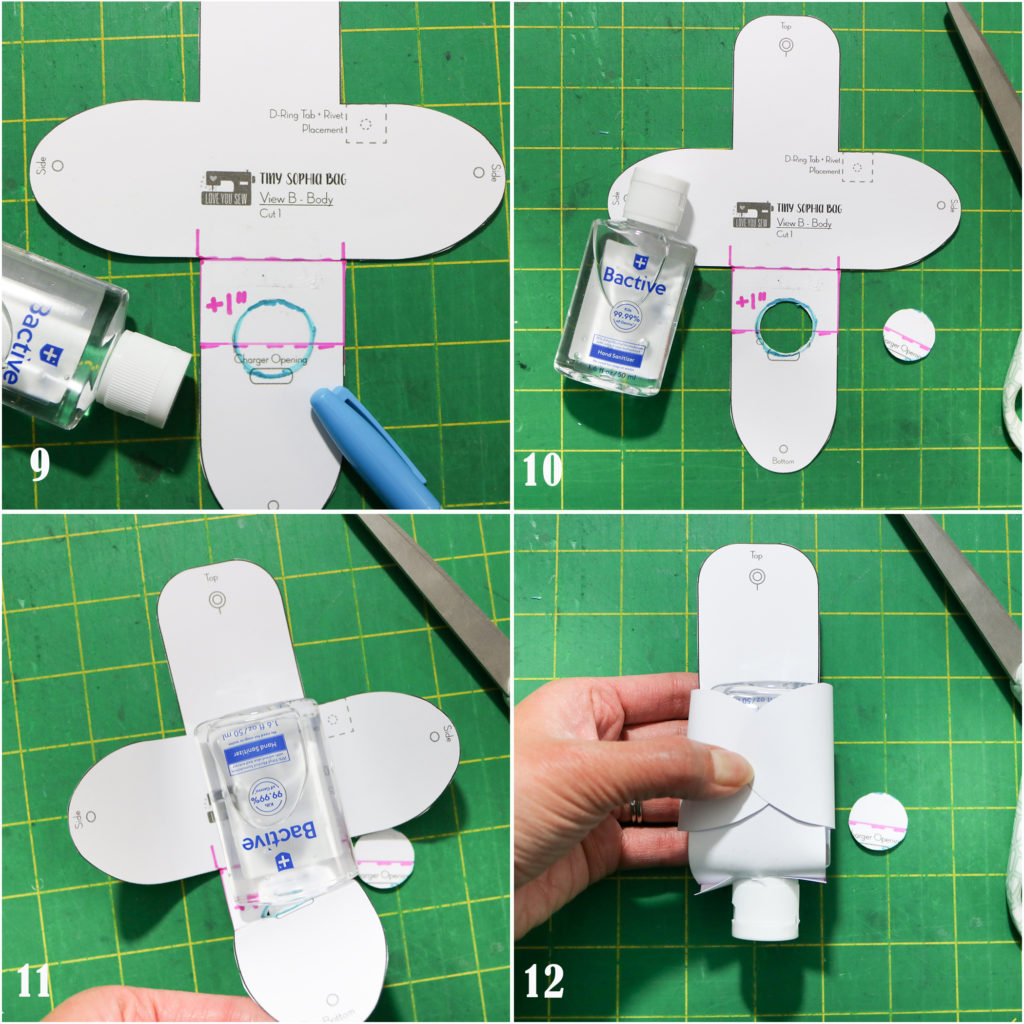
9. Use a sanitizer bottle cap as your opening.  (This replaces the Charger Opening.)  Center it vertically on the template and place it just under mark made in the previous step.  Trace.

10. Carefully cut out the circle with paper scissors.

11. Check that the sanitizer bottle you want to use fits through the opening on the template. Adjust as needed.

12.  Check that the template fits around the bottle by aligning the hardware holes.  Adjust as needed.  Once you are satisfied with the fit, follow the steps in The Tiny Sophia Bag to finish your  travel sanitizer holder!

Notes:

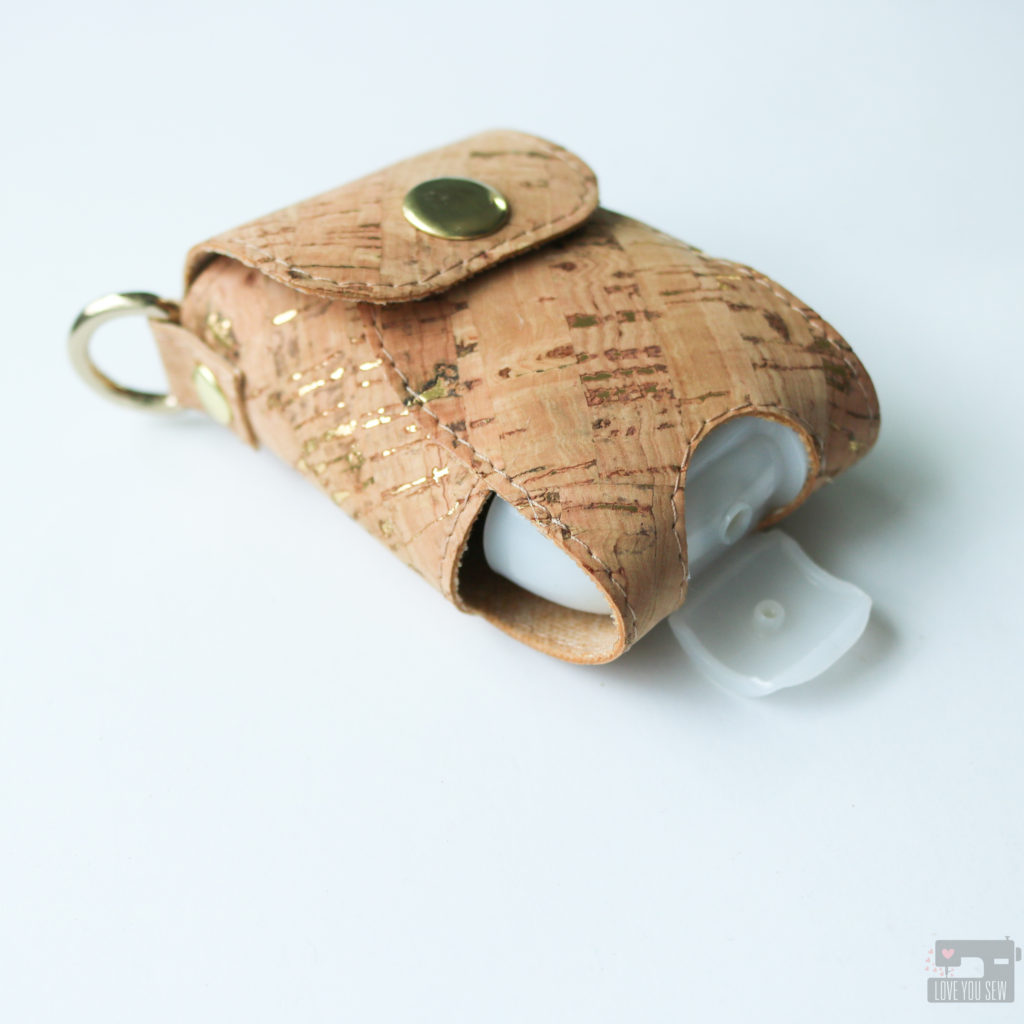
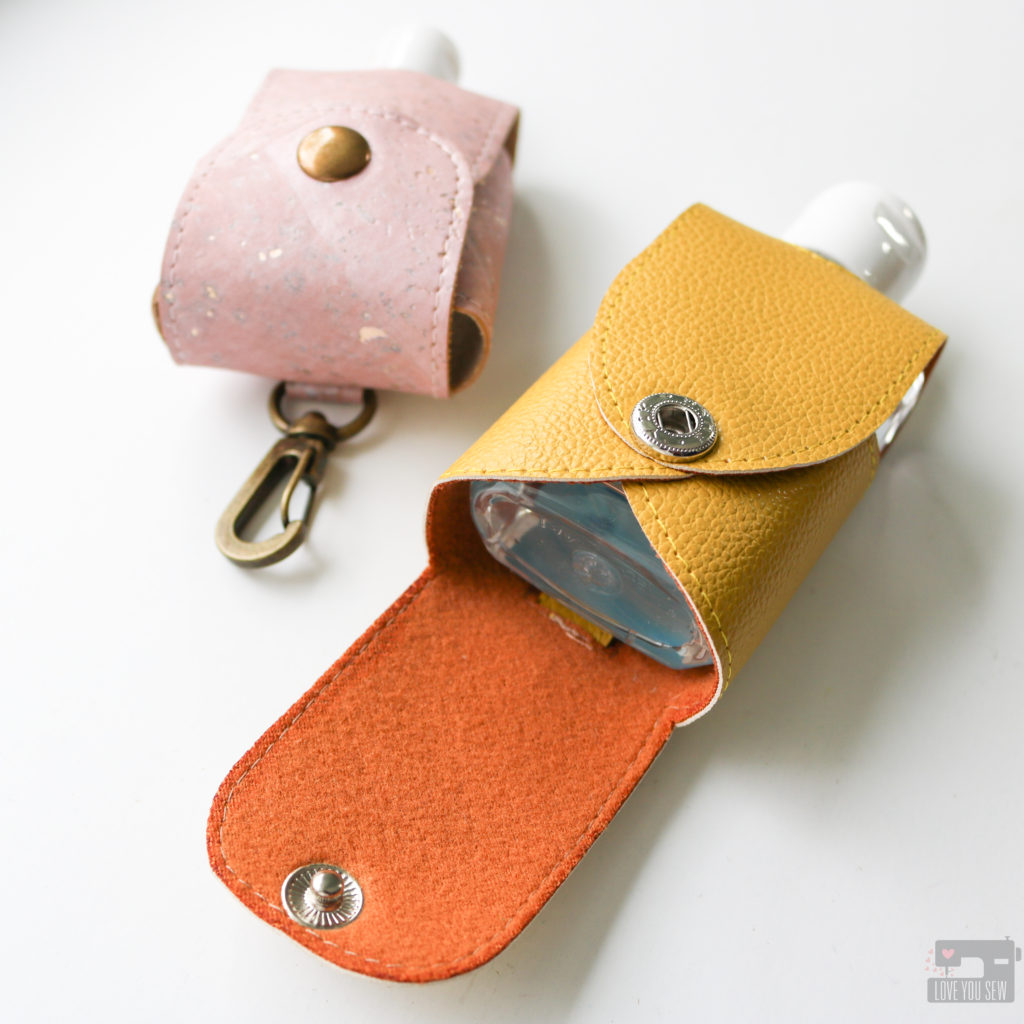
This cork version uses the 1 oz adjustment, but if I were to make it again just for this style of sanitizer bottle from Bath & Body Works, I would make a slightly wider opening to accommodate  that wider flip-cap.

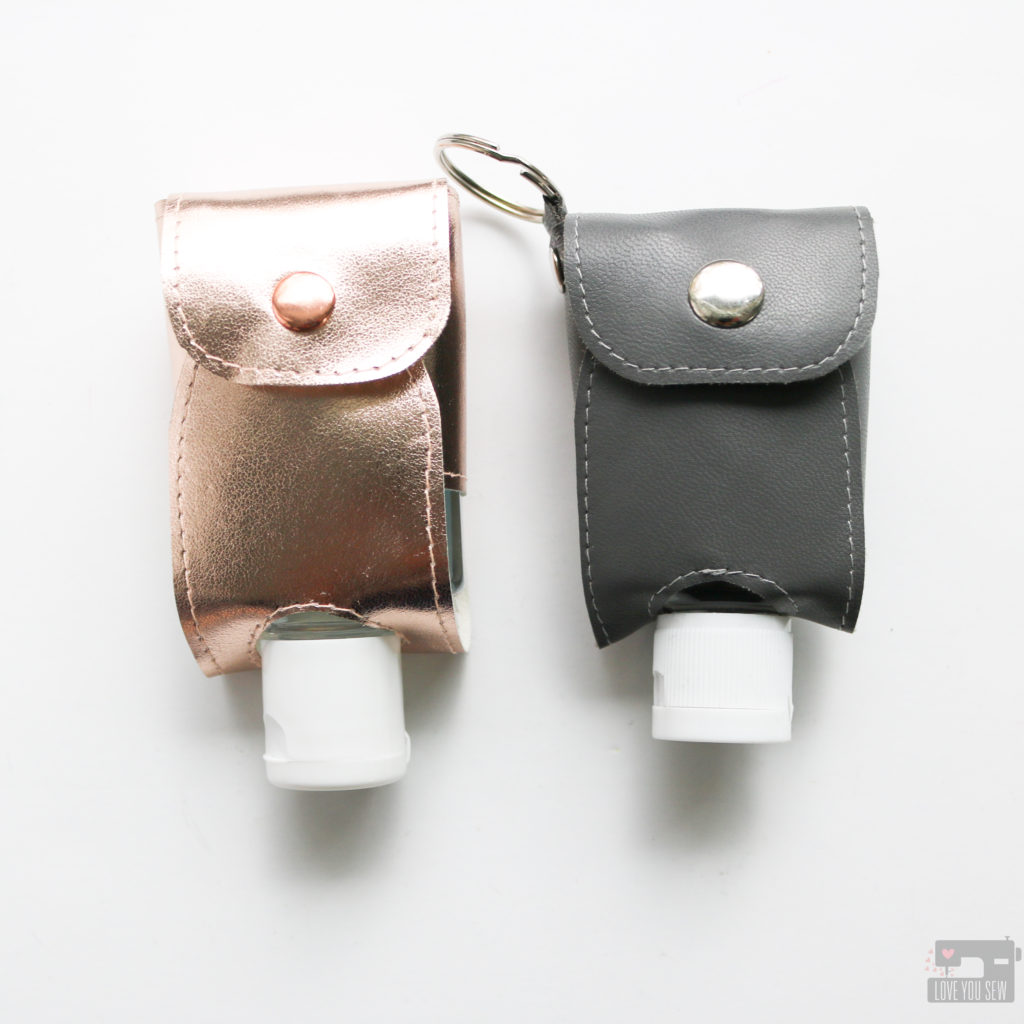
I added stitching to all of my samples in this post, but you don’t have to.  Using faux leather with felt backings like these pictured above leave no fraying and make this a fast and simple project.

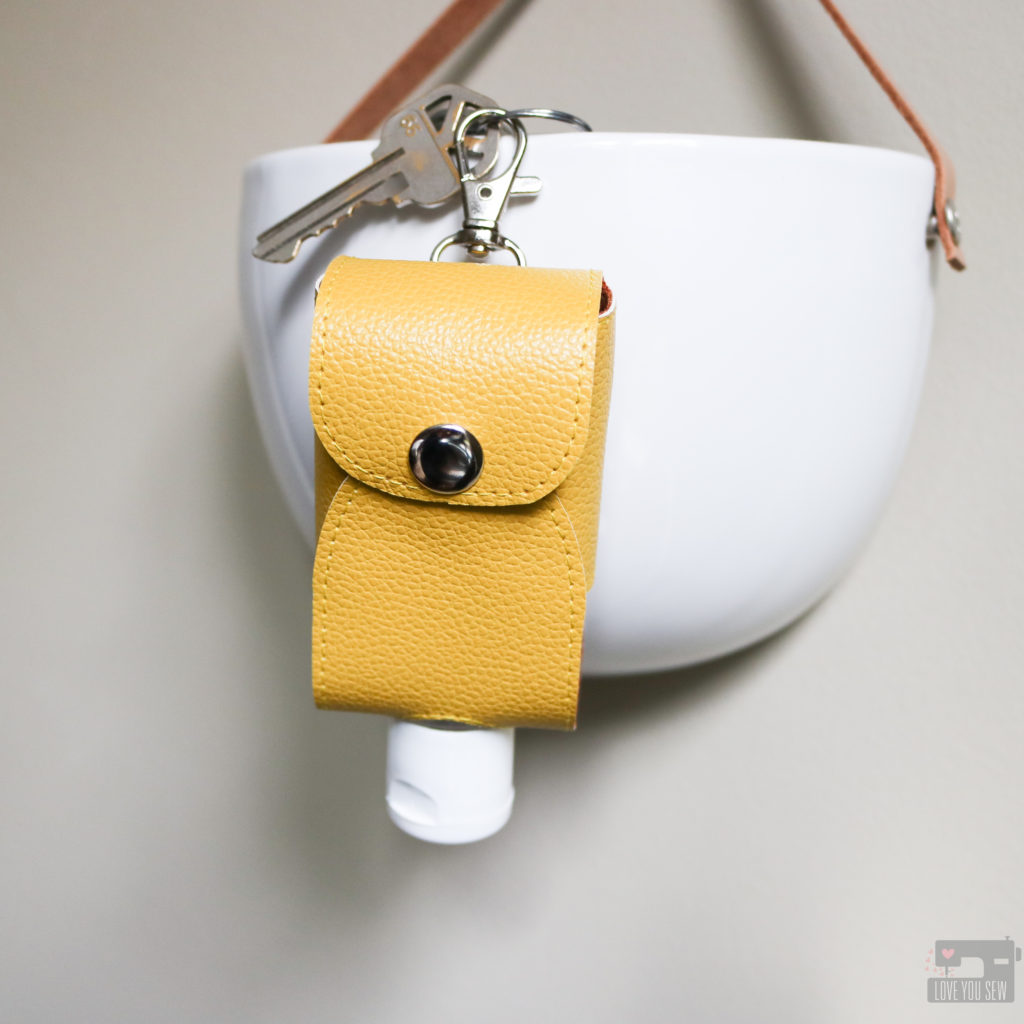
With the holidays ahead, these will make such great gifts!  So I will switch up the hardware to swivel clasps on the back so they can hang easily from key chains, purses and backpacks.

Where to find supplies:

  • For Cork or Faux Leather, I’m a big fan of Sew Sweetness.  Shipping is flat-rate, fast and I think a great deal!
  • For real leather and a variety of finishes, TanneryNYC has remnant bags.  I received small – medium sized cuts and was able to make several Tiny Sophia Bags out of the surprise shipment. These are high quality pieces of soft leather.
  • I love Emmaline Bags and By Annie’s hardware, but if you are looking for a value set for kids, I recently bought these (pictured on yellow case) and these from Amazon.
  • For Snaps, I used spring style ones from Gold Star tool, but recently fell in love with these Rivet Magnets from Kam Snaps (as seen with the pink cork version above.)


I hope you enjoy this hack and find it useful in our current environment.  Please drop a comment and let me know what you think!


Hugs and Stitches,

Cristy


This post may contain affiliate links.  Any earnings go right back into powering this website.  Please read my Disclosures here.

FREE Woodland Mushroom Quilt Block :: Fabric.com Fall Block Party

It’s Week #2 of the 9-week Fabric.com Fall Block Party and I’m ready to take you into the deep woods…  I just love this season with the air getting crisp, the foliage changing colors, and the weather is cool enough for a good long hike.  It’s so much fun to explore the wilderness, especially with my young boys.  We find so many little critters, unique leaves, and lots of different plant-life.  Our own discoveries made me think of the quintessential Woodland Mushroom.

For this design, I wanted a fun scrappy mushroom to go along with all the different colors and textures we see out in nature.  The 12.5″ x 12.5″ (unfinished) block is based mainly on half-square triangles and you will love how just a little rearraging can give your block a new look.

For the Woodland Mushroom, I stuck to the Kona party theme found here, but prints are my key to scrappiness 🙂  These are the fabrics I selected (from top to bottom):

As I was making the block I was thinking of all the ways I could the mushroom as decor….because my house need some help!  I thought of all the fabric signs we see in big box stores with witty sayings all bound together with living picture frames (just a piece of wood at the top and bottom.)  Then it dawned on me to use pant hangers!  I know a lot of you already use them to display blocks, but I thought I would turn it up a notch and refinish a few.

I found these two pant hangers for a total of $0.60 at my local thrift shops.  Both were blonde wood with the same nickel finish on the wire.  With a little fine sandpaper, I took the shine off the entire hanger and used materials I had around the house to refinish it.  A watered down brown acrylic craft paint gave me the “stain” and I happened to have this gorgeous hammered bronze spray paint leftover from another forgotten DIY project.  A few layers of clear coat topped it off to protect the fabric against any paint which may rub off.

The hanger makeover really makes the piece more modern with an industrial rustic feel.  It works well with this fall palette and displays my Woodland Mushroom mini perfectly!  It will be easy to change out mini’s over time and through the different seasons.

Here is the mini displayed with some upcycled “ribbon” cut from a burlap coffee bag and leftover lace from my sister’s wedding.  It is displayed on a mantle with a wreath hanger and helps to bring the random decor I had around the house together.

And if mantle or table-scapes aren’t your thing, the pant hanger make it easy to display a mini quilt on your front door.  I think quilts should be the “new” wreaths, don’t you think?  We should get on that movement!

I hope you enjoyed our walk in the woods!  To make your own Woodland Mushroom block, visit Fabric.com’s blog here.


Don’t forget to keep sewing along and follow the rest of these amazing designers and their Fall #fabricdotcomblock party patterns!

Sept 12 – Fall Geese

Kristi Schroeder – Initial K Studio – @initialkstudio

Sept 19 – Woodland Mushroom

Cristy Stuhldreher – Love You Sew – @loveyousew_ (You are here!)

Sept 26 – Mod Tartan

Jenn Rossotti – Ginger Peach Studio – @jennrossotti

Oct 3 – Time Lapse

Christopher Thompson – The Tattooed Quilter – @thetattooedquilter

Oct 10 – Double Windmill

Haley Anderson – Happiness in the Making – @happinessinthemaking

Oct 17 – Antlers

Lisa Hofmann-Maurer – Sew What You Love – @sewwhatyoulove

Oct 24 – Gather

Elise Baek – Elise & Emelie – @eliseandemelie

Oct 31 – Forest Floor

Sarah Thomas – Sariditty -@sariditty

Nov 7 – Flutter By

Nicole Young – Lillyella – @lillyellasworld


Happy Foraging!

Cristy


***This post was sponsored by Fabric.com and there are affiliate links.  The block design, instructions and post are my own original work with my own opinions.

Observer Fabrics Preview

ObserverPreviewTitle

Have you ever seen something out in the wild, and wondered how pretty it would be to freeze that shot and frame it forever?  It’s that moment that is just SO good, you take in that extra long gaze and lose yourself a little…  Well when you’re April Rhodes, you take that extra step into permanence and create Observer fabrics.  It’s a collection of patterns seen out in the world…through the eyes of Miss April, herself.

IMG_4615

It is such an honor to sew with an unreleased collection.  The initial reveal is always exciting, but I love to hear about the inspiration.  That’s why it’s so wonderful to work with April…as we collaborate together, I get to hear the story behind every pattern and every color.  With all of that information, it then allows me to dig a bit deeper in my design wheel well.

IMG_4716

I was immediately inspired by the Homespun print.  It is based off of April’s love of weaving and fiber arts.  The 24″ x 24″ (finished) quilt is paper-pieced  to make every angle and line as sharp as can be. It utilizes mainly 1.5″ strips, making it very scrap friendly.

IMG_4656

With Observer, the prints are either monochromatic or duotone and this quilt was designed to really show off the contrast by using the colorways, exclusively, in each quadrant.

IMG_4655

As you get closer to the fabrics, you can see the little hints of metallic (yaaas!)  With this collection, April incorporated silver which looks amazing against the deep blues.  It’s always hard to photograph metallic, but you can see it in Triangle Tokens and on the Speck Stardust.

IMG_4930

The background is Art Gallery Fabric’s Premium Linen Blend in Soft Sand.  It is such a great texture and color to make the design and colors pop.

IMG_4898

With so much negative space in the piecing, a random application of matchstick quilting was in order using Aurifil 2310. The areas were split into quadrants, like the quilt design, itself.

IMG_4899

The backing was pulled from April’s Wanderer collection.  Wandering Lands Mineral was the perfect print which really complimented all the tones in Observer and it shows off the quilting beautifully.

Stay tuned…this quilt pattern will be available closer to Observer‘s release in August!!!


IMG_4715

April asked if I would help make some baby leggings as well and how could I not?!?  Ya’ll know babies are my business and LOVE the opportunity to make itty bitty gear.  These leggings are made with Overshot Gold in knit and they are so amazingly soft.  The pattern for the pants are from My Childhood Treasures.

IMG_4711

I drafted a pattern for the hat from an old one I have.  Make it Love it has a great tutorial and pattern which is similar.

IMG_4657

As an added detail, I used the selvage from a woven print on the back of the leggings.  It’s a great way to make a little tag so you know the direction of your hand-made garments.

Aren’t these clothes just perfect for the little bohemian in your life?


IMG_4940

Last, but surely not least, is my mini quilt hoop (measuring about 2.5″ lengthwise.)  Making these quilt hoops has become one of my favorite projects and I cannot help myself when I have such amazing fabric laying around.  I love tiny (who doesn’t?) and love being able to use up every little scrap.

IMG_4943

Of course, I used Dandelyne hoops and chose an oval to make a piece based of the main quilt I designed at the top of the post.  A little gold embroidery thread made this hoop extra special and I love how it turned out.


I hope you enjoyed my little preview of Observer which is due out in August.  Make sure to check out the full collection here.

Do you have any plans for these fabrics?  Please let me know!  I have a few already planned….maybe an envelope clutch, dresses for my nieces, shirts for my boys, and dresses for myself….I could go on and on!


Happy Stitching, Friends!

Cristy

Fundraiser Sewing

Fundraiser Sewing Projects

Whether you sew for hobby, for business, or for necessity, it’s always nice to sew for a cause.  I’m a stay-at-home-mom who has to continually stretch a buck, so I like to help how I can…and that means through sewing.  These past few weeks have provided me a few opportunities to use these skills to help some great local organizations.

My boys go to the same preschool and the Parent-Teacher Organization (PTO) asked me to contribute a few items for a big auction event.  Of course, I said yes. I love this school and am so happy my boys do too.  Although I know I won’t generate a ton of money, I know every little bit helps. I get to help the PTO and get a little local publicity so it’s win-win for me.

Last year I donated gift certificates to my Etsy shop and this year I decided to make a few items to possibly generate more money once the bidders can touch and feel what they are receiving.  With a GC, there is a finite value, but with custom made, hand-sewn products, there is more more perceived worth…at least I hope!

UA Open Wide Pouch

It’s always so hard to choose fabrics for someone, never mind someone you don’t know.  But since this is a school fundraiser, you can’t go wrong with simple patterns in the school colors…so yellow and black it is.  I used Quiet Play’s Geometric letter pattern and Noodlehead’s Wide Open pouch pattern to show some hometown love.

Traincase Outside

The Crimson and Clover Train Case by Sew Sweetness is one of my favorite patterns. Its so versatile in it’s usage….whether to hold makeup, toys, or other treasures.  I used Cotton and Steel Black and White fabrics with the typewriters being  a play on the school and added little yellow accents.  The shot of yellow piping is definitely my favorite.

Each of my son’s classes is also responsible for putting a large basket together. There is a theme and the point is to have all the families contribute a little something in order to make a sizable basket worth buying. One class has a “Lego” theme and the other has “Books.”

Lego Open Wide Pouch Outside

Instead of just buying a box of Legos, I knew I wanted to sew something to hold all the toys. I’m constantly stepping over Legos in my own house and I made some see-through vinyl drawstring bags to combat the mess.  I thought I would make one for the basket but then after browsing Quiet Play’s Craftsy shop, I saw the Lego man. Hello!

Lego Open Wide Pouch Inside

The Lego head pattern is free (yay!) and I used Noodlehead’s Open Wide Pouch again.  It’s design is so perfect for little hands to reach in and out easily.   I added a little embroidery to make the Lego Man’s face and (hopefully) this bag will help keep all of these little pieces off the floor.

Library Bag Closeup

For the “Books” theme basket, I knew right away I would make a library bag. My boys have cute canvas ones they love to fill up and I figured one of their schoolmates would too.

Library Bag

The bag is made with Art Gallery Fabrics Denim Studio so I didn’t need any interfacing to give it structure. I used a very simple tutorial from Skip to my Lou and altered it so I could incorporate this super cute book paper-piece pattern from Patchwork Please! by Ayumi Takahashi.

Besides all these PTO donations, I was asked to contribute some items from my Etsy shop for a Pelatonia fundraiser. This is one of the largest bike races in Columbus and generates millions of dollars…all which toward cancer research.  Some large companies have donated money to cover administrative expenses so that 100% of rider fundraising will go to charity.  How awesome is that?

Baby Travel Set

I donated a full set of baby travel items with arrow fabric since the Pelatonia logo is also an arrow. The group I’m assisting is bringing in a whole cross-section of items and I’m crossing my fingers that these pull in lots of money!

Have you donated some sewn items for fundraising?  How did they do?


Happy Stitching,

Cristy


***This post may contain affiliate links which help me on the back end to fund this site.  Compensation is only through your own purchase. 

Sewing Room {Pattern Organization}

Pattern Organization Title

It’s funny when I’m asked what kind of sewist I am.  Quilter? Bag-Maker? Garments?  Well….I tell everyone, “I am all of the above.”  I like to dabble in everything — to challenge myself and I just love being able to make as much as I can with my own hands.  With this variety in my sewing repertoire, comes a TON of patterns!

I have a mix of both digital and paper patterns.  If given the option, I almost always take the full printed pattern.  As much as I love the instant gratification of downloading a digital pattern, the extra taping is a bit annoying and I have more difficulty tracing with printer paper.  I know…it’s nice to always have a back-up of a pattern on my computer, but be rest assured, I always make copies.  I trace garment patterns onto muslins and I create cardstock templates of bag pieces.  Which type of pattern do you prefer?

With all of the patterns and their print-outs…and the traced muslins…and the instructions…how do I organize them all?  As much as I would love a one-size fits all solution, it just doesn’t work for me. I have three different methods of organizing my sewing patterns and maybe one, two, or all three of them may work for you.

Classic Filing Method

Pattern Organization File Folders

This has place from my former corporate office days.  It also was my first method when started sewing.  Having all the supplies on-hand didn’t hurt either.  I had a stack of file folders, a desktop tiered rack, plastic file boxes and even a metal cabinet.

I use this method to hold my digital patterns and printout of free tutorials on-line.  (Thank you fellow bloggers!)  These are all categorized by my most frequent sews as shown.


Shelf Method

Pattern DVD Storage

Most physically purchased paper patterns are about 6″ x 10″.  They can easily get lost in regular shelving and other paper storage containers.  For awhile I had mine in cute little wire bins…but the patterns were quickly outgrowing my bins and I couldn’t see them well.

Fortunately, I had a friend who wanted to get rid of a DVD shelf…and it was nice solid piece.  (I bartered a toddler dress for this…score!)  This DVD shelf not only is the perfect size for paper patterns, but it holds fat quarters perfectly.  I love how I can see everything and my patterns are in easy access.


Art Portfolio


Pattern Organization Portfolio Open

So we tackled, letter-sized patterns and instructions with the file folders and the smaller printed patterns, but what about the big stuff?  For awhile, I folded all the taped pdfs up in those file folders and even used a large binder with those clear plastic sheet protectors, but they didn’t last long.  The patterns were all poking out and the folders got too full too quickly.  I needed something bigger…

When my kids started to bring home arts and crafts from school, I wanted to save all their cute projects.  So I picked up a smaller size art portfolio from my local big box retailer.  I use them to organize each year of school for my guys.  Then….it dawned on me one day that I should use one  for my big paper patterns.

This 11″ x 17″ portfolio size is perfect for my needs.  All of my patterns fit with only one or two folds without needing advanced origami skills to get them back into original form.  I love how it also holds my muslins and the clear pockets allow me to quickly identify what patterns are which.

How do you store all of your patterns?


Have a great week!

Cristy