Summer Swimsuit with Pinecrest Fabrics

Right before we leave for vacation, what do we, as sewists, always do?  Pack???  Nah, that makes too much sense….we just sew more clothes!  Isn’t there always one more garment we desperately need to have or else it’ll ruin our trip?  😛  Okay, it may not be that dramatic, but I still wanted a new swimsuit for the family vacation this summer.  There was some extra motivation too, since I received my package from Pine Crest Fabrics riiiight before we were about to leave.  Who can leave gorgeous fabric just sitting there!


FABRIC

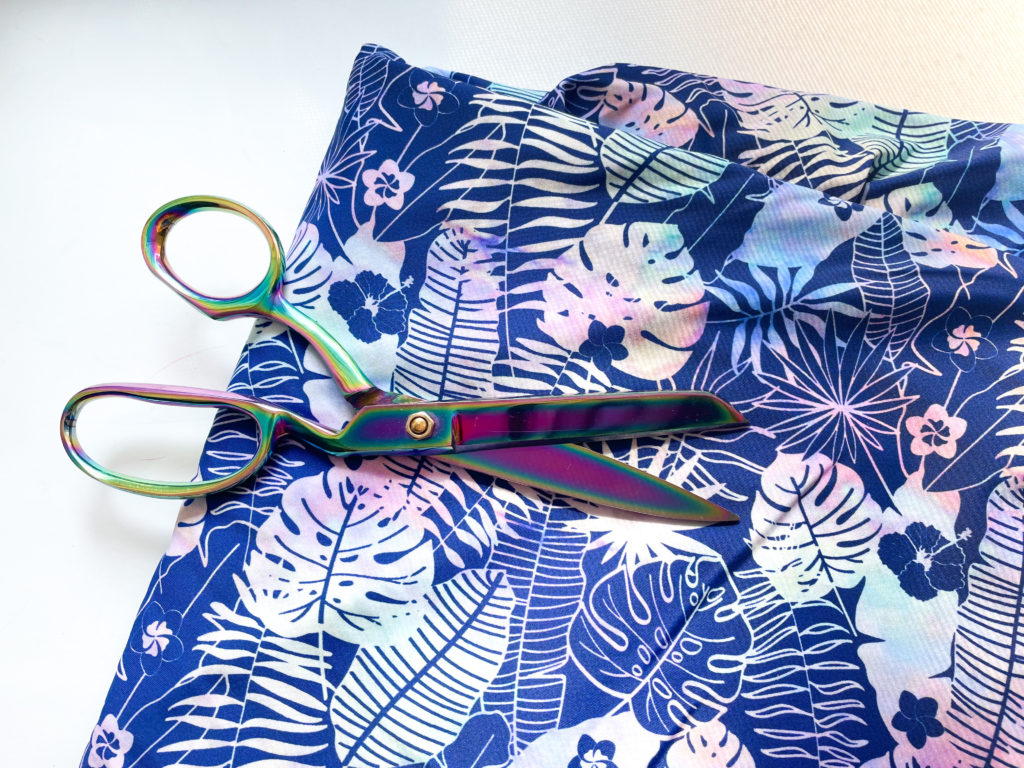
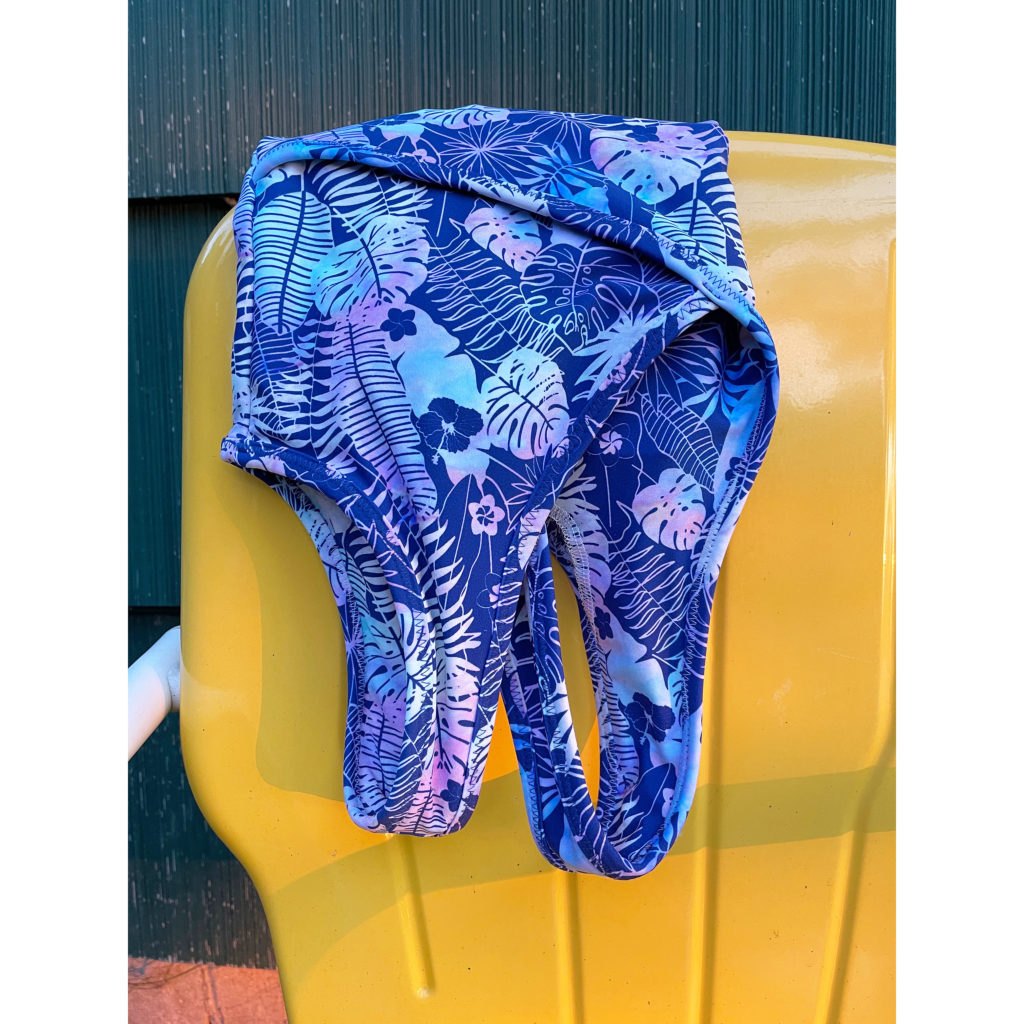
I am very fortunate to have worked with Pine Crest Fabrics before with some Athleisurewear and with other swimwear fabrics.  With every make, I’ve been incredibly impressed with these high-quality stretch fabrics.  They are durable, silky smooth and have great recovery with the stretch.  This Pastel Tie-Dye Jungle print is no exception.  It’s a departure from what I would normally wear, but swimsuits are meant to be fun, right?  PCF has an incredible library of prints and can even do custom prints for wholesalers.  I love this indigo-purple color and that tie-dye is SO on trend right now. The scale of the print is perfect for form-fitting apparel…I absolutely love it and can’t wait to make a few extra separates from the scraps I have!

As a repeat maker, testing the feel of all the different base cloths they manufacture is a special honor, especially those which are more sustainable like with this fabric that uses  80% recycled Greenlon (TM) Nylon.  I love to thrift, upcycle and use sustainable fabrics when I’m making new garments, and knowing that Greenlon (TM) uses recycled plastics using in the fibers is just amazing!  On top of that, PCF also meets the following to be eco-friendly:

  • Global Responsibility Standards (GRS) –  This means recycled materials are verified and the production process meets responsible practices.  You can read more here.
  • OEKO-TEX certified to test for harmful substances to human health.  You can read more here.
  • HIGG Index – This is part of the Sustainable Apparel Coalition for moe standardized measurements in the the textile and apparel industries.  You can read more here.

On top of feeling good about all of these certifications, this fabric is STILL absolutely amazing in its weight, hand and feel.  The four-way stretch is strong which allows for full movement, but also has great recovery and compression.  The fabric is completely opaque, so if you wanted to make leggings or bike shorts, they would be squat-proof too.  I like the cool feel from this base cloth and it’s silky enough that I don’t worry about chafing…especially during a long day in a wet suit!

Mystery deadstock fabric with Pine Crest Fabrics solid lining

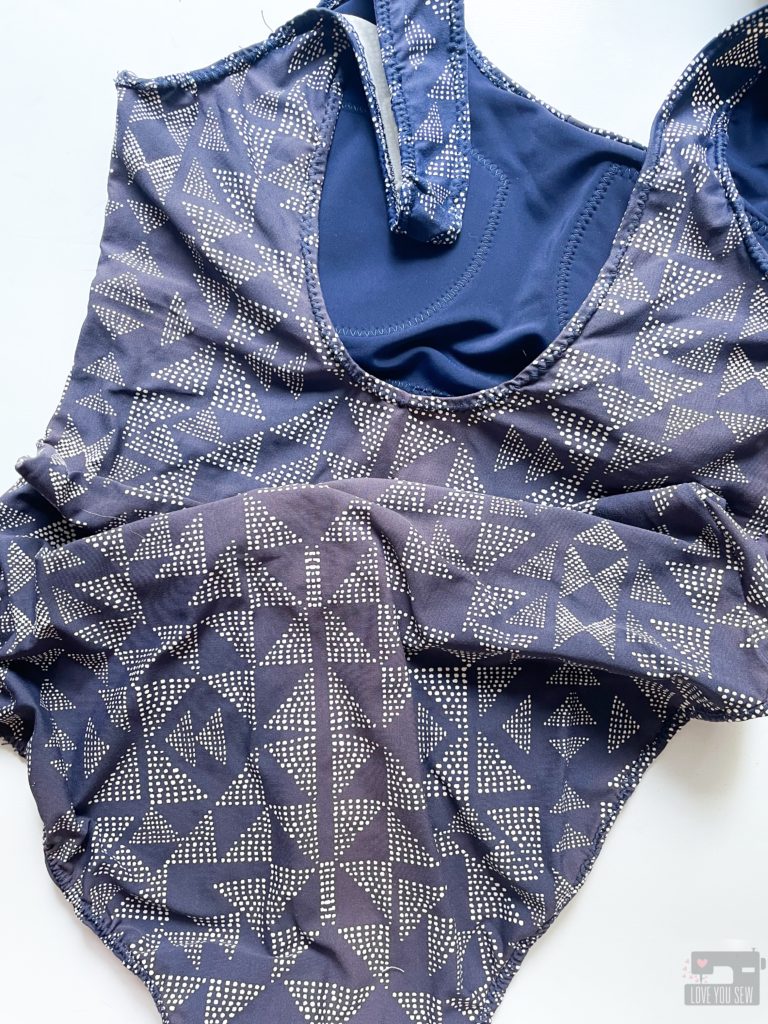
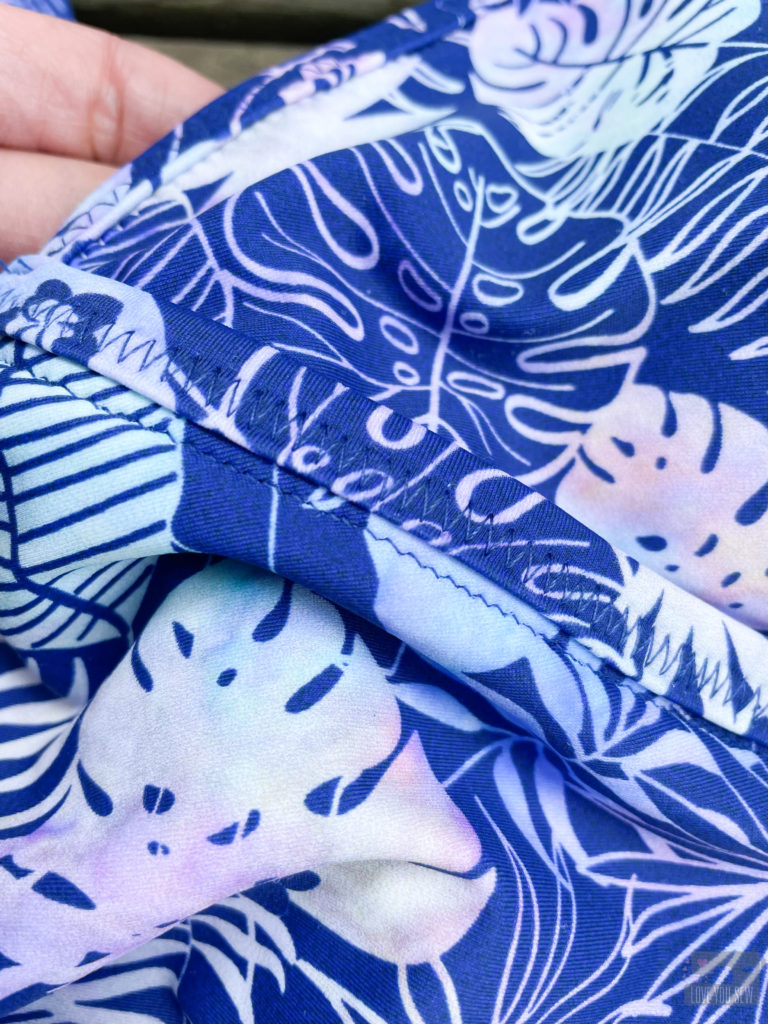
I’ve sewed with a lot of spandex fabrics with good experiences and some that didn’t live up to my expectations.  I made a swimsuit (picture above) using some deadstock fabric I purchased a few years back, so origin and content is a mystery.  I loved the print and was happy to buy something that was overstock from a manufacturer.  However, I did a lot of indoor swimming over the winter and my lap suit was ravaged by the chlorine.  You can see that It went from navy to orange in the center of the print!  But if you check out that solid navy lining — it’s Pine Crest!  The navy blue is still as saturated as day one.  This is a true testament to the quality and high chlorine resistance!  It’s just a bummer that I have to toss this suit before the construction and/or fit deteriorated…


PATTERN

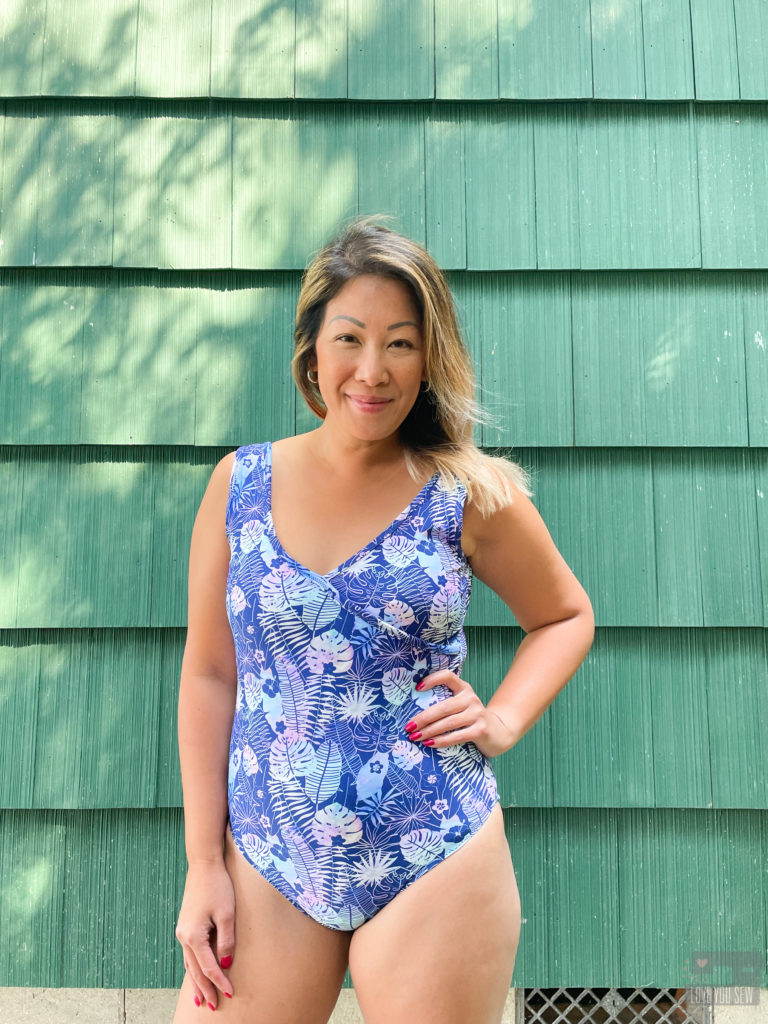
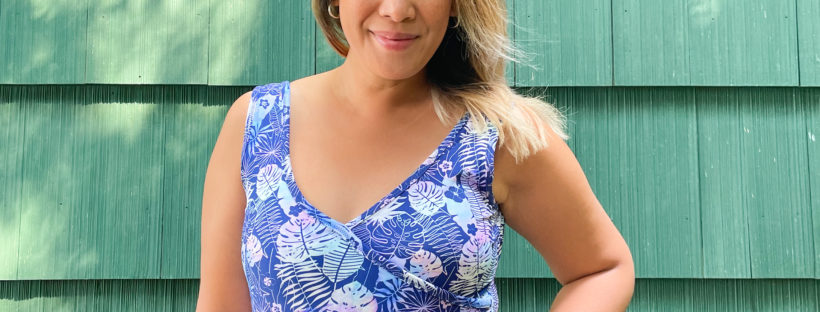
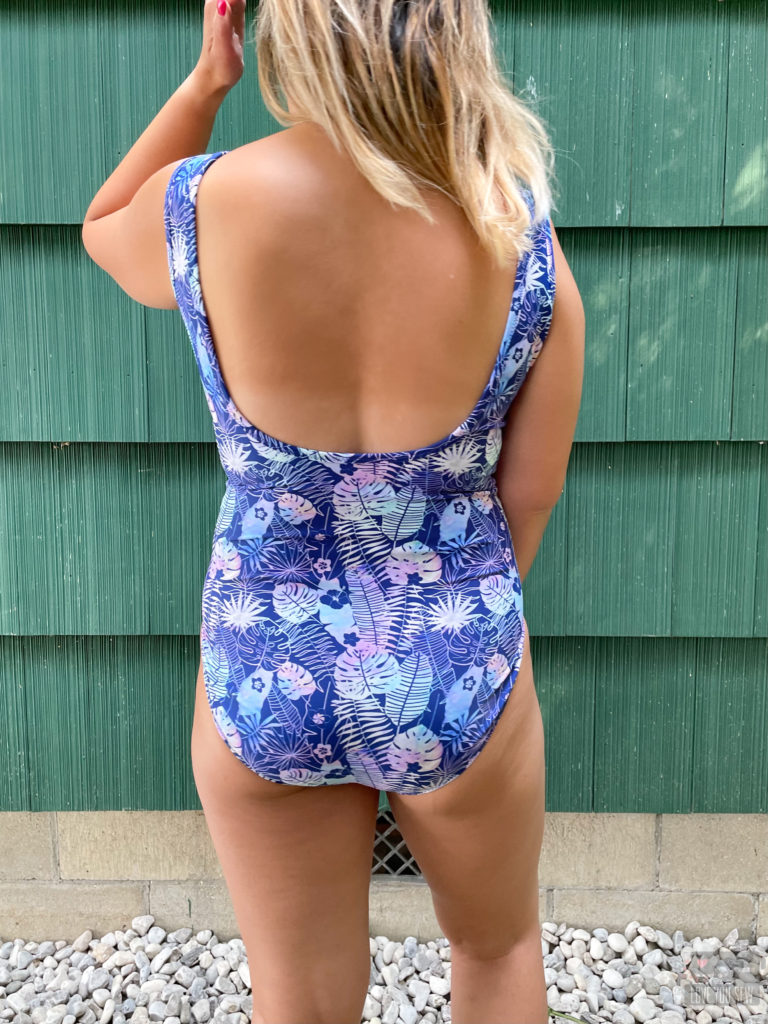
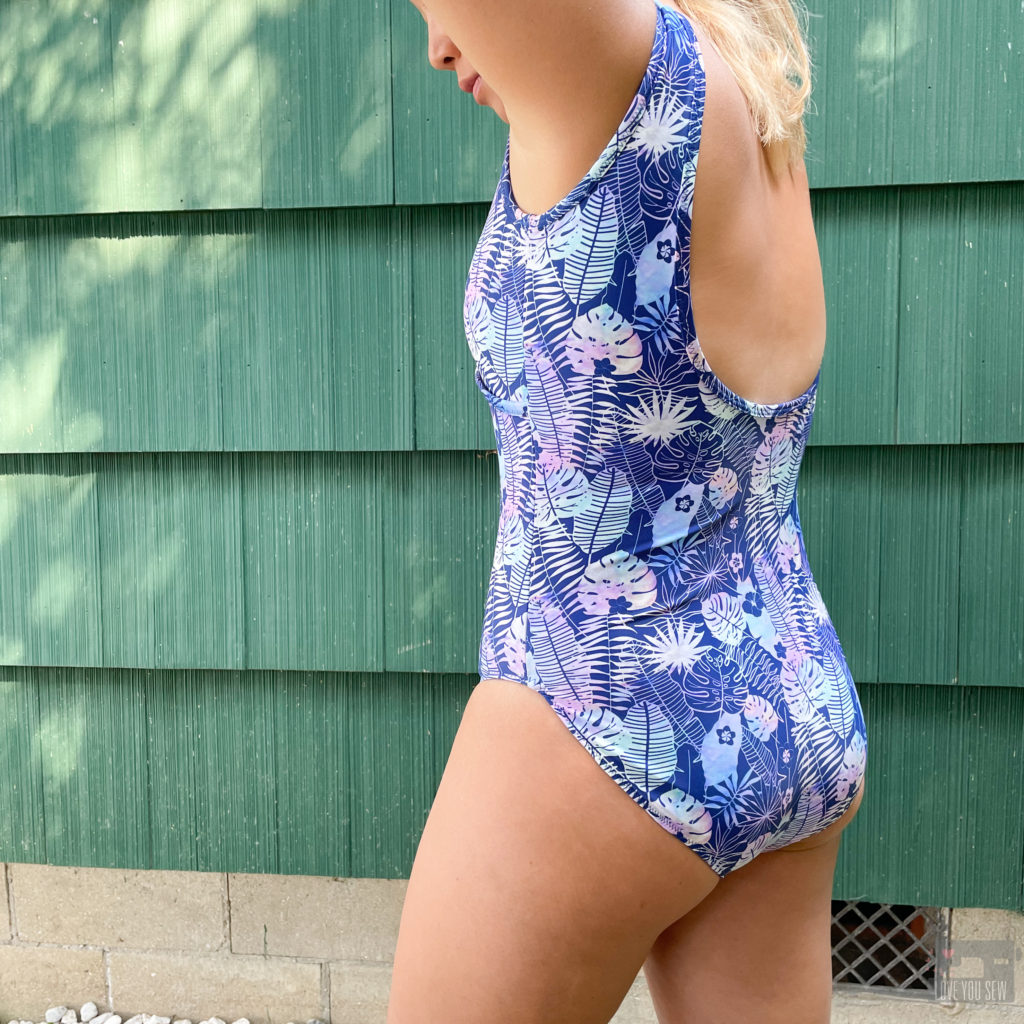
After having my babies, I mostly wear full bathing suits during the hot months.  It keeps me covered where I like to be covered, but still allows me to easily play and swim with my kids.  After finding the Violet Swimsuit by Laela Jeyne Patterns, I knew I wanted to try it out first with the plain V-neck (and then later with a ruffle.)  I used this suit as my wearable muslin/toile while I tried out this pattern for the very first time.

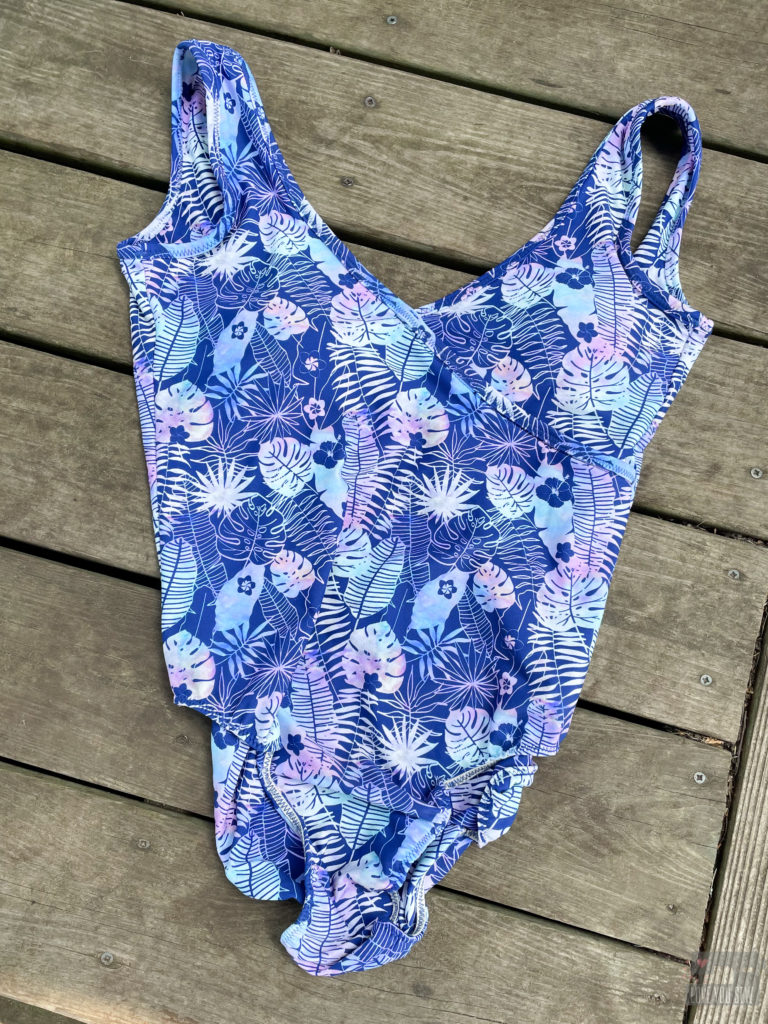
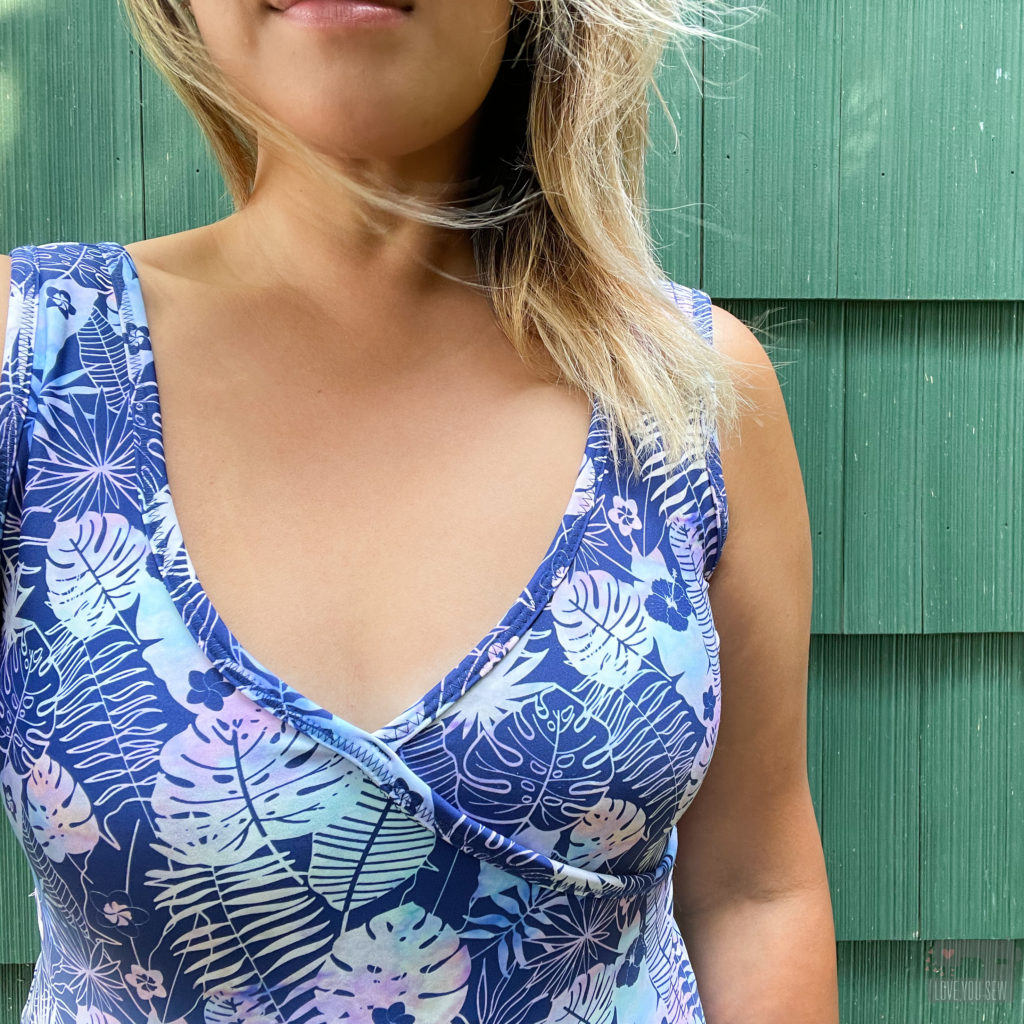
The Violet Swimsuit has two views featuring a faux crossover neckline with and without a ruffle.  There is also a cut out variation at the side of waistline for some extra style.  All edges are bound and the suit is fully lined.  You can select from a high or low scooped back and I opted for the lower style…Can you tell I don’t usually wear one with that tan line???  I love the construction technique for removable pads and love that this suit has different templates going from A-E cups.  The pattern fits up to a 49.5″ bust and up to a 47″ high hip.

Details and Modifications:

  • I measured 10 in the Bust and Waist; 12 in the Hips – graded out the pattern to fit
  • Used the same fabric as the lining
  • Raised each leg opening by 2″ – Since I’m short, I prefer suits to not cut off my leg at it’s widest point (making me look even shorter.)   So, I prefer a higher leg to give an illusion of extra length.
  • Added 1″ to each leg elastic since the leg opening was now larger
  • Increased the seam allowance  1/8″ at the shoulders and at the crotch for a more secure fit
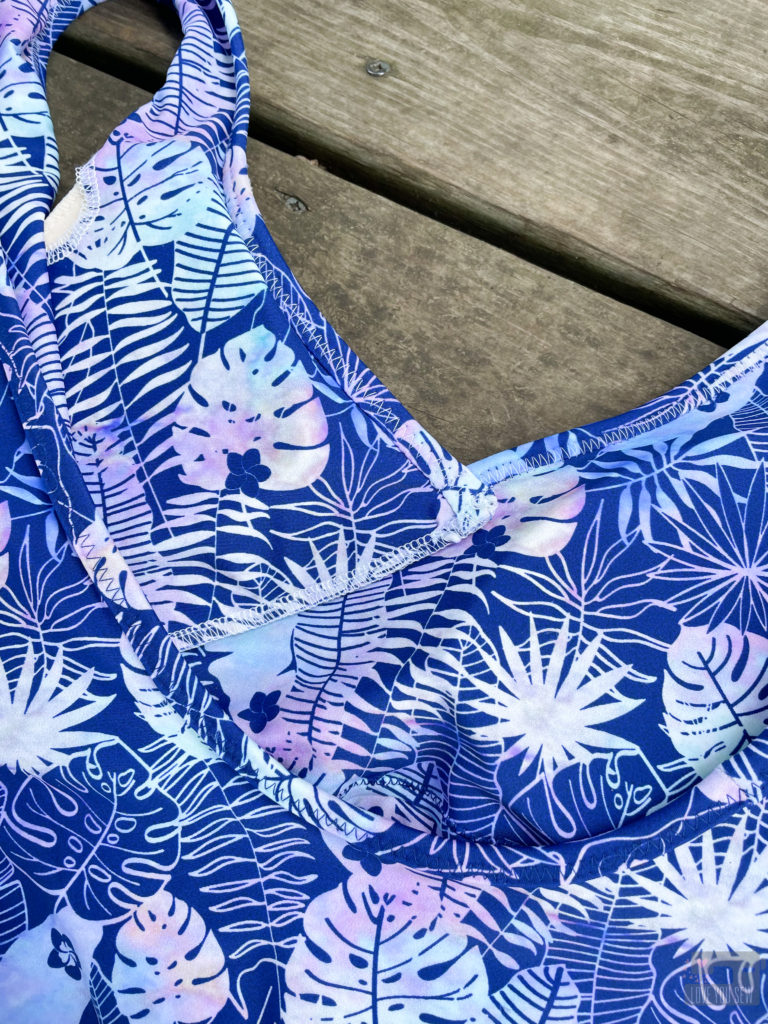
  • For the binding, I sew it to the lining side of the suit first and then flipped it over to the main fabric so I could better control the placement of the topstitch.
  • You will notice in the flat-lay of the suit that I inserted the elastic the wrong way but didn’t catch it until it was too late.  Instead of picking out the seams I let it be and the suit still wears wonderfully!

All of the other swimsuits I’ve made before used elastic to secure the edges and I was so happy to try out this binding method.  Like most suits, you do NOT need a coverstitch machine and can sew one with the basic stitches (and a ball-point needle!) on your domestic machine.  I used a zig-zag stitch and some washable Wonder Tape (aff link)  to help hold the binding evenly as sewed.  *’Just remember that you have to then wash the garment prior to the final fit since it inhibits the stretch.

The faux crossover feature of the suit does require top-stitching to hold it in place and I was pretty stoked to use my “lightning” stitch for the first time.  Yes, I do own a coverstitch, but I certainly don’t always want to spend the time setting it up for 8″ of stitching!  This is a great low-profile stretch stitch and I’m so pleased with how it looks and holds up.

Overall, I’m very pleased with this make.  The fabric and print are phenomenal and I appreciated the cool hand and quick drying after a long day on the lake with my kids.  With new makes, I appreciate lots of notches and that’s the one thing I wish the pattern had….especially with the binding not centered at the back as you would intuitively think would happen.  I also wish the pads sat more evenly in the suit, but once on, it does stay in place.  Buuuut, these little things won’t stop me from making another!  I’ll post up my ruffle version soon!  Have you made any new swimsuits this year?


Happy sewing!

Cristy


These fabrics were gifted to me by Pinecrest Fabrics in exchange for this blog post.  I purchased this pattern to use with the fabric.  All opinions are my own.  

There maybe affiliate links used in this post.  You can read about my disclosures here.


Erin Backpack Sew Along || Part 6: Final Bag Assembly

Welcome Back to the Erin Backpack Sew Along!  We are now at the FINISH —  Part 6: Final Bag Assembly!  If you missed any of the prior blog posts, you can find them below:

It’s now time to put the bag altogether and add all the dimension.  To make sewing a little easier, remove the sewing machine table to better maneuver the bag around the free arm.  Take time sewing even though the videos are short…most segments have been sped up 4x-6x the normal speed!

ASSEMBLE the exterior

To assemble the exterior part of the bag, click into the video above.  Note the following as you watch:

  • You can always unzip zipper to help ease the bag under the machine
  • Don’t be afraid to  use finger and arm muscles to keep thick layers together.  Move up to a larger needle, if needed
  • Backstitch well over pocket seams
  • Go back and stitch Y-seam corners, if needed.  I have to go back all the time!
  • With Main bottom, trimmed SA in half instead of notching due to thickness of canvas and foam.

ADD LINING To FINISH BAG

Items to note:

  • I added the Craft/Wonder tape to the Lining while it was free and unattached to the bag.  This makes it a little easier than waiting later as instructed in the pattern
  • Trim back any foam or fabric that maybe creating bulk, especially at the zipper ends.
  • When attaching the Lining, fold in the seam allowance  to see where placement should be BEFORE gluing.
  • Again, move slowly for even stitching around the zipper
  • If you are looking for the Jumbo Clips or thimble I use, you can find them on my >> Amazon Erin Backpack Supply List.

If you haven’t added the rivets onto the Back Strap Tabs, you can add them on now.  (I’ve decided to leave them off of my version.)


CONGRATULATIONS on your new Erin Backpack!  Make sure to post your pictures on Instagram using #ErinBackpackSewAlong #ErinBackpack and #LoveYouSewPatterns to win the prize pack!  Entries are open until the end of the month!

Thank you to everyone who has joined along for my very first sew along!  I’ve learned quite a bit about video editing while trying to provide you the right content to navigate through this pattern.  I hope you enjoyed it!  Let me know your thoughts in the comments.


Happy Stitching!

Cristy


This post may contain affiliate links.  Please read here for all of my Disclosures.

Erin Backpack Sew Along || Part 5: Make the Lining

Welcome Back to the Erin Backpack Sew Along!  We are now on Part 5: Make the Lining.  If you missed any of the prior blog posts, you can find them below:

With this part, we will tackle the entire lining and even assemble it!

Zipper pocket

The interior Welt Zipper Pocket is constructed the same way as the outside one, except without the Zipper Plate.  So, we don’t have to go through all of the steps again.  If you need a fresher, you can head back to Part 4.

With this pocket, there is no basting, just a regular topstitch to secure the zipper to the lining (as shown above.) .

For some more visual interest, you can always add another Zipper Plate or add in some rivets.  I placed one on with side of the zipper opening,  3/8″ from each end AFTER pocket has been closed up.  This helps add a little more security to the pocket lining.

You may have noticed that I added in a branding tag.  This is not apart of the instructions, so I skipped it in the video.  But if you would like to add one in this same spot, I sew the tag after finishing the Welt Zipper Pocket.  The leather stamped tags are from ViVi in Oz.

Slip Pocket, Elastic Pockets and assembly

The rest of the Lining construction and assembly can be found in the video above.  You can view the different sections timestamped as follows:

  • Slip Pocket  (00:10)
  • Elastic Pockets (01:35 )
  • Accessory Strap (04:25)
  • Key Fob (04:58)
  • Assembly (05: 06)

Items to note:

  • You can get extra hardware help by clicking on these posts -> Rivets  -> Spring Snaps
  • May need to adjust the length of elastic based on what type/style you are using.  You want to have enough pulled in so that the Elastic pocket is bunched up enough to equal the length of the Front Lining.
  • DON’T skip the 2nd line of baste stitching for the gathering.  It makes life MUCH easier –especially when trying to gather stiffened fabric from the interfacing.
  • If you would like to take the option of adding rivets to the Elastic Pockets, make sure to NOT punch the holes directly on a seam.
  • Yes, the Front Lining IS suppose to be shorter than the Back Lining.  This takes the width of the zipper into account and incorporates it as part of the backpack’s front wall.


Can you taste the finish?  The very last of the Erin Backpack sew along comes later this week, Part 6:  Final Assembly.  I hope you have been enjoying the process.  Don’t forget to use #erinbackpack #erinbackpacksewalong and #loveyousewpatterns on Social Media!  I’m so excited to see your finished bags!


Hugs and Stitches,

Cristy


Erin Backpack Sew Along || Part 4: Create the Front Panel

Welcome Back to the Erin Backpack Sew Along!  We are now on Part 4: Create the Front Panel.  If you missed any of the prior blog posts, you can find them below:


With this part,  we are tackling the entire Front Panel with four different pockets. It seems overwhelming, but I’ve broken down all the pockets into 4 different short videos so you can work at your own pace.


WELT Zipper POCKET

At this point, the Front Panel is the only pattern piece left that hasn’t been basted to foam. This is added later because creating the Front Welt Pocket through foam would produce so much bulk and be very difficult to work with.  I love all of you too much to put you through the extra wrestling and time spent trimming back foam! Ha!

I know you will ask me about the zipper pulls used on my bag 😉 These zippers are from MyHandmadeSpace and yes, I made the tabs myself!  They are approximately 3/8″ x 4″ folded in half and secured with a seam straight up the center.  I added a rivet to balance out the look with the rest of my bag.  These are SUCH a great option to really personalize your bag.  I’m so glad I bought them as a stash option!

Now let’s get to work.  Click into the video about to watch how the Welt Zipper Pocket is created.  Please note the following from the video:

  • I am using “Craft” Tape as an alternative to Wonder Tape. This is only 1/8″ wide, but is permanent.  With the coating on the canvas, I wanted to use a tape that was a little stronger than Wonder Tape. So, to avoid human error, I like to add this directly to the zipper tape first, and not to the lining.
  • While adding on the Zipper Plate, I used glue instead of Wonder Tape.  Again, I was looking for something stronger I could sew through and unfortunately, Craft Tape cannot be sewn through. (Your needle would gum up.)
  • I’m adding the rivets earlier than the instructions.  I don’t know why….but I started going by memory without checking instructions and went out of order. (This is what I get for not checking!) There is not a huge difference if you add them before closing the pocket lining or waiting until after the foam is basted on.  Per the instruction, my intent to add them post foam, was to have extra anchor points against the foam to keep it from separating with the Front Panel.  But there are many other points anchoring the foam to the main fabric with the rest of the pockets and Front Strap Tabs.

TIP: When I sew through an accent fabric and want to minimize punctures, I like to pull the threads through for a clean continuous line of stitches.  However, from the back, I don’t want the threads just hanging inside.  So, I knot the threads and use a light dab of glue to seal them against the fabric.  I like to leave the tails long so that they will be sewn into the pocket later on.


SIDE ELASTIC POCKETS

With untreated fabric, interfacing would’ve been fused to the part of the Elastic Side Pocket facing the bag, as seen above on the left.  But, since I’m using a heavy treated fabric, I cannot add heat and fuse to it.  So you will see there is no interfacing to indicate the wrong side of the fabric in the video below.

Click the video to watch how to make and attach the Elastic Side Pockets.  Please note the following:

  • For extra durability, I demonstrate how to sew the pocket with an extra triangle at the top of the seam. This helps reinforce that area since it will be pulled on heavily.
  • The size of the rivet used in the triangle has a 6mm cap and is not included in my hardware kit. I thought I would just make it a little different as to not compete with the added embellishment.  This is the same size I use on the zipper pulls as well
  • As an option, you can add in accent fabric with rivets as extra way to highlight pockets. It was an afterthought when making my waxed canvas sample seen here, but I wanted to show you the steps just in case you wanted to add them as well!


POP-OUT POCKET

If I am in a clothing store, I will always take a look at it’s bag section.  I like to see what’s popular and if there are any outstanding features.  Well, I saw a 3-D pocket similar to this one that I was determined to figure out on my own because I thought it was a unique way to create one.  With a home machine, my design had to be changed, but the essence is there.   Now, I get to share with all of you how figured out this pocket construction for my bag-makers!

Please click into the video above to view and note the following:

  • When finishing the edge of the Zipper (that’s sewn directly to the Front Panel,) can just zig-zag along the zipper tabs.  But since I primarily work on a straight stitch machine, it would require me to set up a machine.  With the content being so heavy this week, I went with the serger that sits right next to my regular machine.
  • When attaching the Zipper to the Front Panel, I switched feet on the second seam to get a little  closer to the teeth and clear the overlock stitching
  • During the filming, I lost a few segments when attaching the sides down to the Front Panel.  I had to re-film those parts, but the Front Panel was already completed. So you will see that there are no hanging bits of fabric as part if the instructions.  You might  even see some of the Front Strap Tabs.


FRONT STRAP TABS

These Front Strap Tabs are for the cross-body and shoulder carrying options.  So all the weight of the bag will be on these spots.  That is why there is so much reinforcement stitching, as well as the added rivets.  You don’t want these ripping out later, so take your time on every stitch!

Click into the video above to watch hoe to attach the Front Strap Tabs and note the following:

  • I work with both my Teflon and Zipper Feet.  I don’t call out the changes, but you can see them in the video
  • For a clean finish, I always like to leave long thread tails and pull them to the back.  With several knots and a dab of glue, those seams will hold just as well as several back-stitches.

Although a hardware press is a great tool, this is one case when a manual setting tool is better than a press.  The dies require at least an 1/8″ clearance around the rivet caps whereas you hardly need any clearance with the tool seen above.  There are some projects where there isn’t enough throat space with a press to install as well.  So don’t ever get rid of those setting tools!

CONGRATULATIONS on finishing this Part 4 beast!  You are more than half-way done now and doing great!  Check back next week for Part 5: Making the Lining.


Happy Sewing!

Cristy


Please note, this post contains affiliate links.  Please refer to my Disclosures for additional information.

Hardware || Install Double-Cap Spring Snaps by Hand

Installing snaps by hand isn’t as hard as it looks! The Double-Cap Spring style snaps are my personal favorite for bag-making and for garments. I’ve tried many different kinds of snaps over the years, including plastic KAM style ones for baby accessories and then Ring Style ones for bags.   Out of all the ones I’ve tried,  I think these Doubled-Cap Spring snaps are the most forgiving with manual setting tools and produce the BEST results with minimum investment.  Check out my video tutorial below to see how easy it really is!!!

I love using these snaps in my patterns like The Tiny Sophia Bag (shown above,) the Megan Bucket Bag and the Erin Backpack.  You can also use these in shirts like my Holly Jumpsuit, and in jackets, like with my Kelly Anorak.

Materials needed:

  • Your project!
  • Double-Cap snaps – 12.5 mm/20 : These are my preferred size to handle most of my needs and I personally like the Double-Cap for extra strength even though they are slightly more expensive than the single cap style.
  • Setting Tool Set (use “633” tools for 12.5 mm snaps) – For the price, I bought this whole set on the off-chance I would need other size tools for future snaps.  They have held up well so far with lots of use
  • Punch Pliers – These are my preferred style with the ability to change hole sizes and punch to either a rubber or metal bed.
  • Jeweler’s Bench – This tool maybe underrated, but this is actually key in getting a nice firm hardware install
  • Hammer – Everyone has one at home and with all my bag and garment making, I had to get one specifically for the sewing room so my husband wouldn’t have to keep looking for the one from our toolbox!


Tutorial:

Click into the video above to watch the entire snap installation process.  As with anything new you learn, make sure to practice before moving onto your actual process.  You’ll get a feel for the swing of the hammer and how much pressure is needed for the posts to attach to either the stud of the socket.

Even though I do own a hardware press along with the right dies for these snaps. many times, I’ll still go the manual route.  Sometimes, it’s just  a little bit quicker when I just need one or two snaps installed.  The application is more forgiving, and that’s what I appreciate versus other snaps which have to be SO perfect to work….ugh….

These snaps are paired correctly going from left to right [Stud Post + Stud] [Socket Cap + socket]

After watching the video, take note of these TIPS as well to help:

  • With Double-Cap Spring Snaps, the caps can be confusing to figure out.  But you will see that only one post can fit through the socket.  Make sure you pair those together.  The remaining cap will then be paired to the socket
  • Use a solid work surface like a thick sturdy table
  • Work at natural waist height – when a project is on the ground, the swing of the hammer is thrown off and can lead to angled application
  • Again, practice, practice, practice!!!


I hope this helps to alleviate your anxieties around hardware snaps.  Once you assemble a few, you’ll be an expert in no time!  In just a few weeks, I’ll also share my hardware press details 😉


Enjoy hammering away!

Cristy


This post may contain affiliate links which help keep this website running .  For my full affiliate Disclosure, click here.