Observer Fabrics Preview

ObserverPreviewTitle

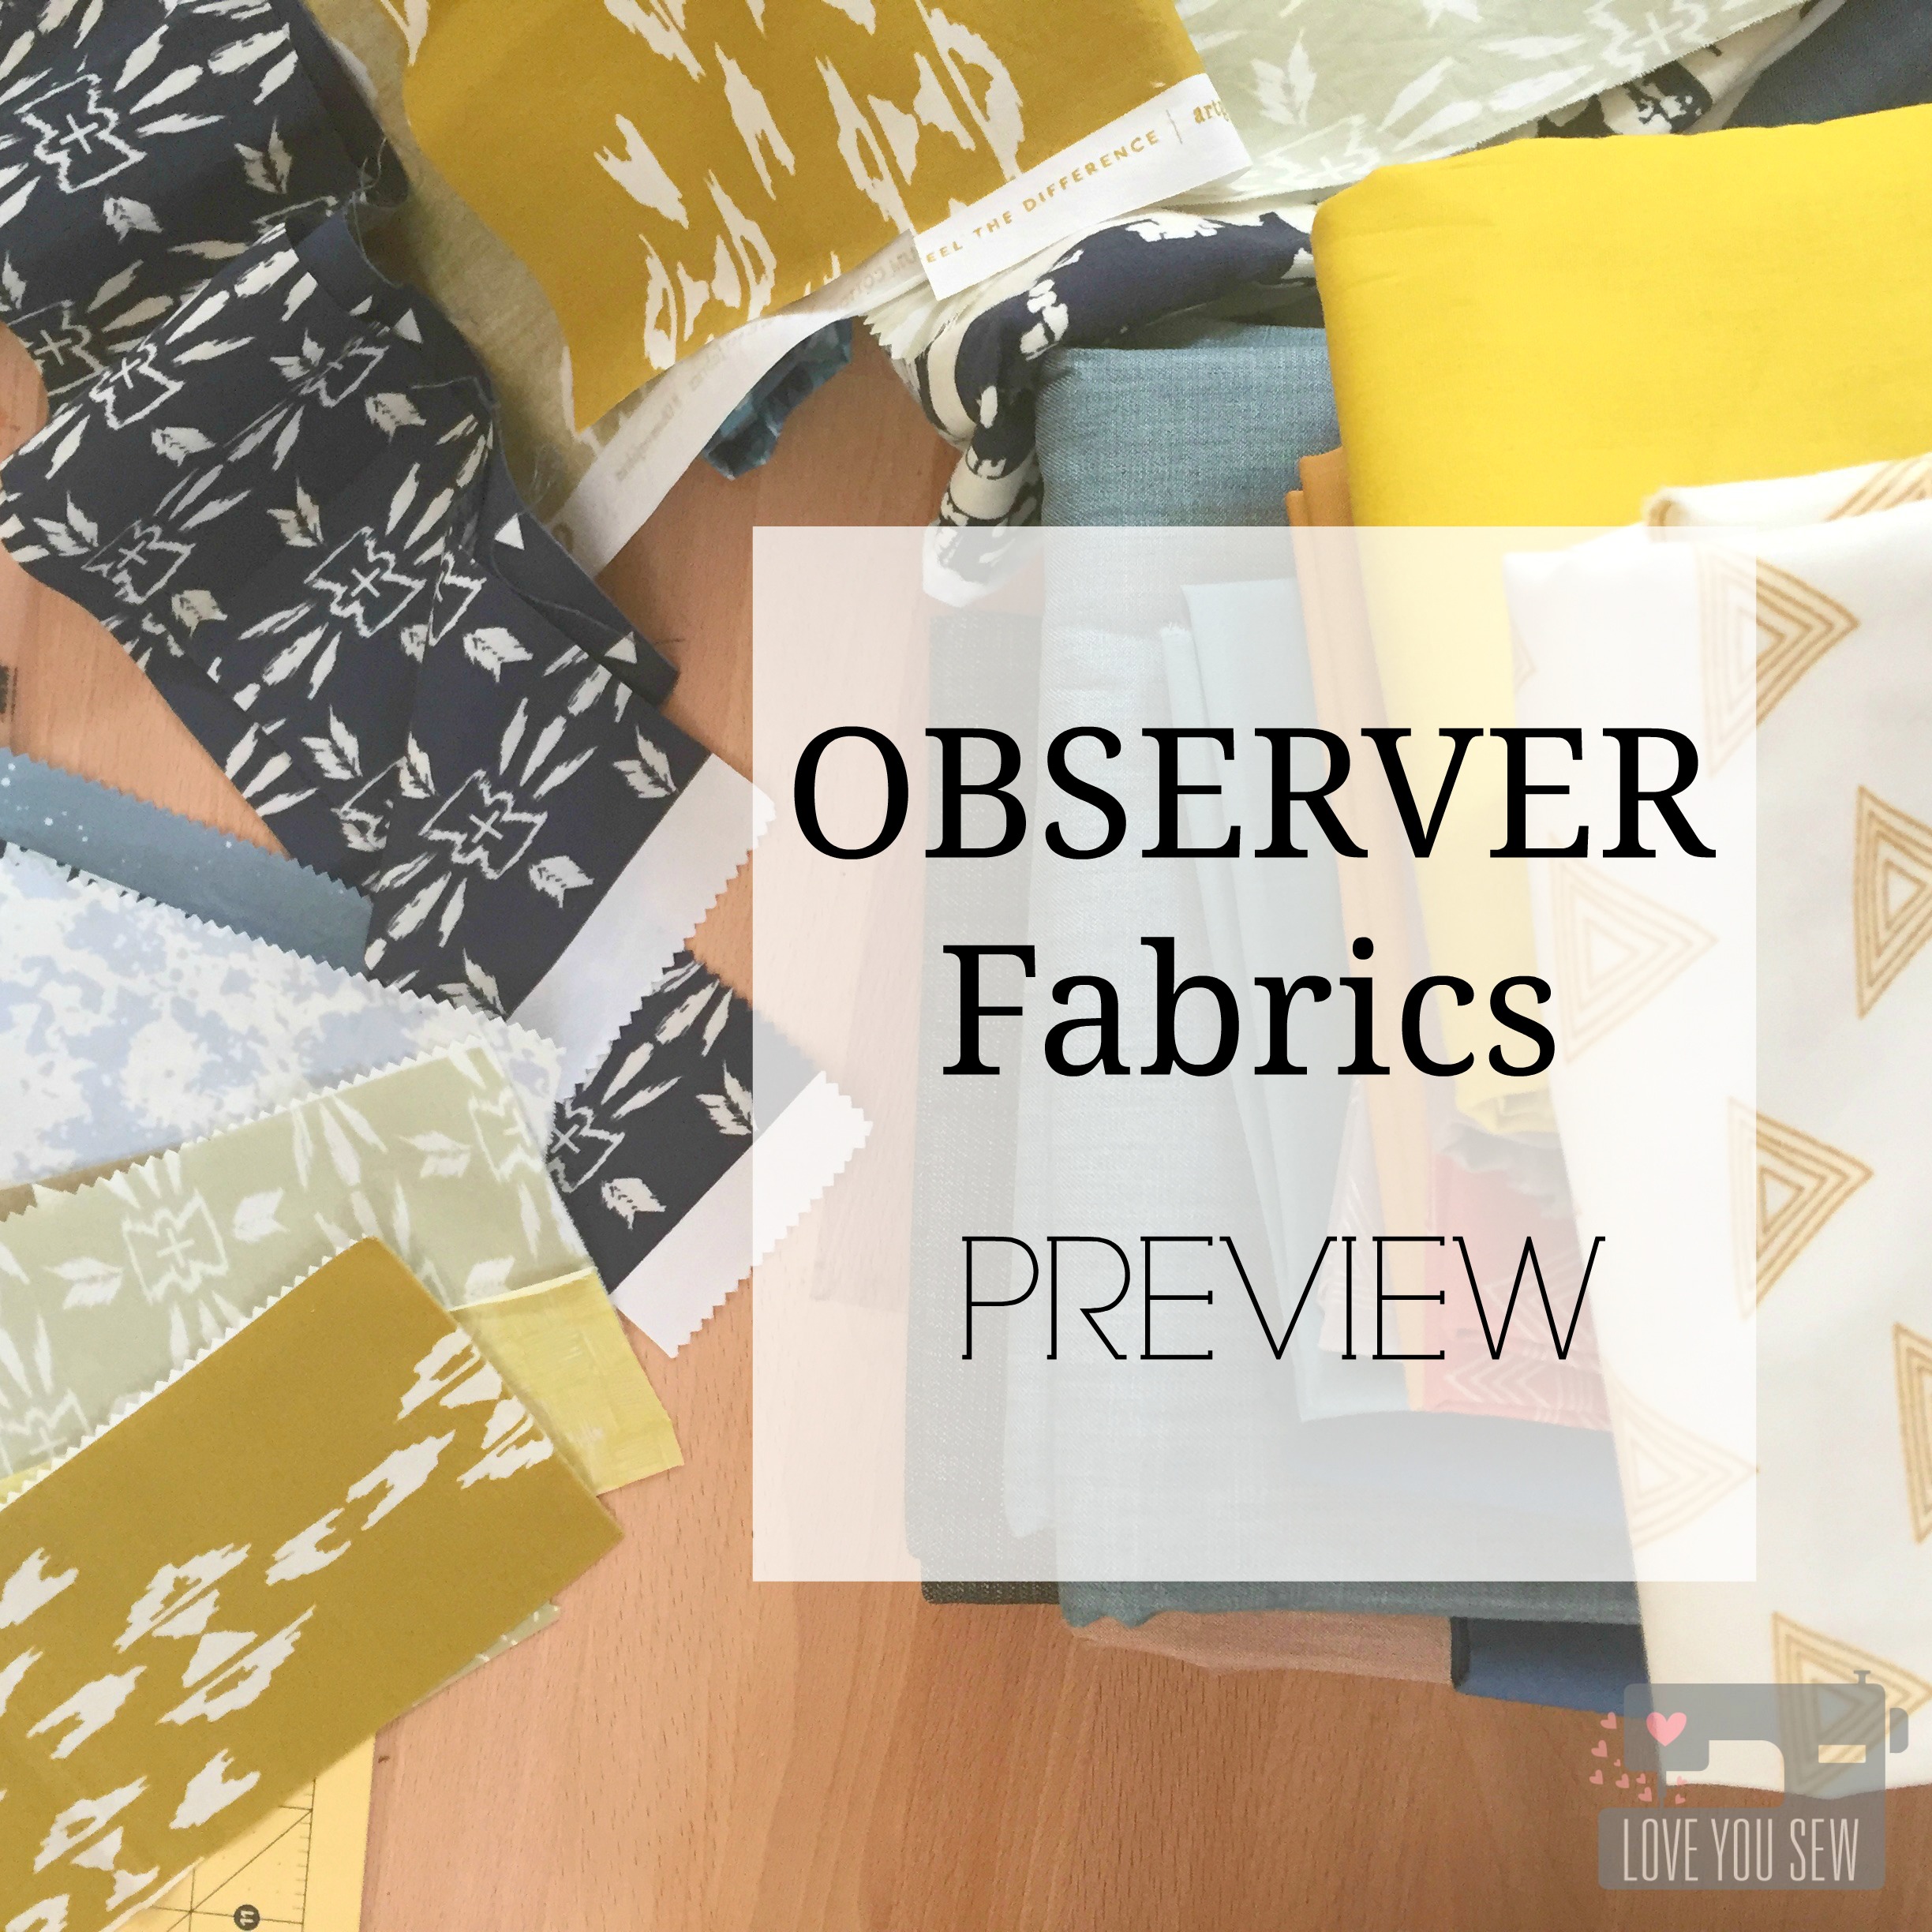
Have you ever seen something out in the wild, and wondered how pretty it would be to freeze that shot and frame it forever?  It’s that moment that is just SO good, you take in that extra long gaze and lose yourself a little…  Well when you’re April Rhodes, you take that extra step into permanence and create Observer fabrics.  It’s a collection of patterns seen out in the world…through the eyes of Miss April, herself.

IMG_4615

It is such an honor to sew with an unreleased collection.  The initial reveal is always exciting, but I love to hear about the inspiration.  That’s why it’s so wonderful to work with April…as we collaborate together, I get to hear the story behind every pattern and every color.  With all of that information, it then allows me to dig a bit deeper in my design wheel well.

IMG_4716

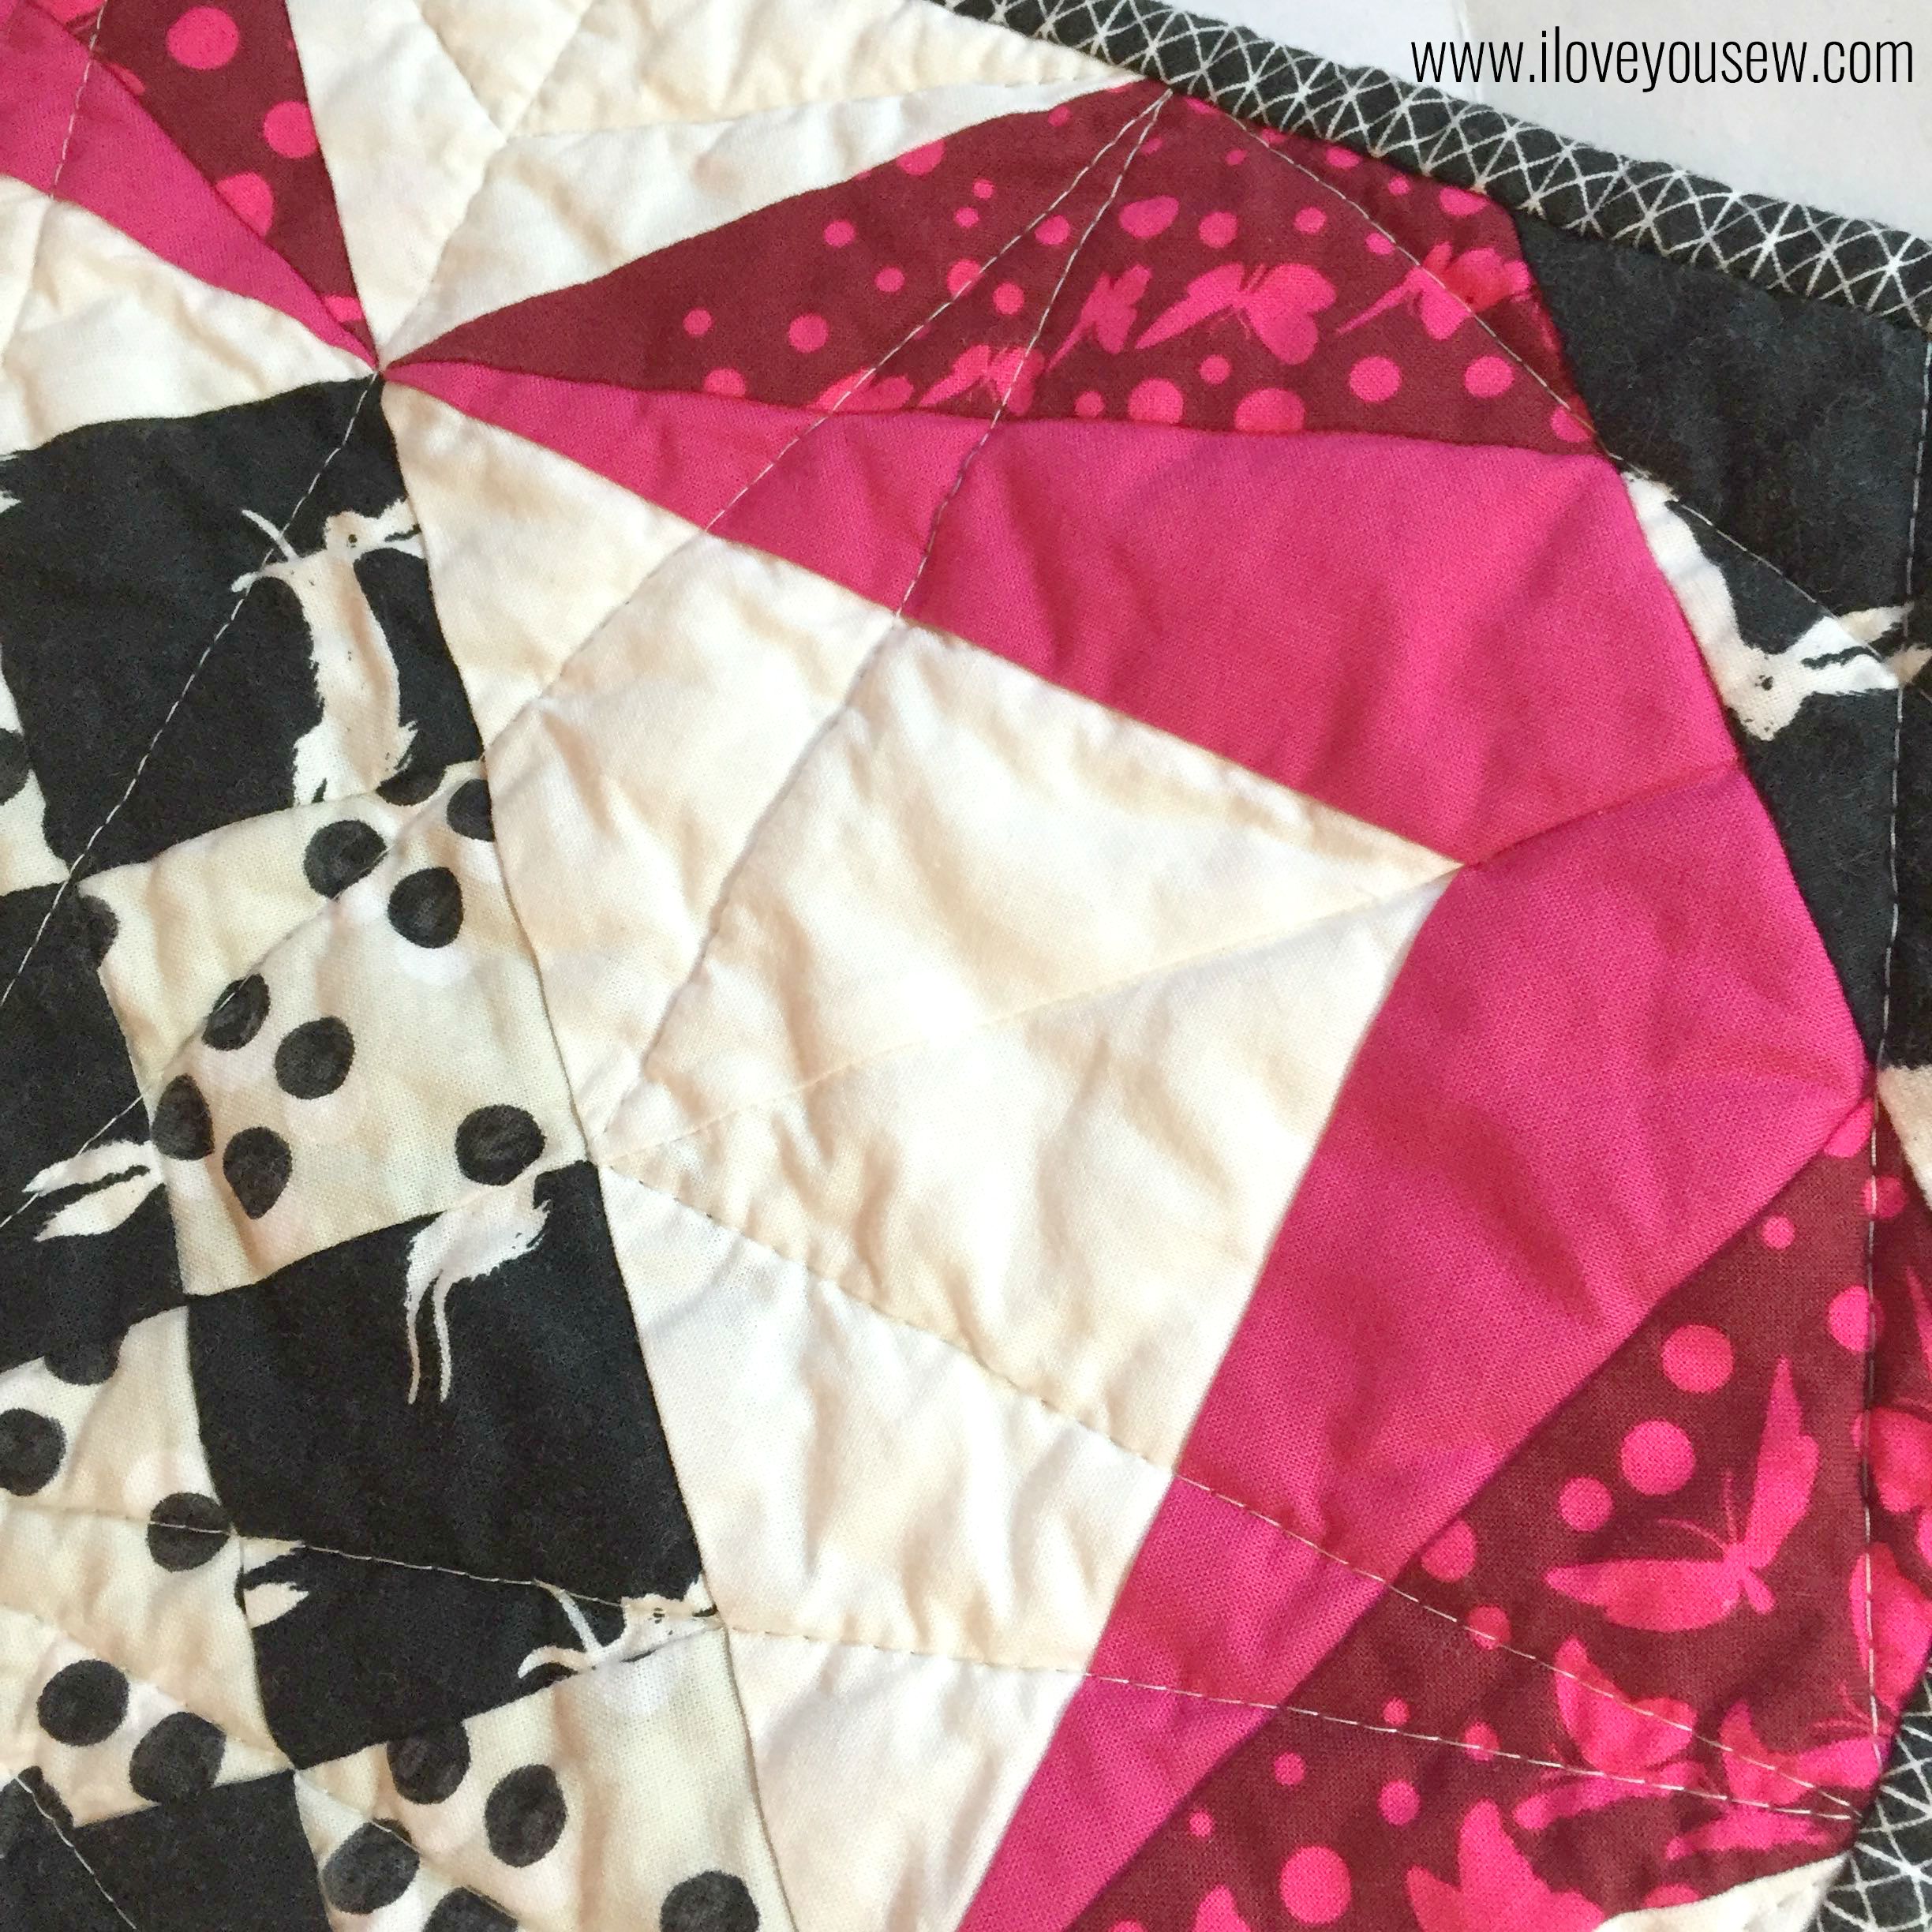
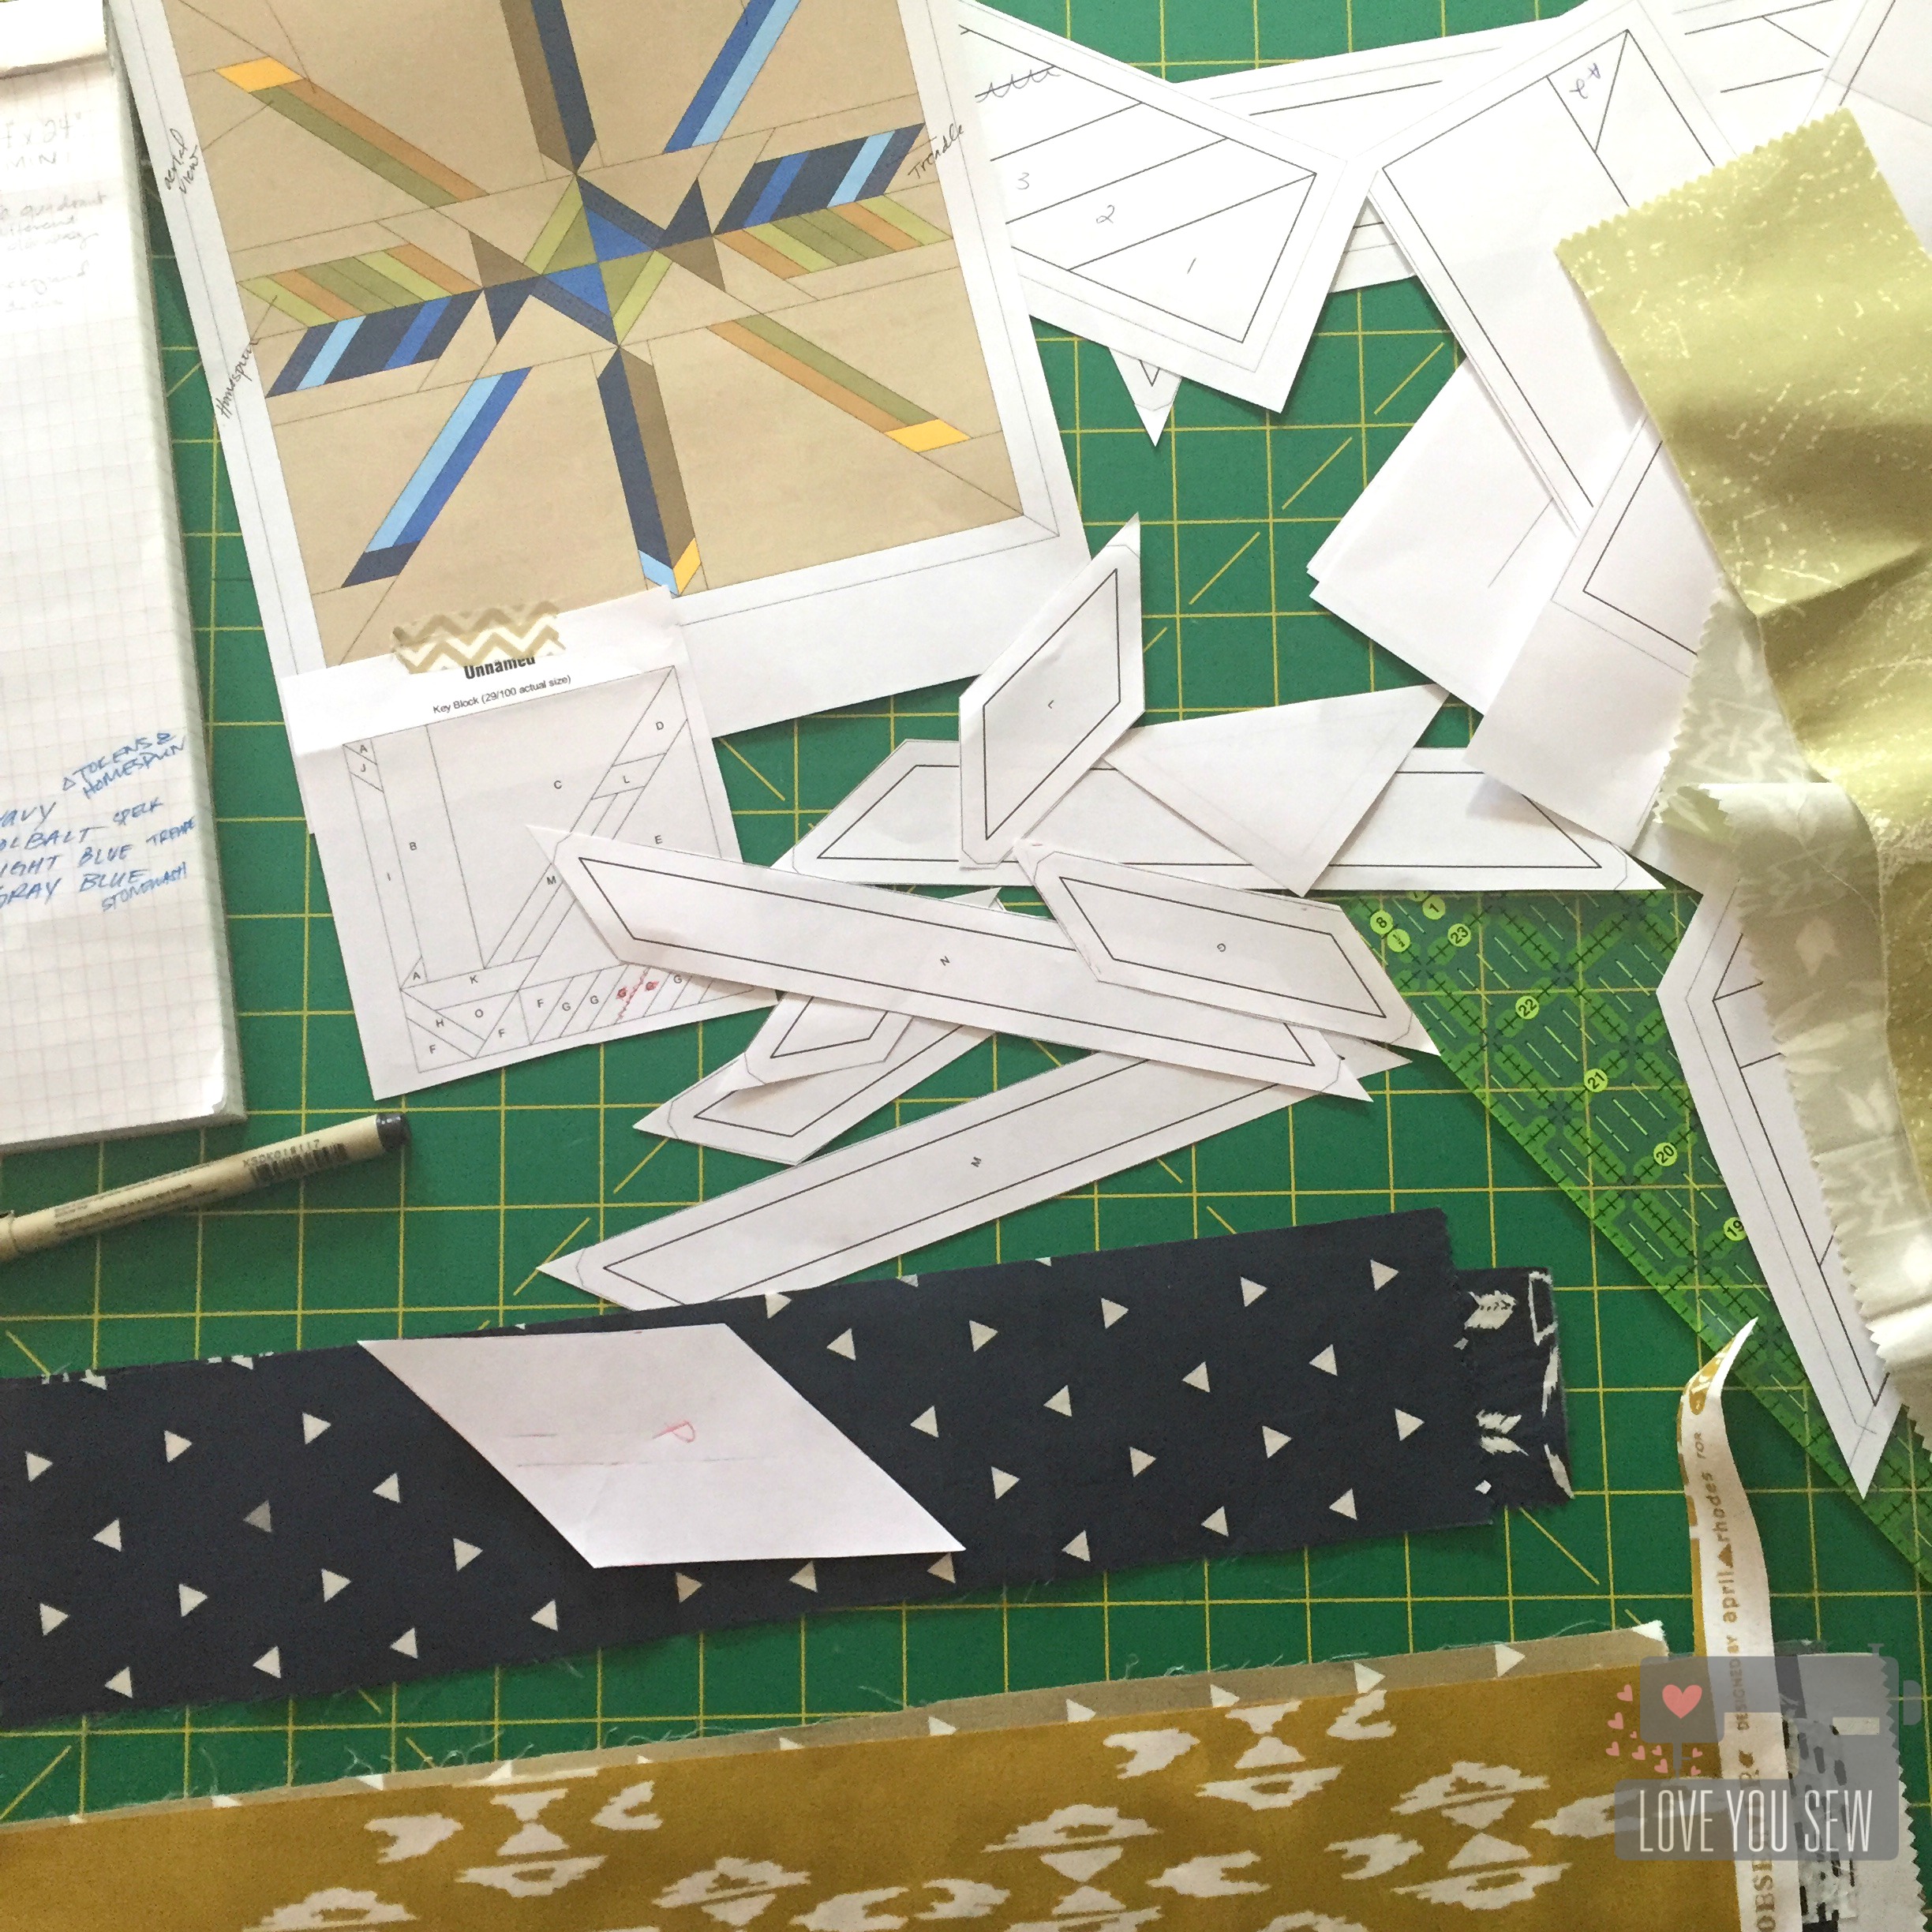
I was immediately inspired by the Homespun print.  It is based off of April’s love of weaving and fiber arts.  The 24″ x 24″ (finished) quilt is paper-pieced  to make every angle and line as sharp as can be. It utilizes mainly 1.5″ strips, making it very scrap friendly.

IMG_4656

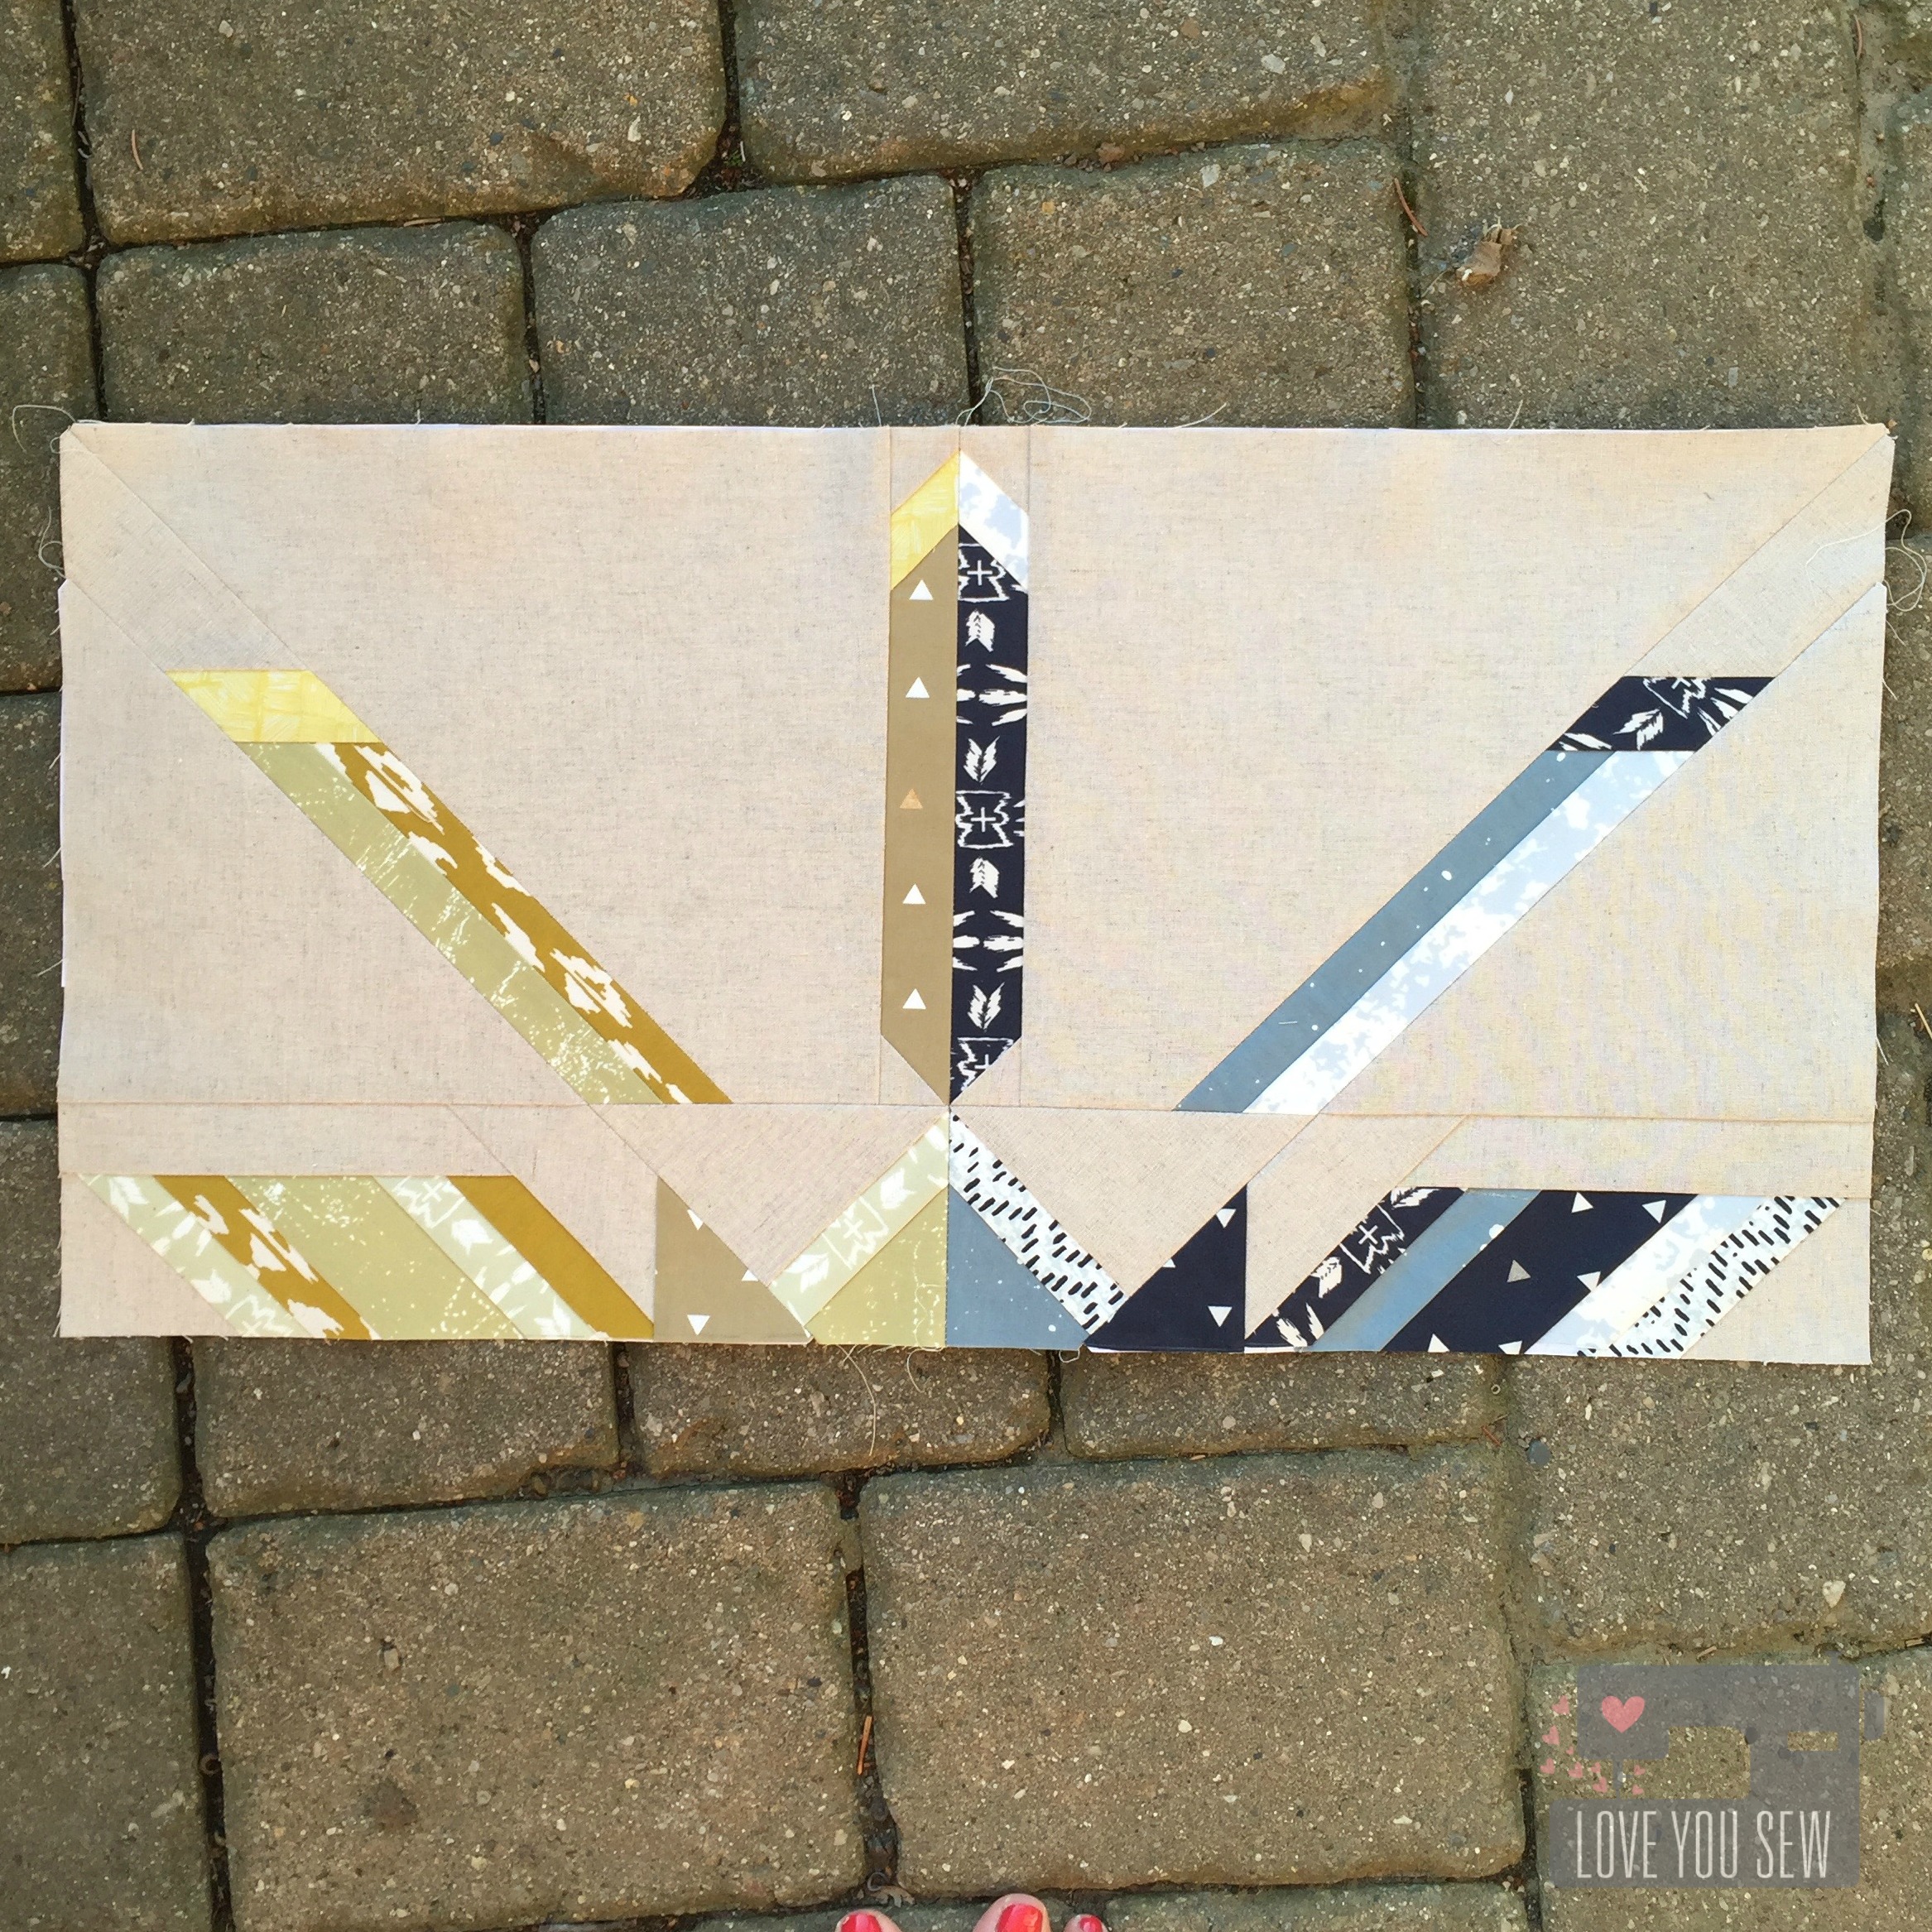
With Observer, the prints are either monochromatic or duotone and this quilt was designed to really show off the contrast by using the colorways, exclusively, in each quadrant.

IMG_4655

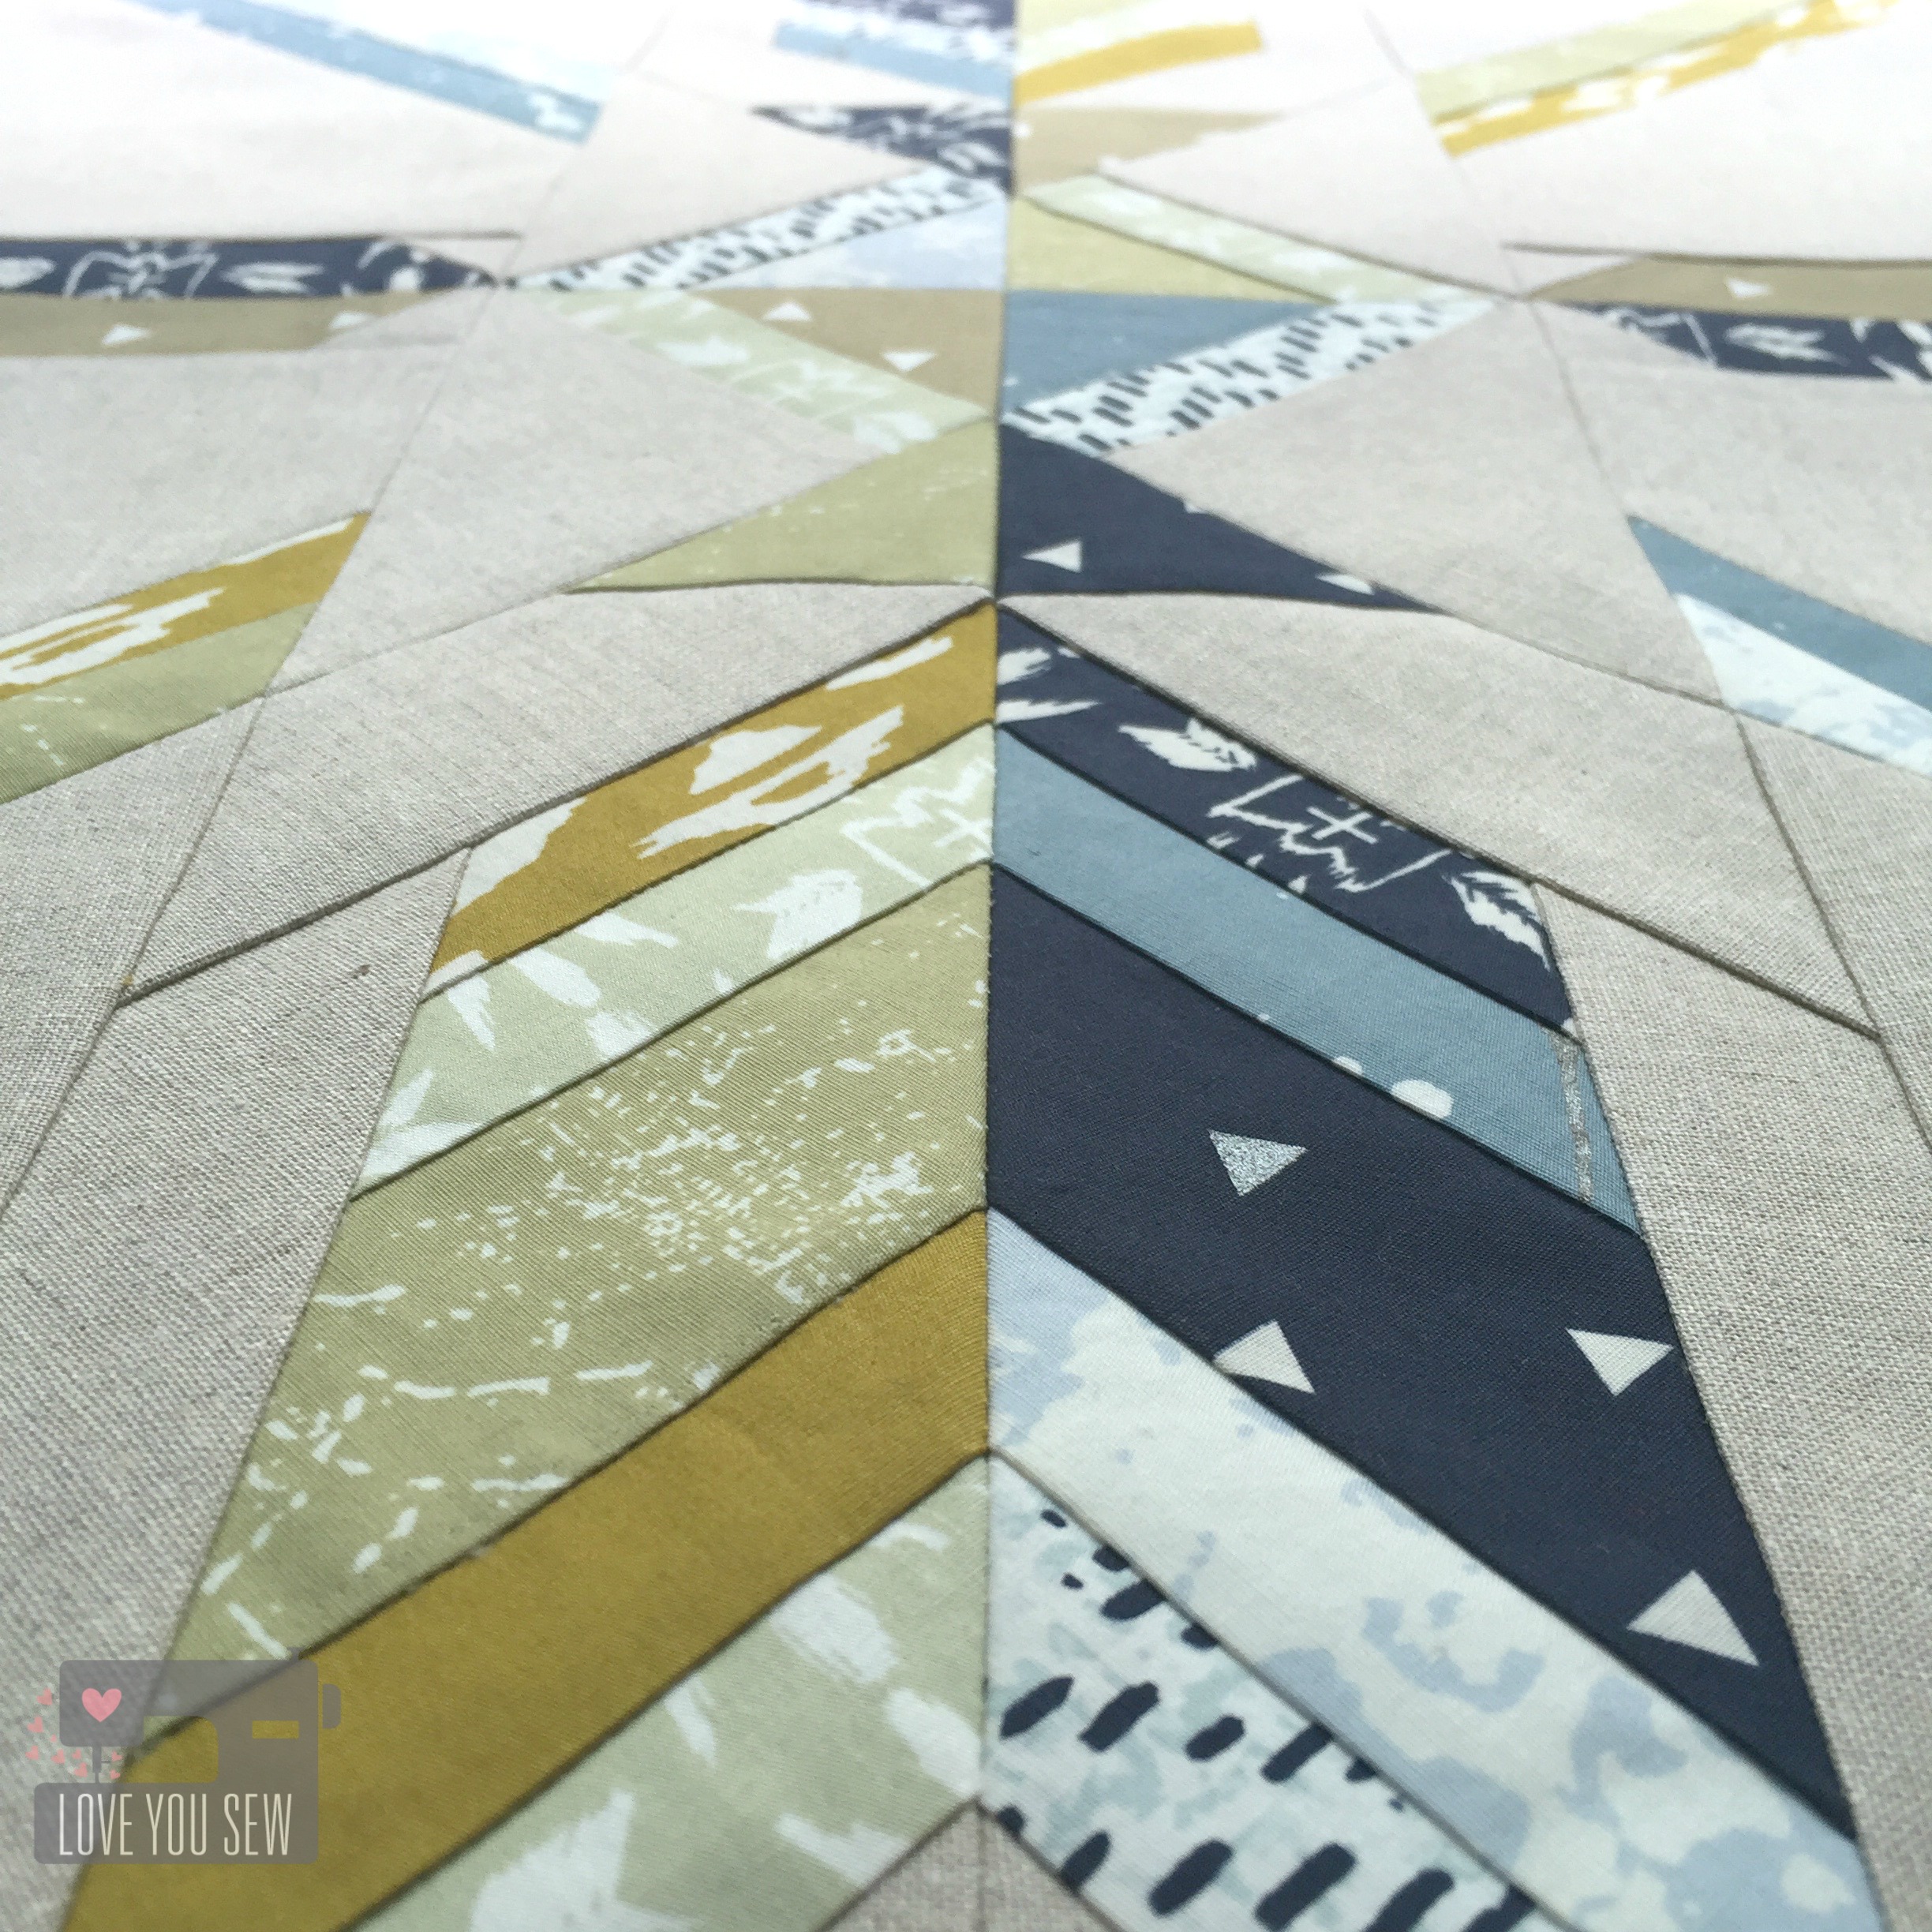
As you get closer to the fabrics, you can see the little hints of metallic (yaaas!)  With this collection, April incorporated silver which looks amazing against the deep blues.  It’s always hard to photograph metallic, but you can see it in Triangle Tokens and on the Speck Stardust.

IMG_4930

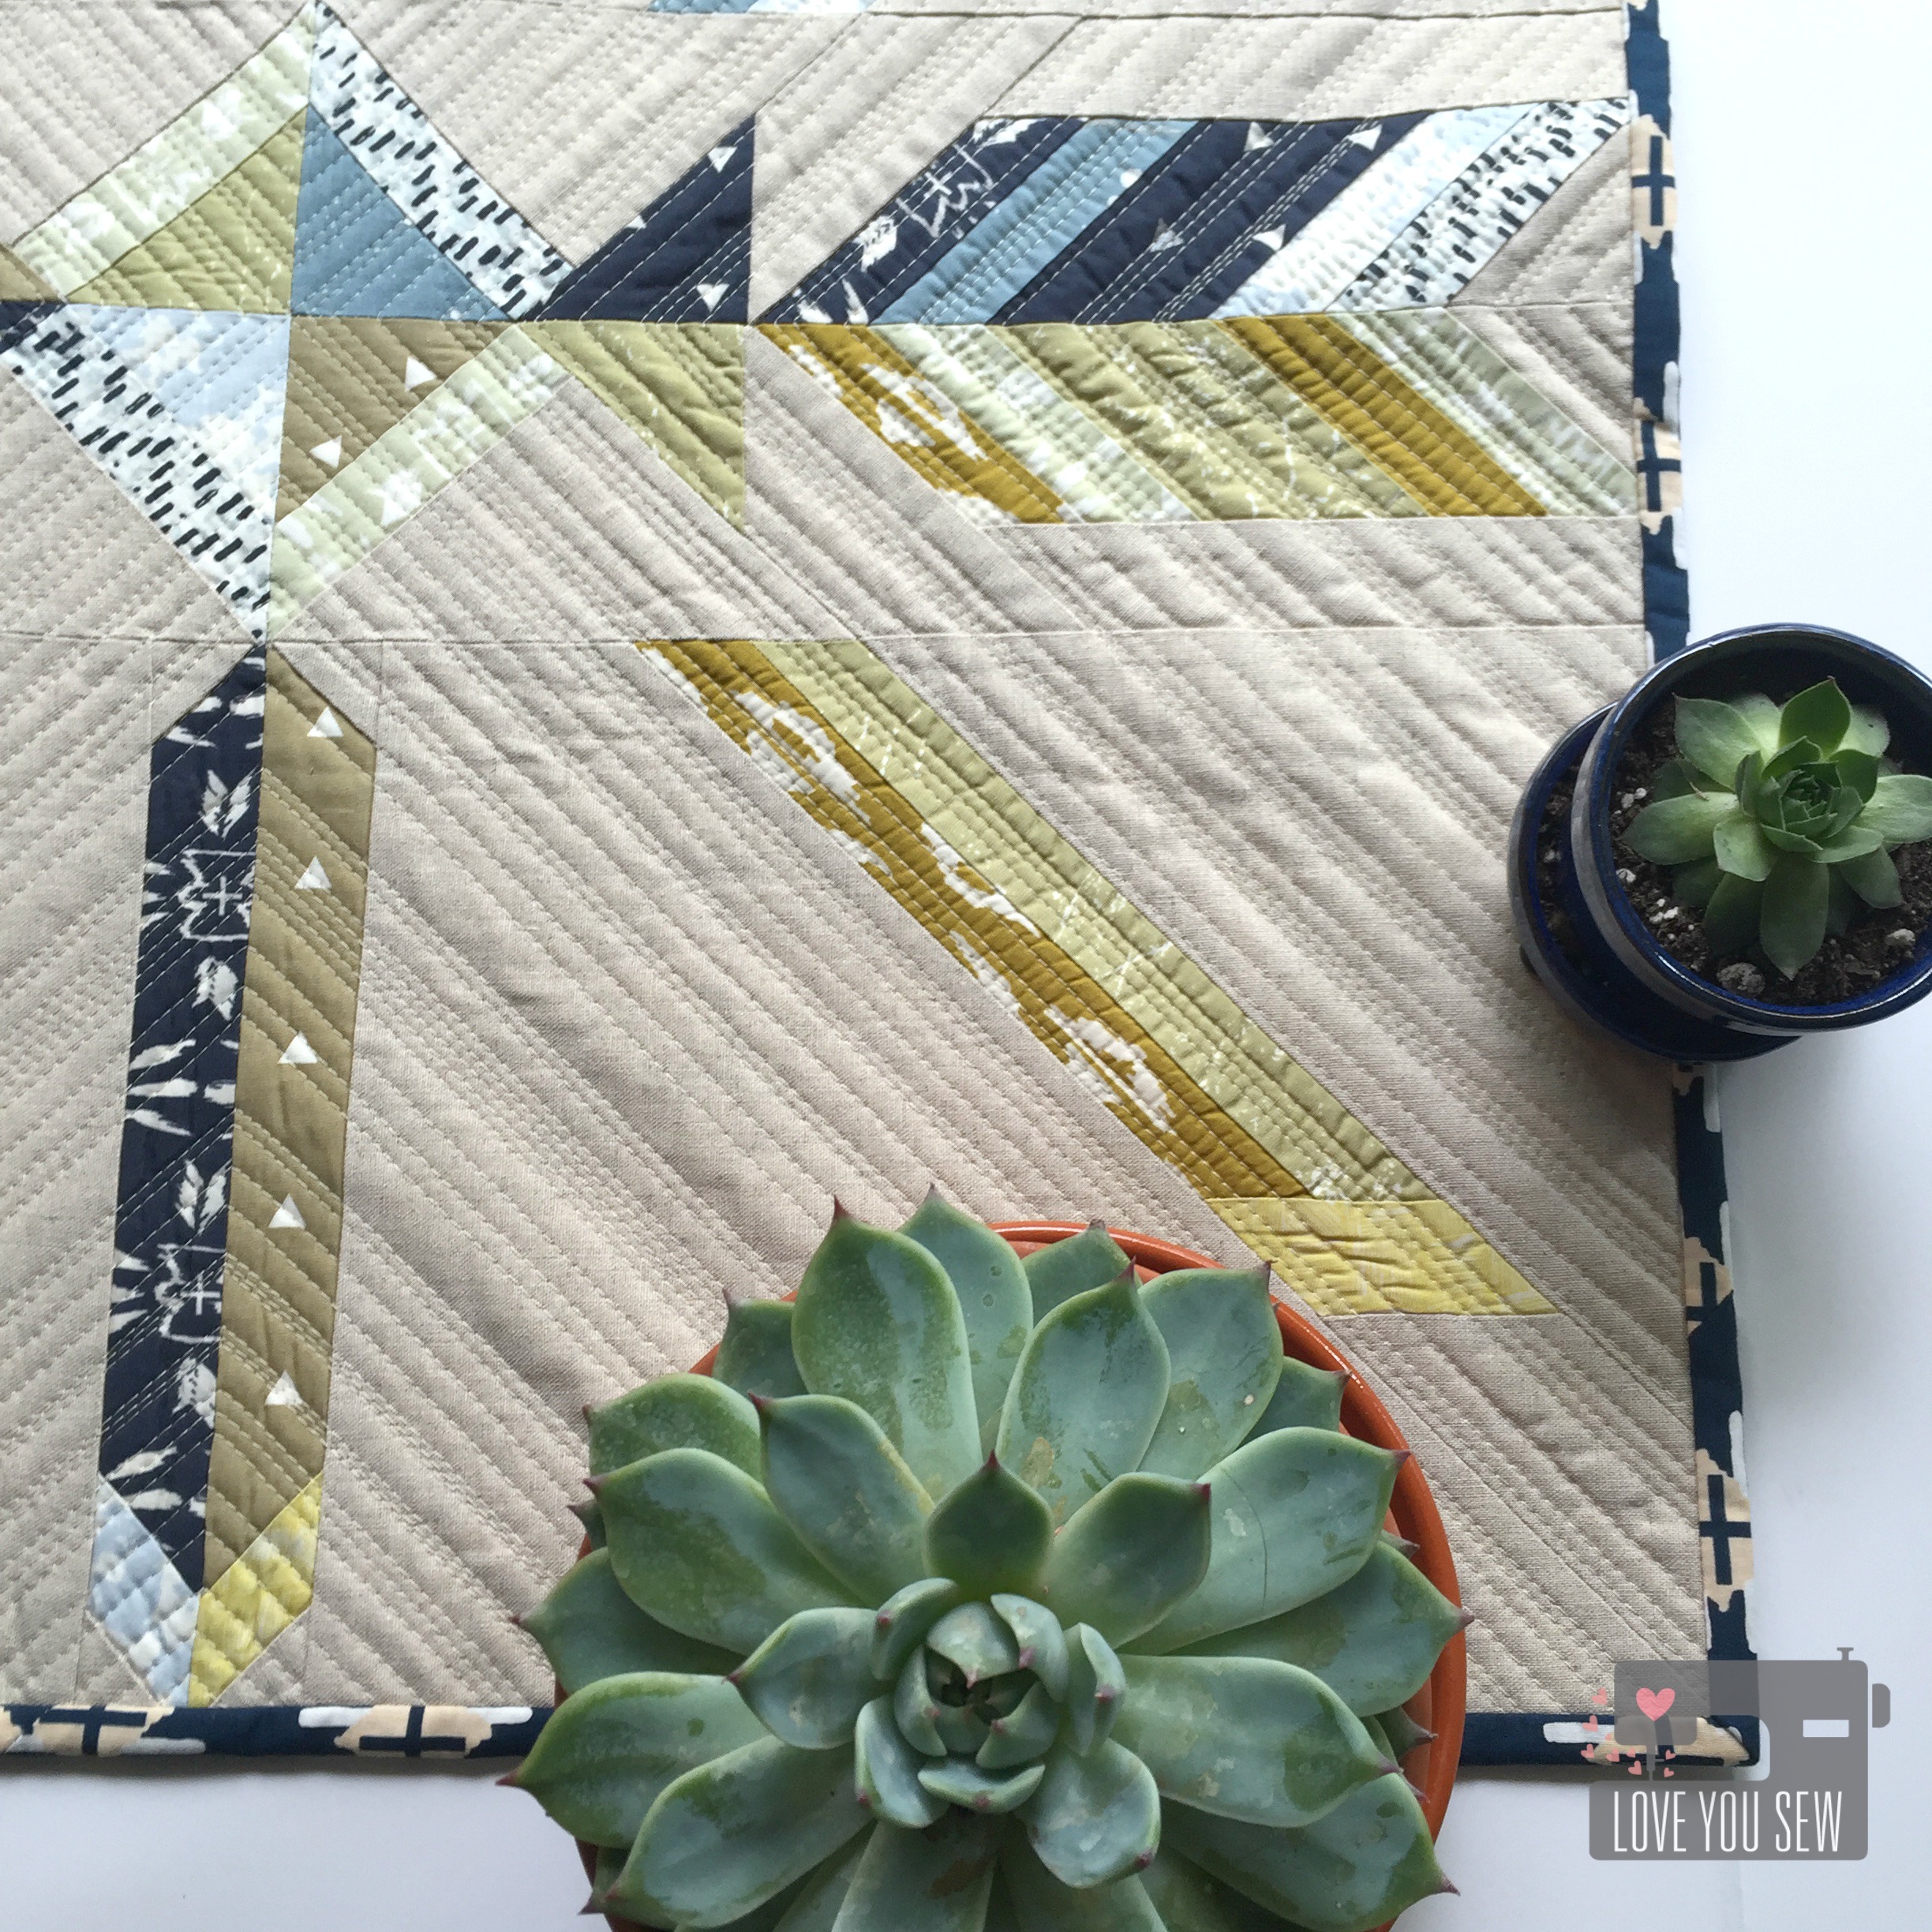
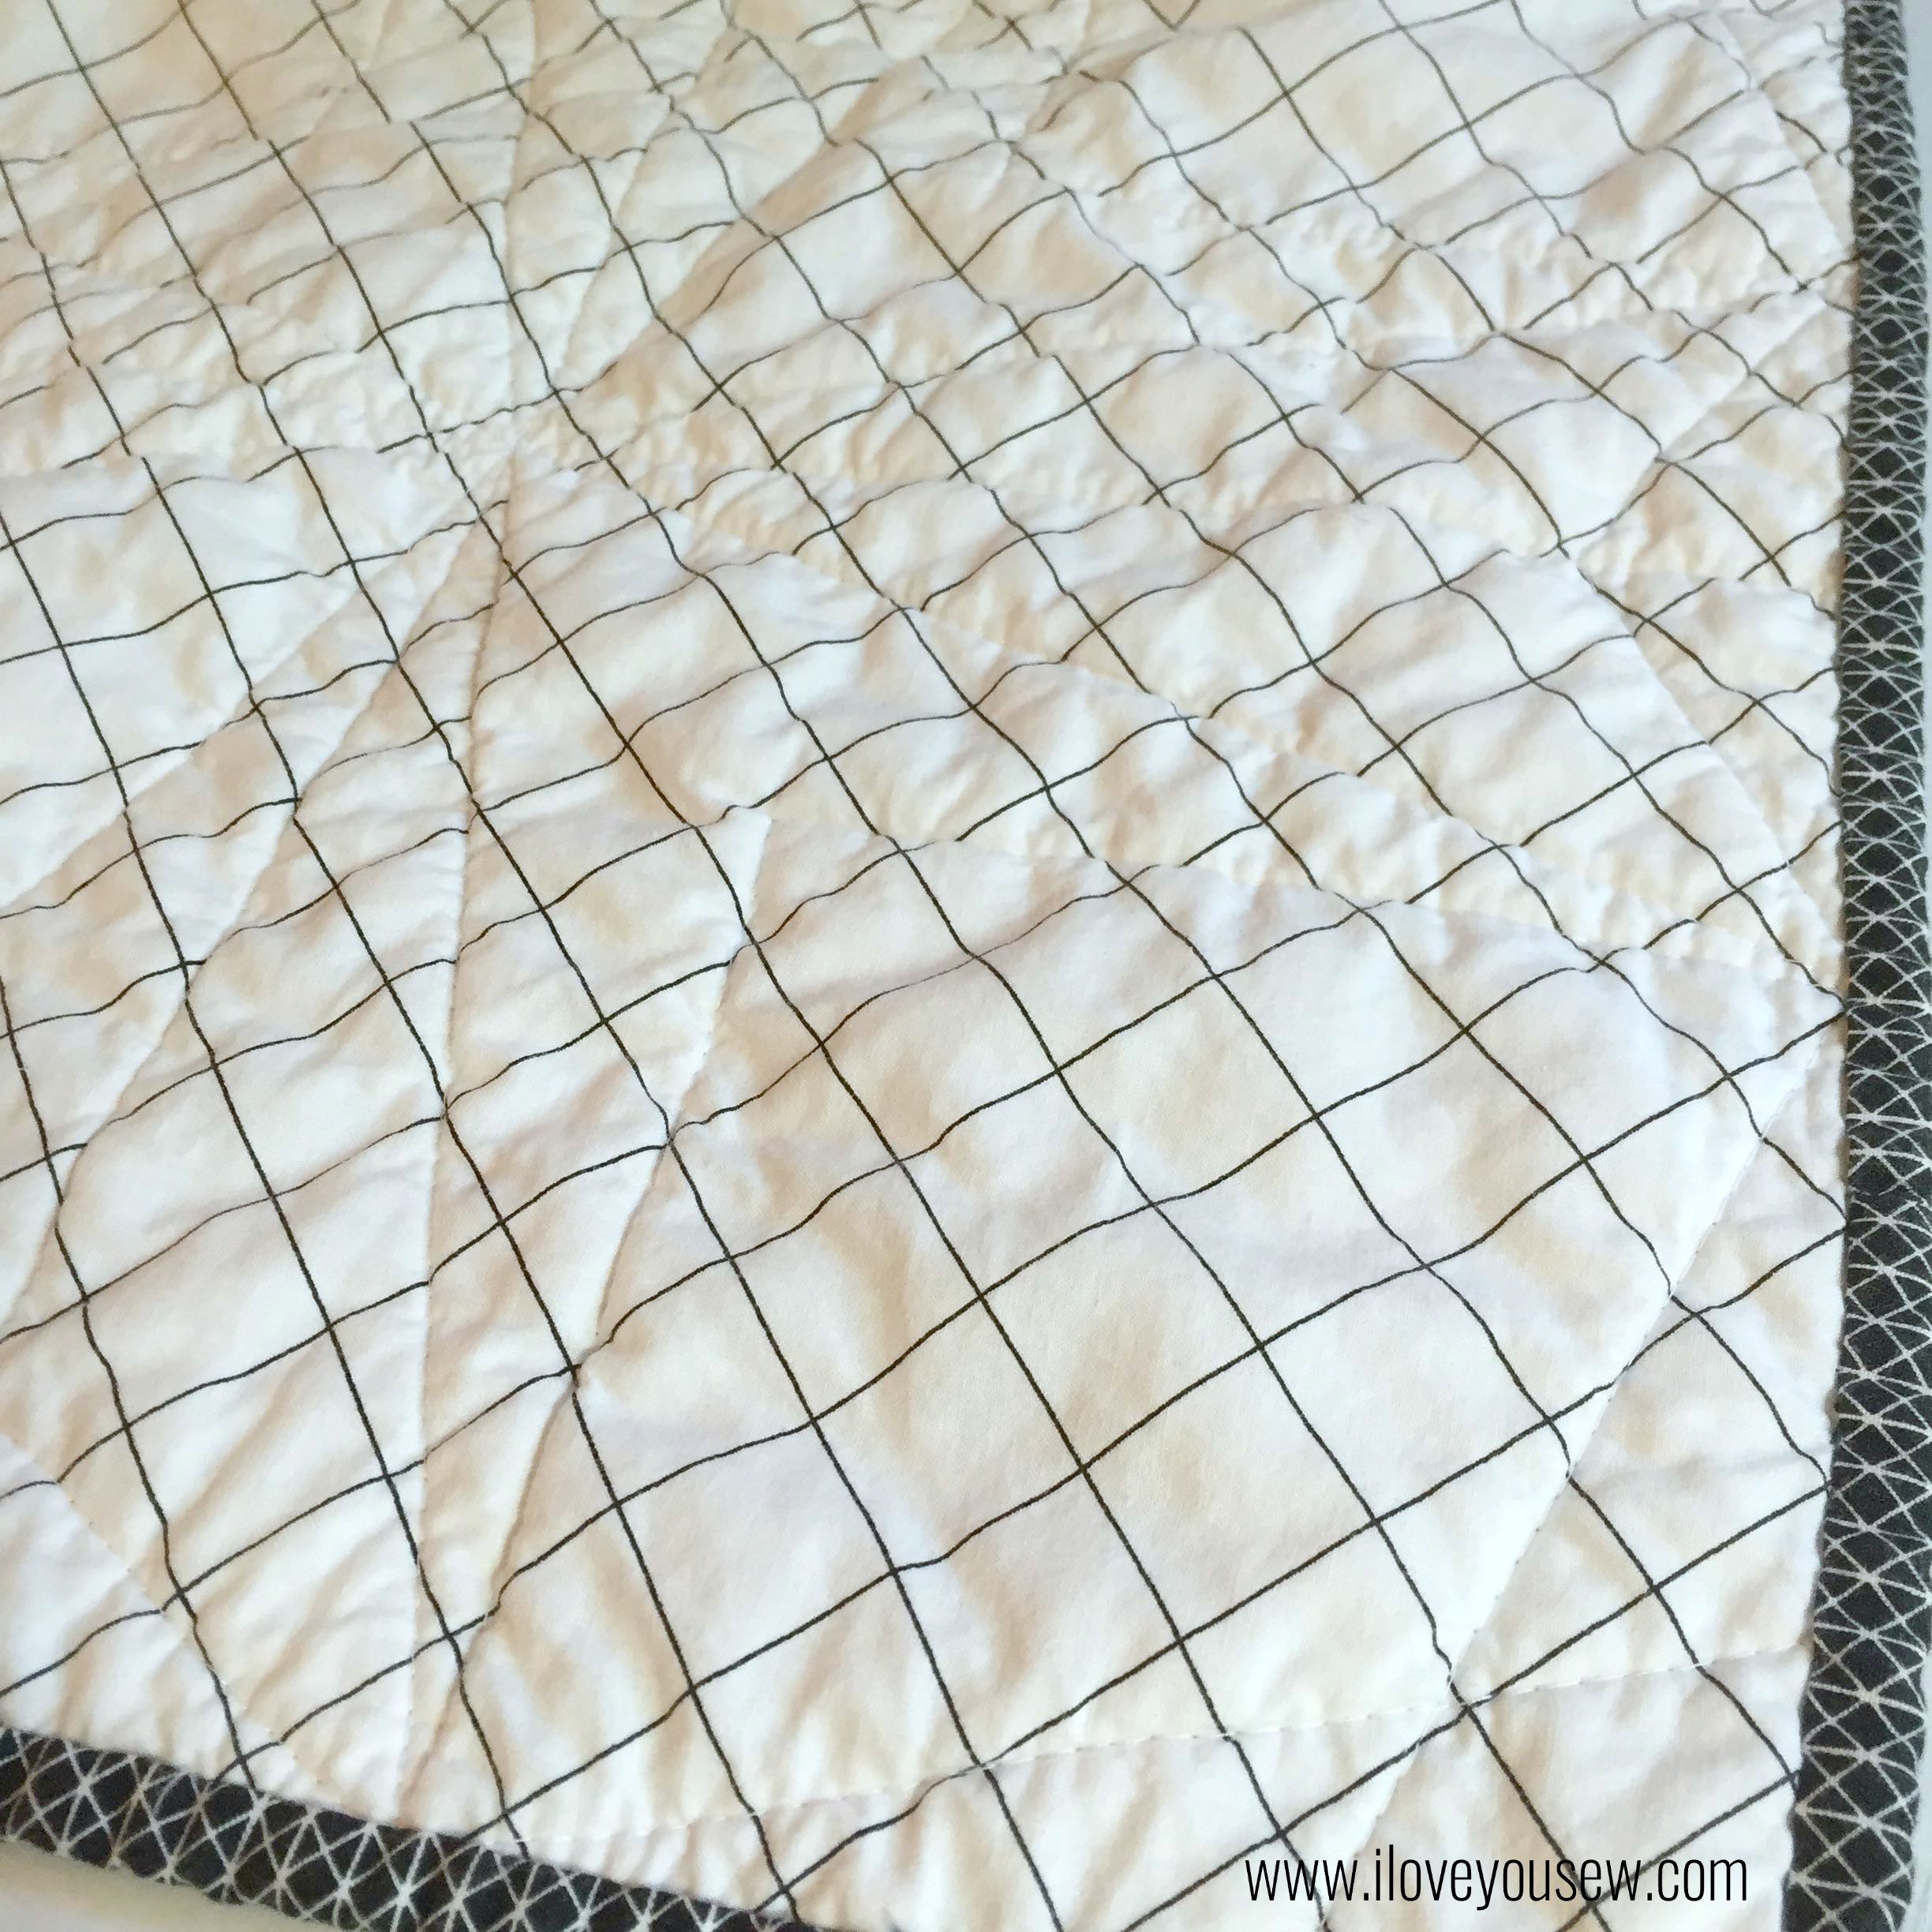
The background is Art Gallery Fabric’s Premium Linen Blend in Soft Sand.  It is such a great texture and color to make the design and colors pop.

IMG_4898

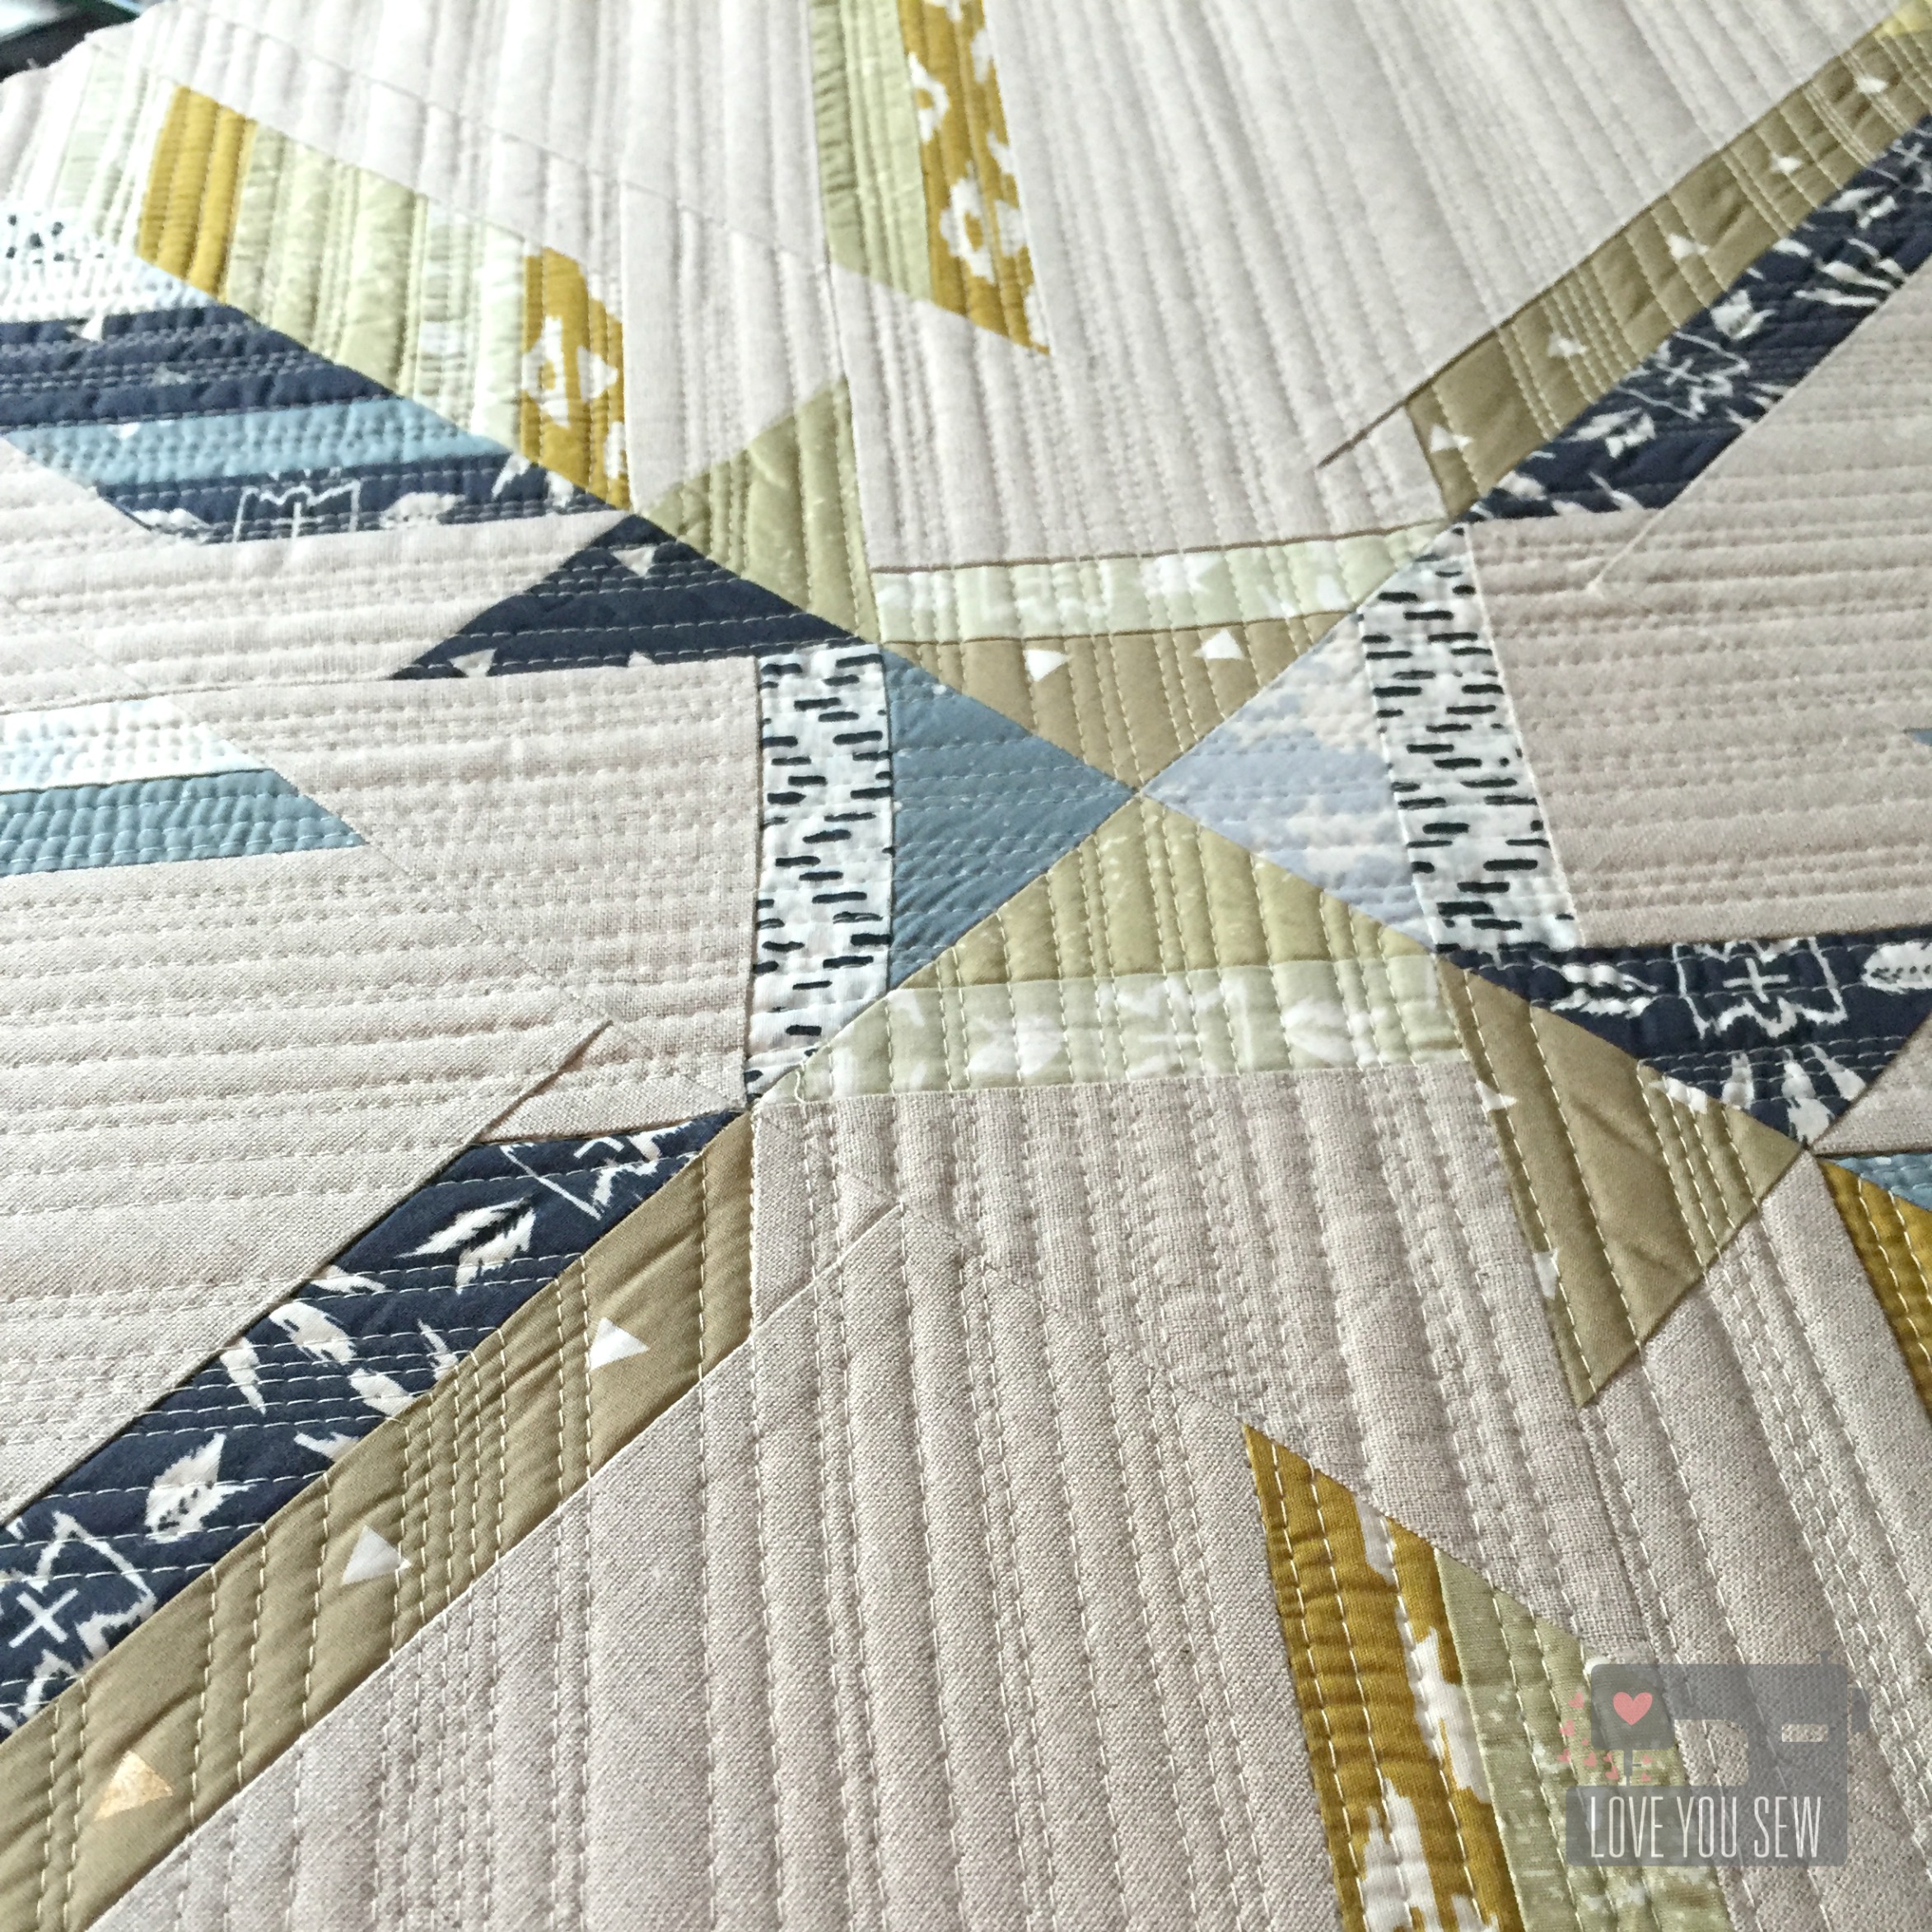
With so much negative space in the piecing, a random application of matchstick quilting was in order using Aurifil 2310. The areas were split into quadrants, like the quilt design, itself.

IMG_4899

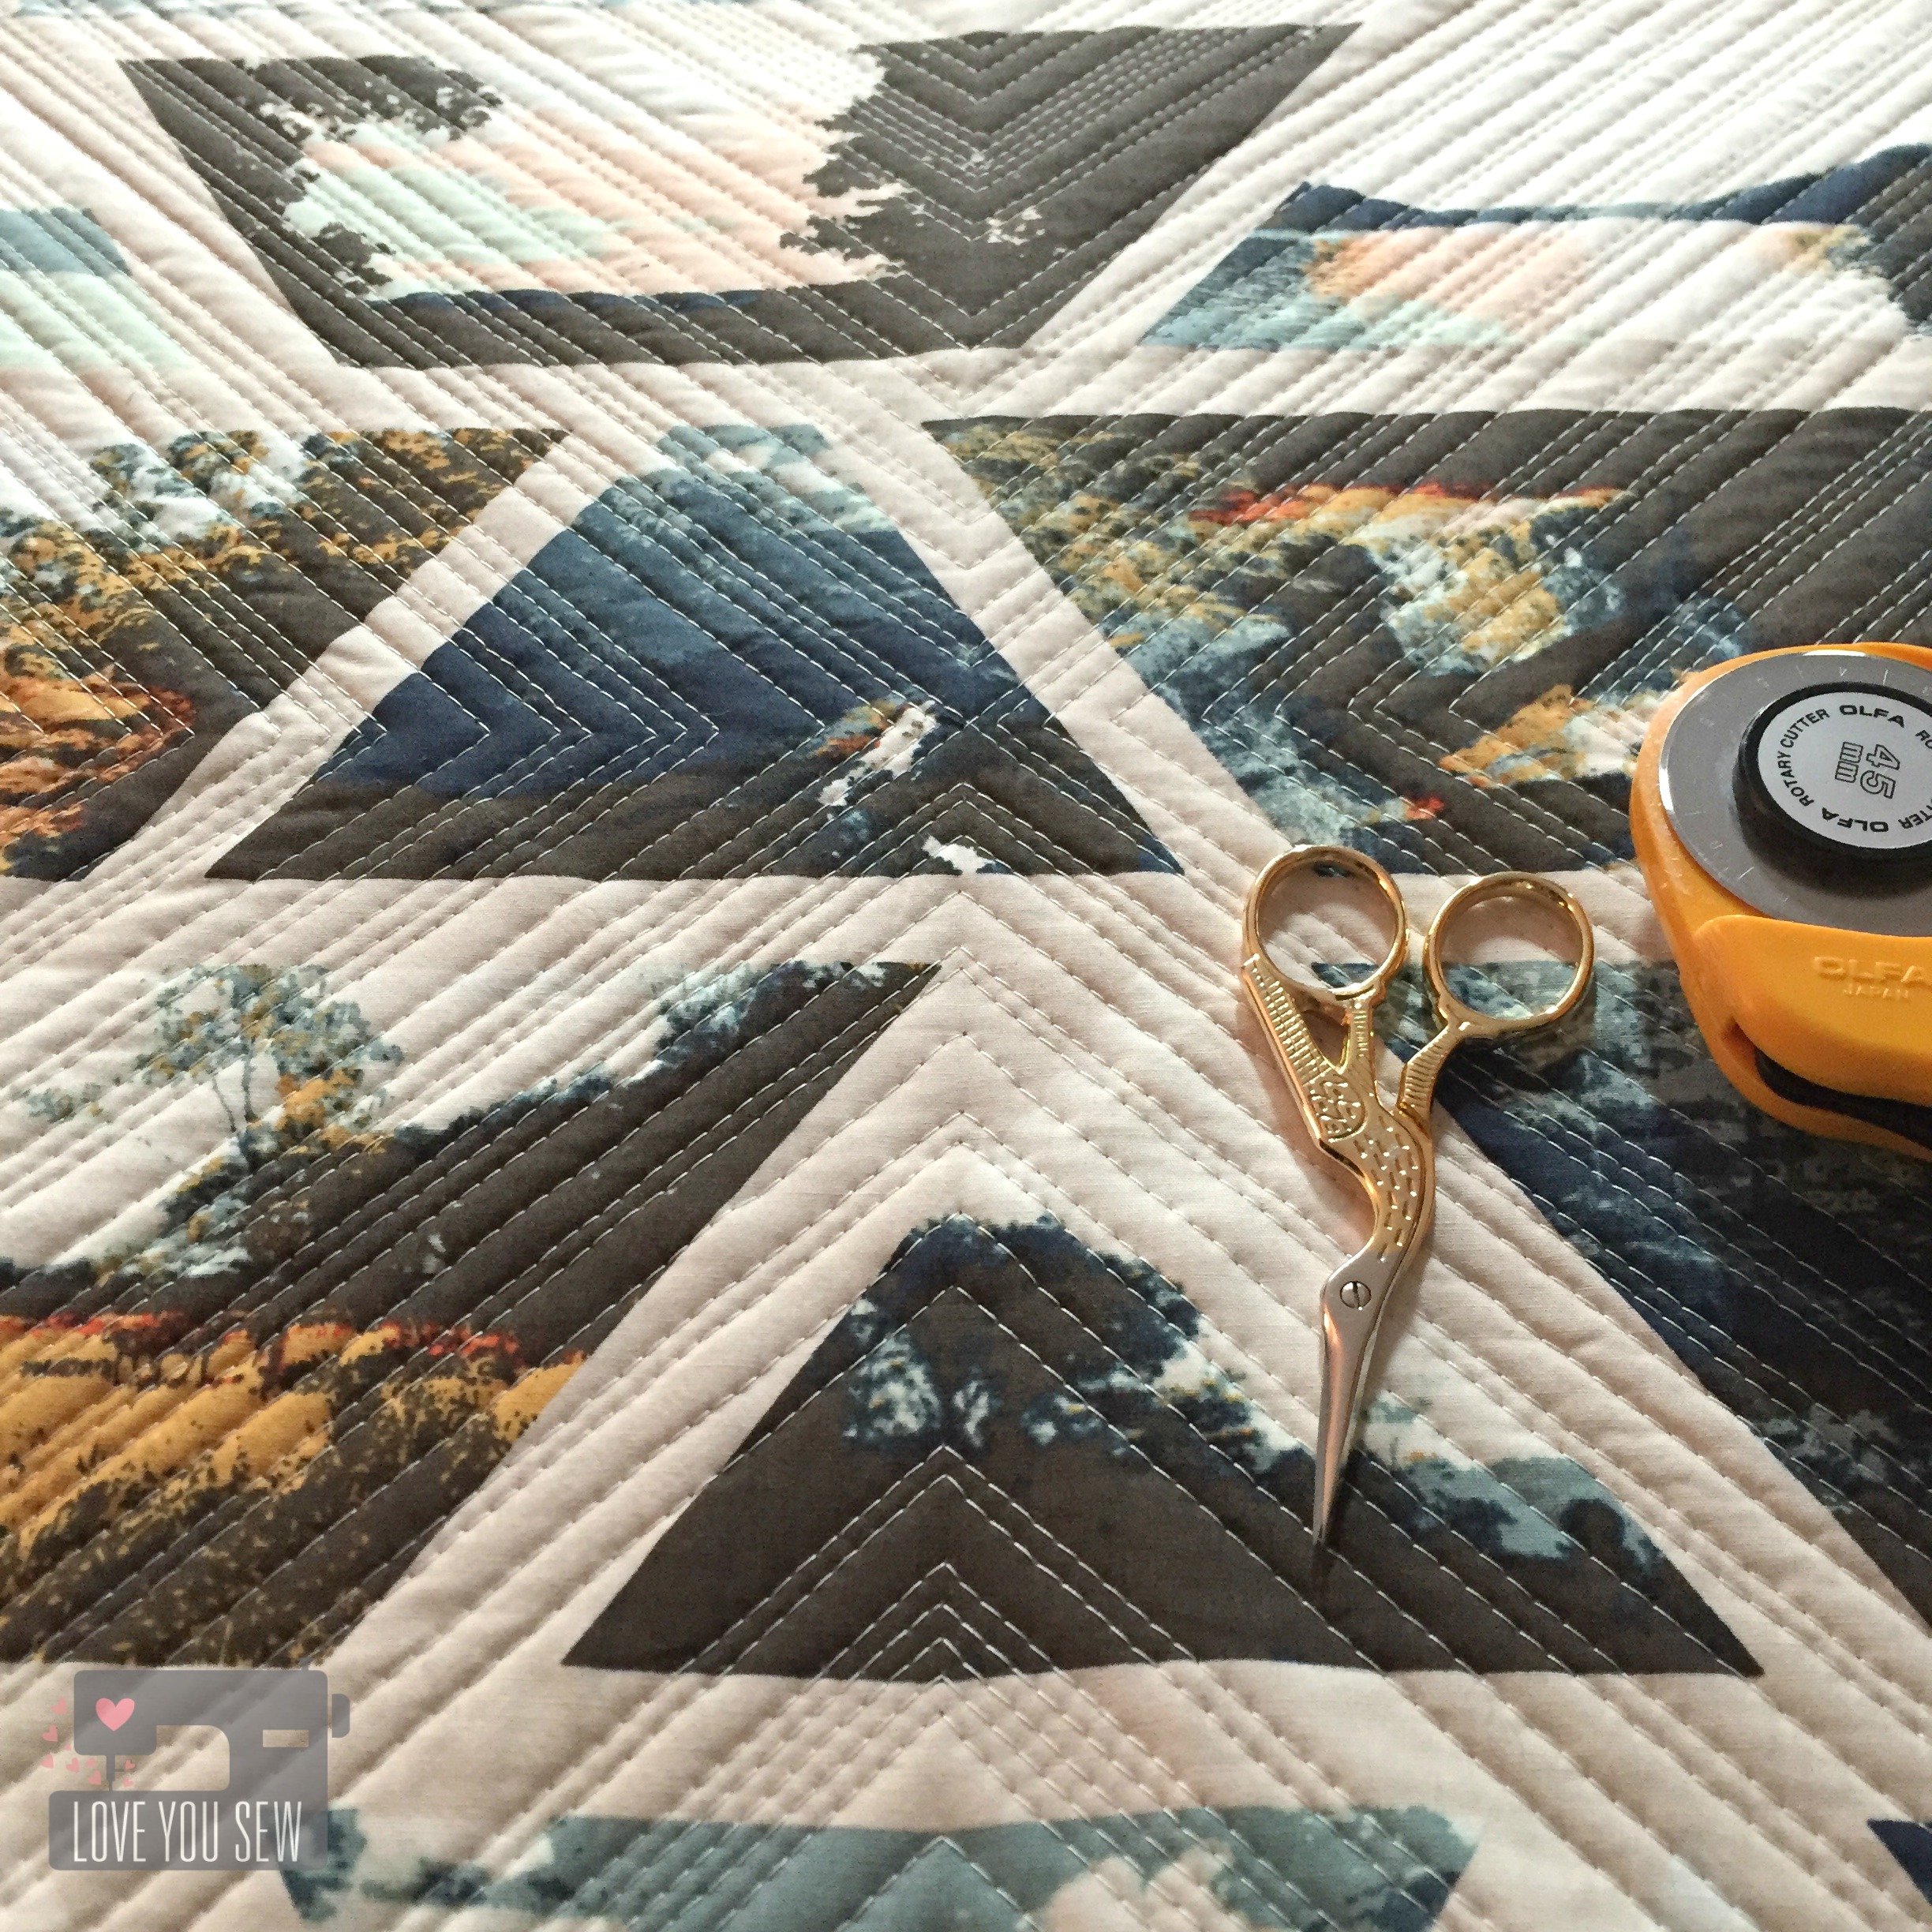
The backing was pulled from April’s Wanderer collection.  Wandering Lands Mineral was the perfect print which really complimented all the tones in Observer and it shows off the quilting beautifully.

Stay tuned…this quilt pattern will be available closer to Observer‘s release in August!!!


IMG_4715

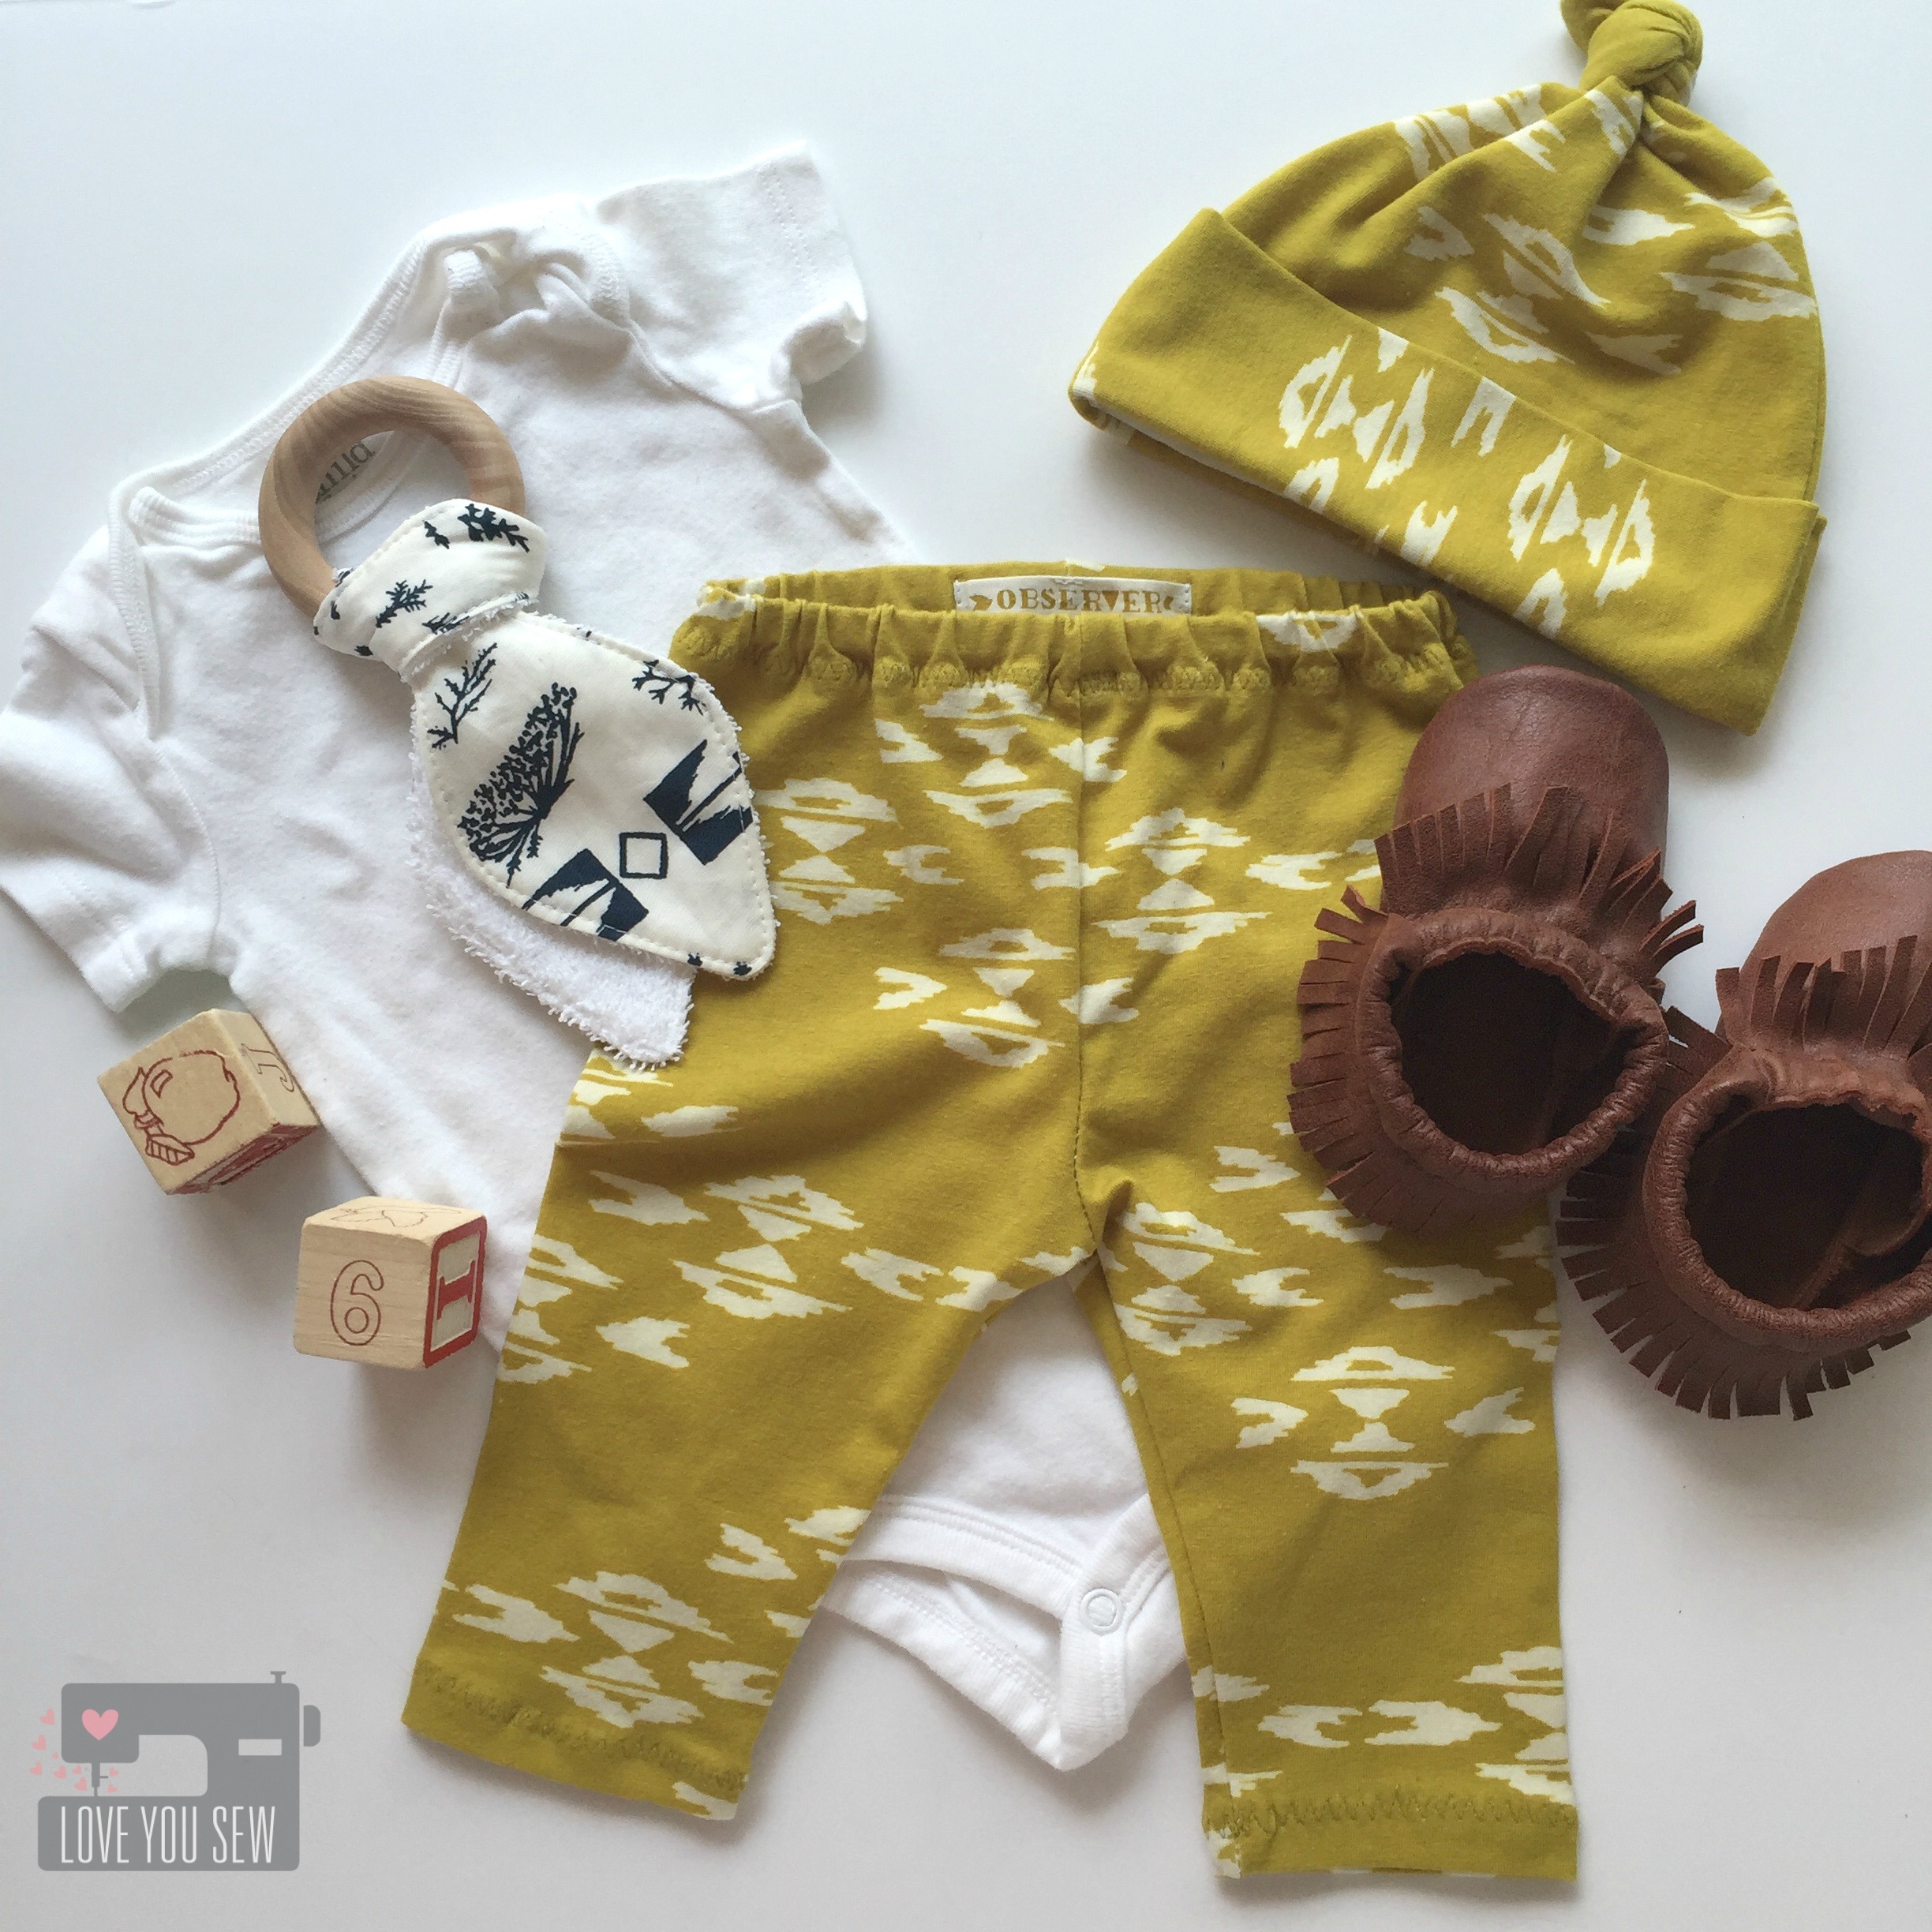
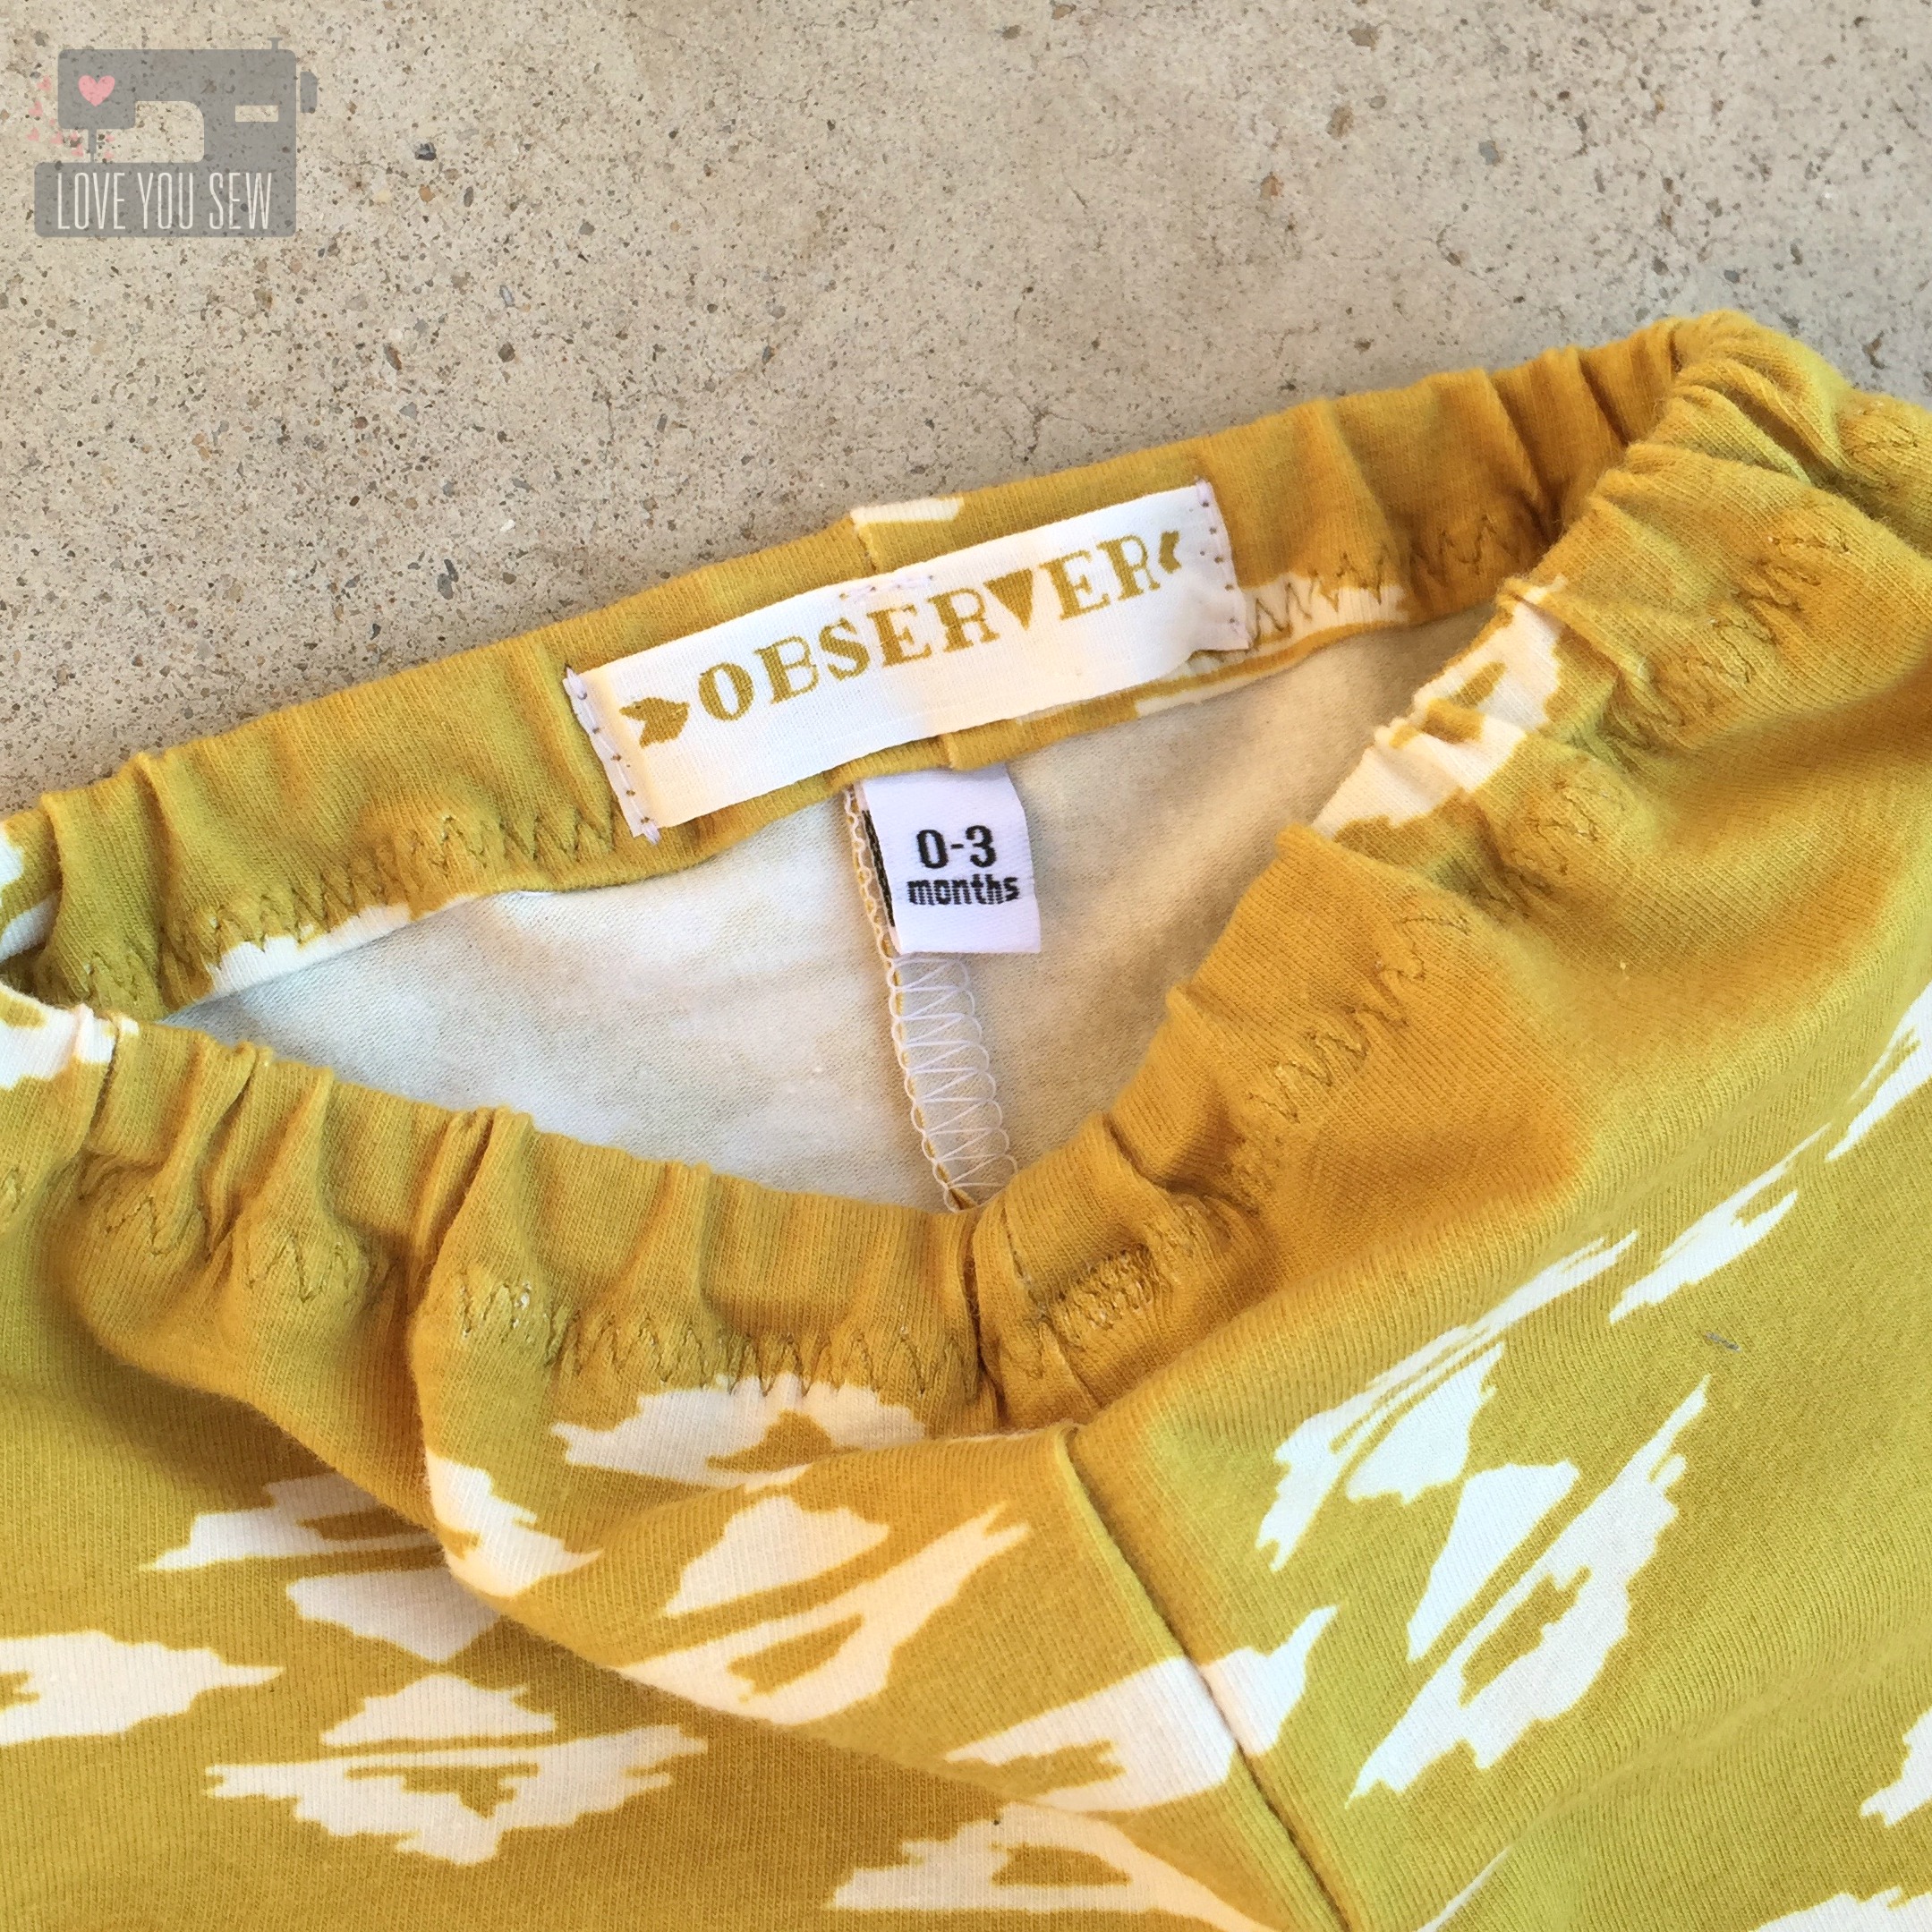
April asked if I would help make some baby leggings as well and how could I not?!?  Ya’ll know babies are my business and LOVE the opportunity to make itty bitty gear.  These leggings are made with Overshot Gold in knit and they are so amazingly soft.  The pattern for the pants are from My Childhood Treasures.

IMG_4711

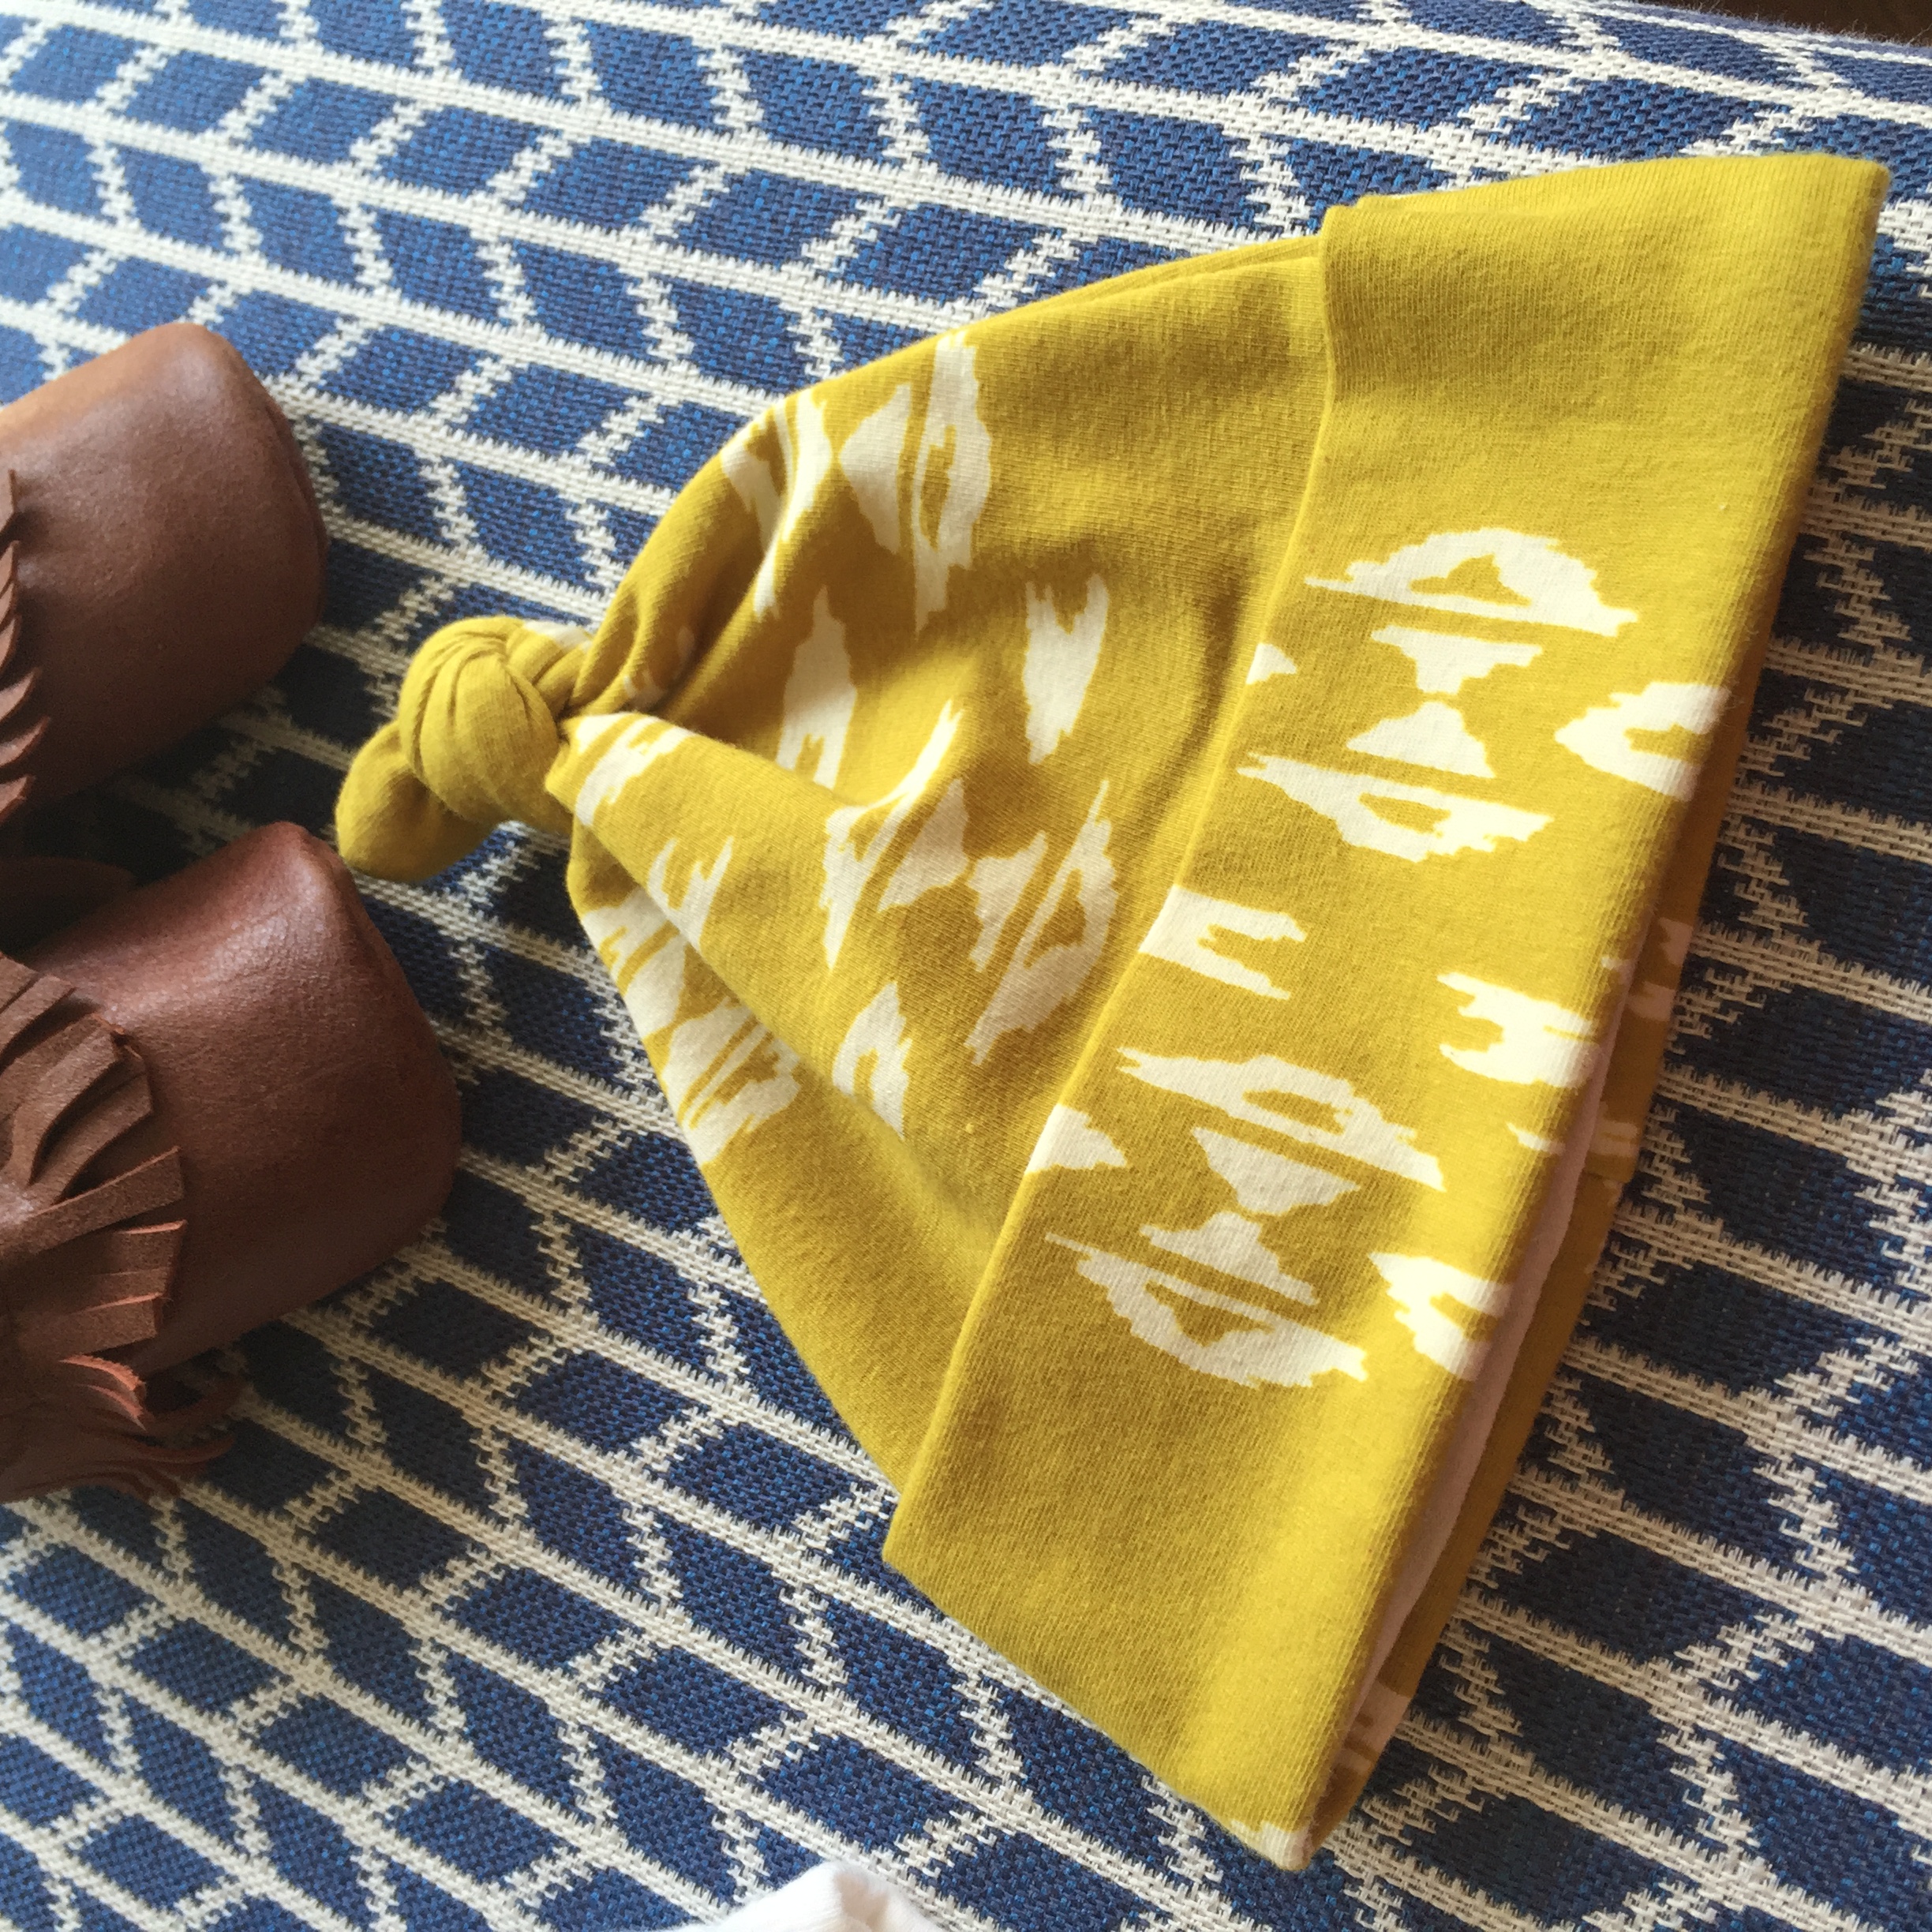
I drafted a pattern for the hat from an old one I have.  Make it Love it has a great tutorial and pattern which is similar.

IMG_4657

As an added detail, I used the selvage from a woven print on the back of the leggings.  It’s a great way to make a little tag so you know the direction of your hand-made garments.

Aren’t these clothes just perfect for the little bohemian in your life?


IMG_4940

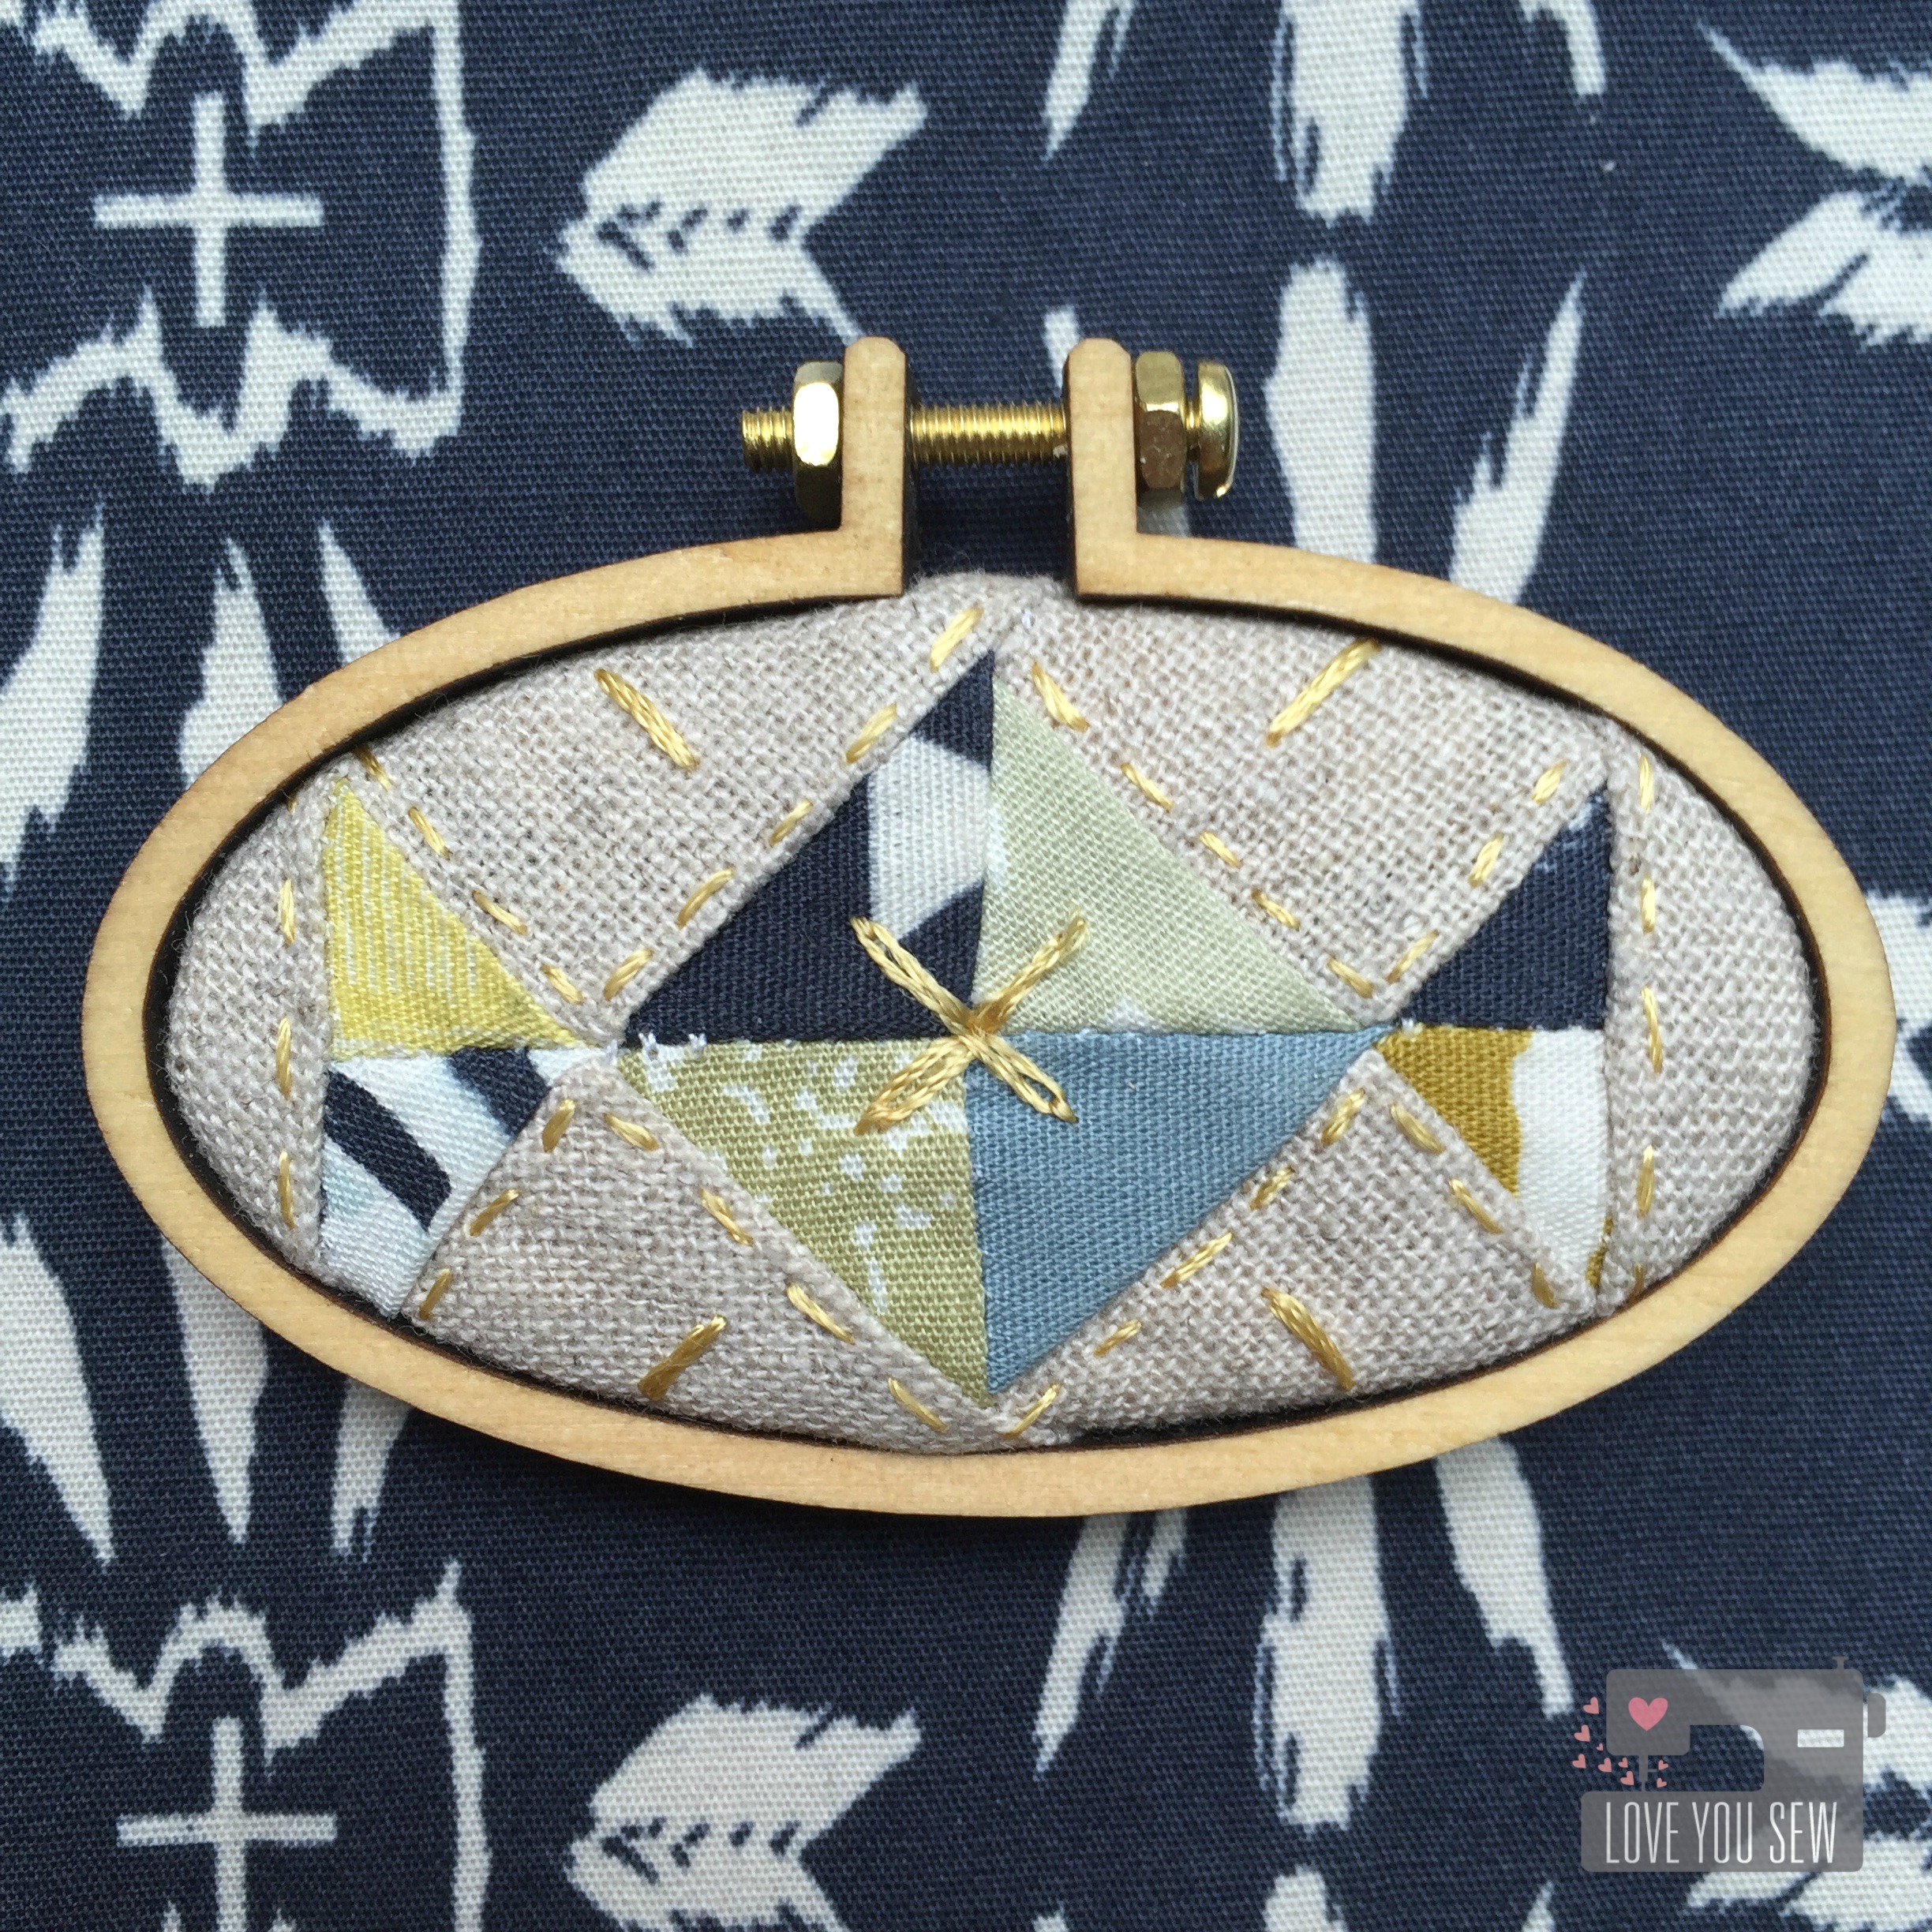
Last, but surely not least, is my mini quilt hoop (measuring about 2.5″ lengthwise.)  Making these quilt hoops has become one of my favorite projects and I cannot help myself when I have such amazing fabric laying around.  I love tiny (who doesn’t?) and love being able to use up every little scrap.

IMG_4943

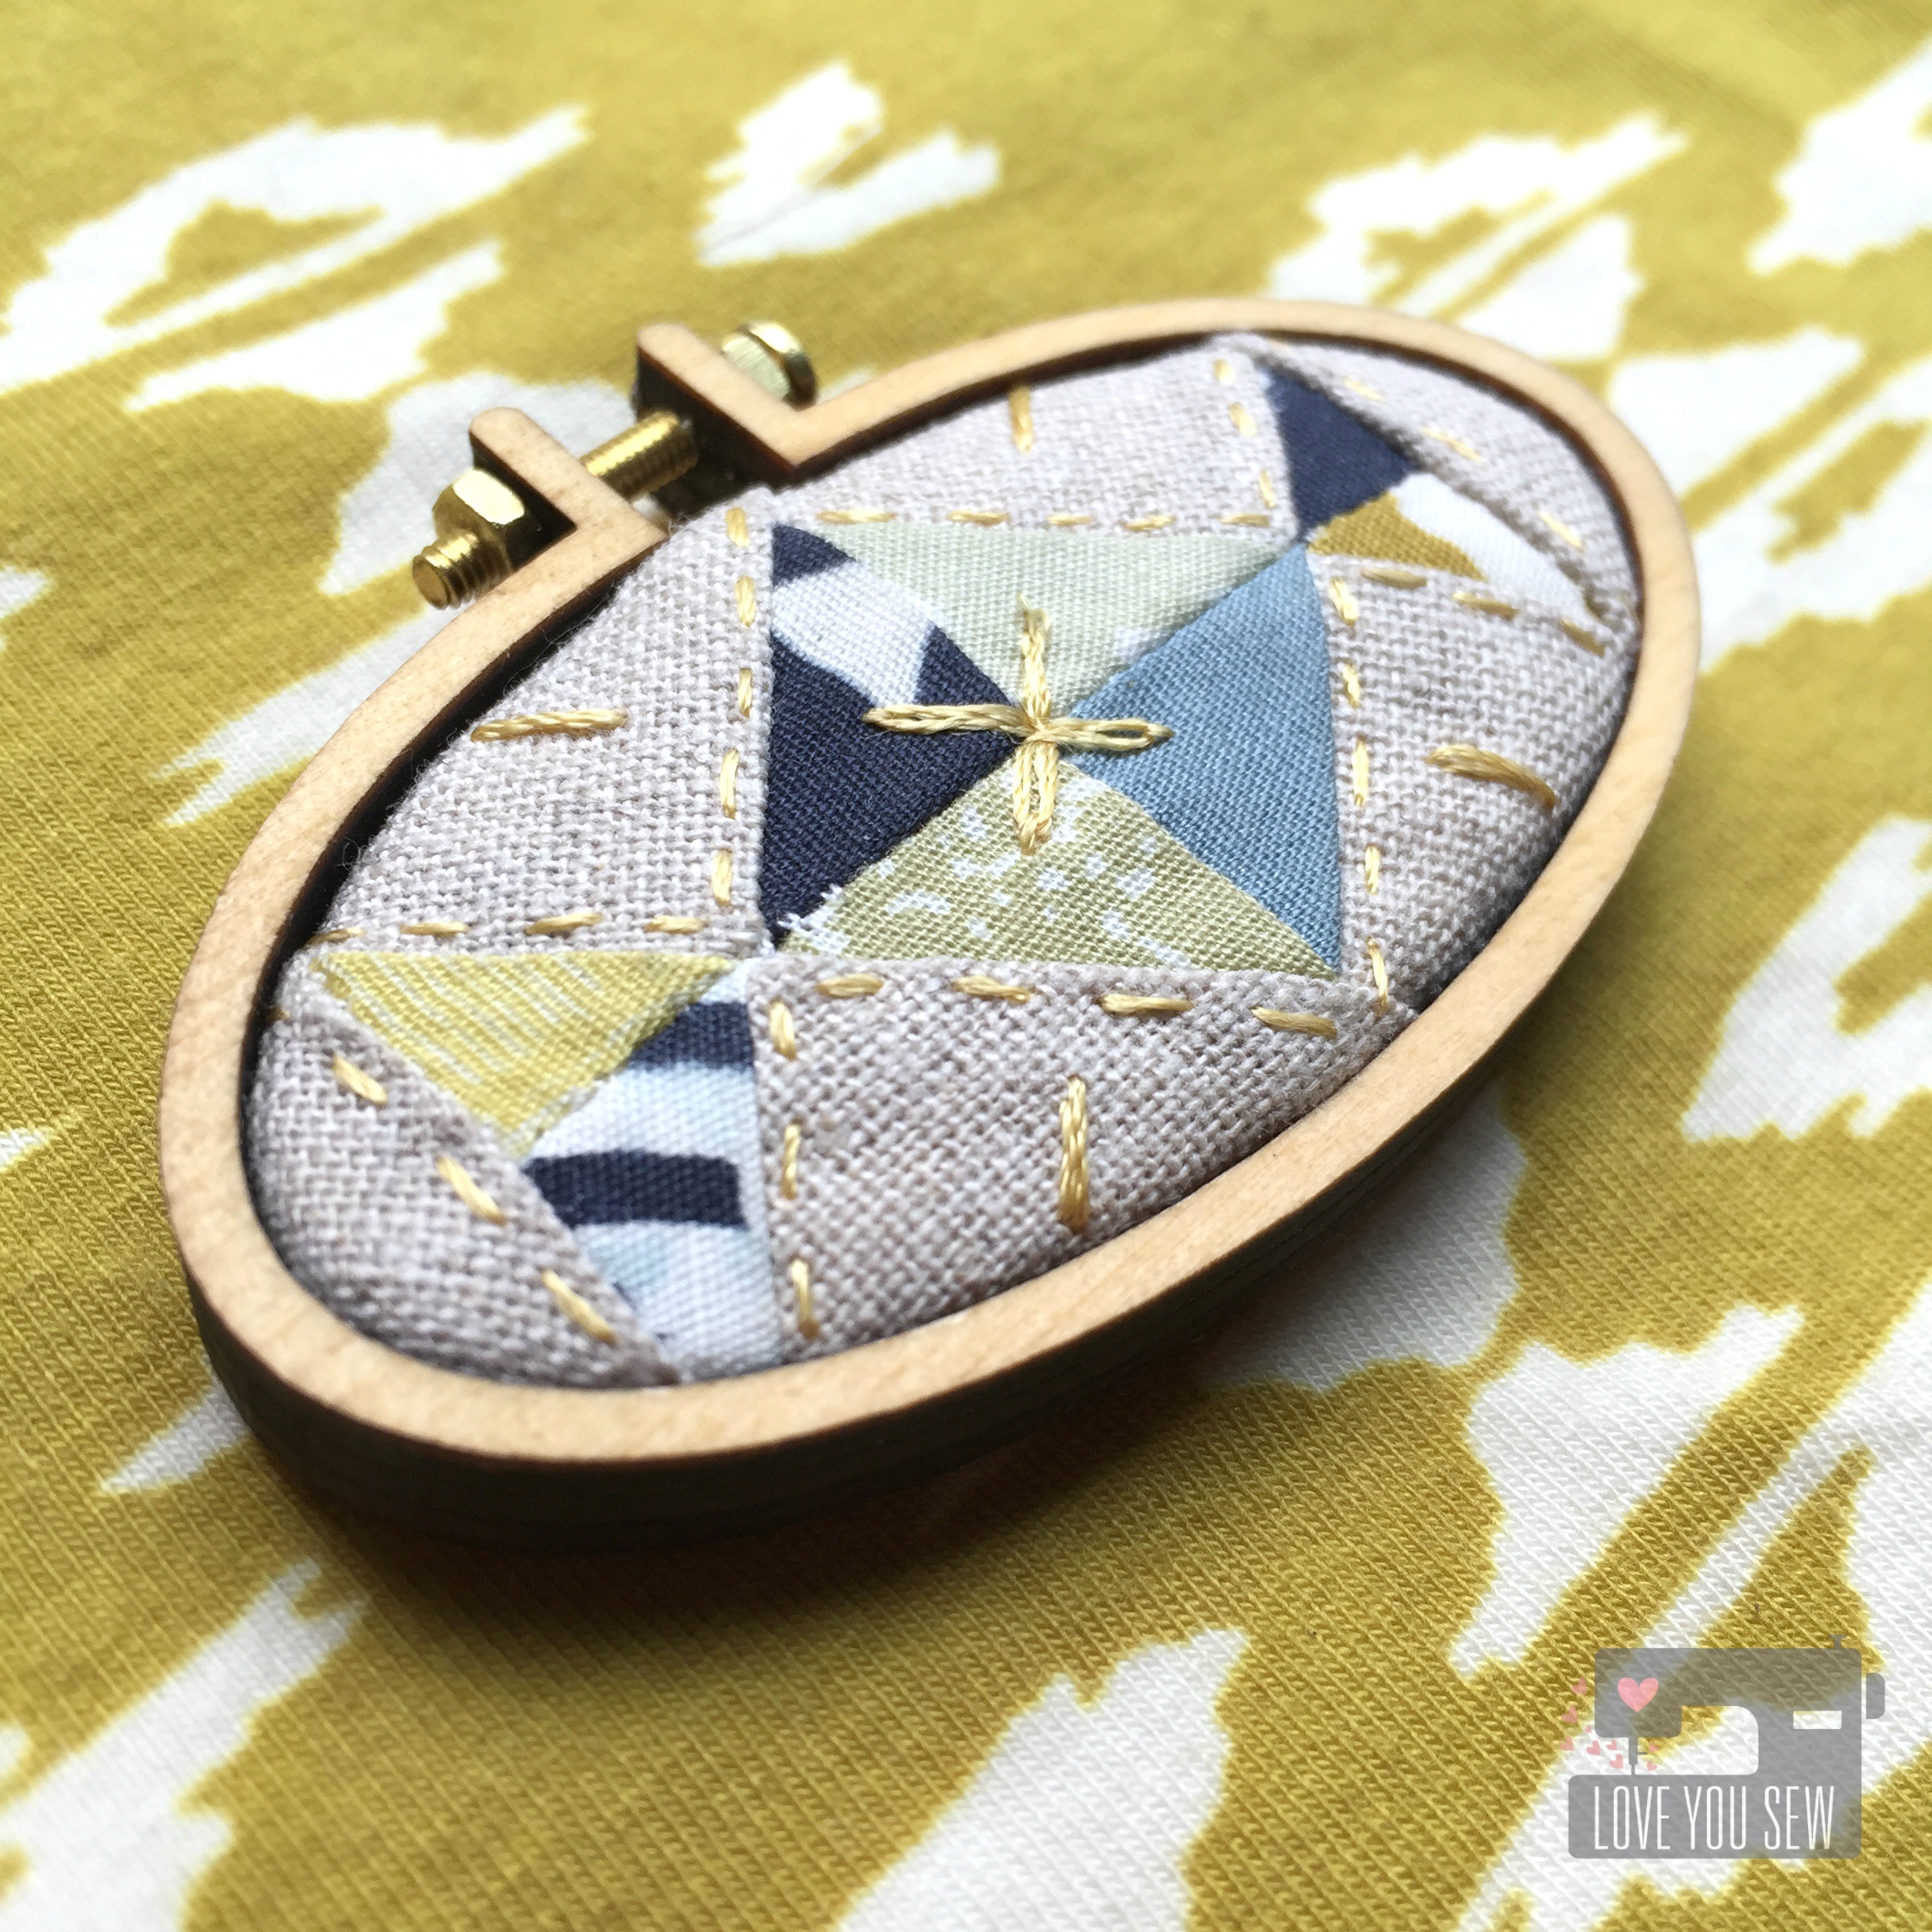
Of course, I used Dandelyne hoops and chose an oval to make a piece based of the main quilt I designed at the top of the post.  A little gold embroidery thread made this hoop extra special and I love how it turned out.


I hope you enjoyed my little preview of Observer which is due out in August.  Make sure to check out the full collection here.

Do you have any plans for these fabrics?  Please let me know!  I have a few already planned….maybe an envelope clutch, dresses for my nieces, shirts for my boys, and dresses for myself….I could go on and on!


Happy Stitching, Friends!

Cristy

Hello Bear Triangle Quilt

HBTriangleQuiltTitle

One of my dearest friends is expecting and I knew I wanted to make something very special for her.  The Hello Bear collection by Bonnie Christine for Art Gallery Fabrics came to mind immediately…especially, since I just made the Dwelling Quilt with it.  It’s whimsical and playful with such a soothing palette…and best of all, it’s gender neutral!  My girlfriend wants to be surprised with the baby’s sex, so I chose colors that could go either way.

SizzixTriangleDie

On Black Friday, I picked up several Sizzix Quilting dies, including this 4.5″ Isosceles triangle one.  I made one other triangle quilt awhile back and definitely cut off all the tips as I pieced the top together. There is such a striking look with all the triangles and I knew getting a die to help me cut my fabric would help me keep the point intact!

I have a paper-crafter friend who bought a new Big Shot for herself awhile back.  She then sold me this one for less than half the price….score!  I initially just wanted to use it for paper but quickly found out about the fabric dies.  These are a bit pricey, but I’m hoping to add to the collection as I scout out good sales.  Let me know if you ever see one 😉

HBTriangleQuiltDesignWall

Since there is a finite width to the Big Shot, some pre-cutting is needed to fit the fabric on the dies.  But since I could cut up to 4 layers of fabric in one turn, this was still the faster way to go.

HBTriangleQuiltPointsMatch

The die gives you the perfect notches to make piecing SO much easier and more accurate.  I’m pretty proud of these beautiful points (above!)  And did you know, you don’t have to trim after piecing?  That’s the winning feature for me because I despise trimming.  That is probably my least favorite thing to do…

HBTriangleQuiltCloseUp

To add more texture and variety to the Hello Bear fabrics, I used Robert Kaufman Essex Linen in Indigo.  You can also see some solids from Art Gallery’s Pure Elements and I added a splash of Bound from April Rhodes.

HBTriangleQuiltFullProfile

The finished baby quilt is 40″ x 40″.  I quilted along the triangle edges to not distract from all the fun forest creatures you can see here.  This was such a fun quilt to make as I tried out my new Sizzix “toy”….but it was more special because this is going to such a dear friend.  <3  I can’t wait to see her baby wrapped up in this quilt!!!


Happy Stitching,

Cristy


Hawthorne Threads Roam Fabric Blog Hop

blog hopWhen Hawthorne Threads asked me to participate in this blog hop for Roam, I just about jumped out of my seat!  I had the pleasure of working with some of their digitally printed fabric for my niece’s nursery bedding so I already knew just how lovely this fabric would be.

Roam is a soft, dreamy rustic collection in both a Dawn and Dusk palette.  I tend to lean toward blues when I select fabric, but for some reason I couldn’t resist playing with the Dusk fabrics.  There is something about the earthly yellows, purples and pinks that is just so incredibly soothing…

I Love You Sew-4

I selected The Plains in Sage and Prairie Flowers in Dusk to make the Desert Rose Dress by Caila Made.  This is such a cute dress pattern for toddlers and the Roam fabric was just a perfect playful fit for the design.

I Love You Sew-1

With the contrasting top and skirt, I couldn’t help but add a little extra pink pom-pom action….because…who can resist, right?!?  If you have not worked with pom-pom trim before, I suggest basting it in before you attached the top to the skirt.  It makes it MUCH easier to attach and stay even as you sew!

I Love You Sew-2Along with the dress, I made a Side-Snap Infinity Scarf.  The Buffalo Plaid in Honey is such a gorgeous coordinate.  I love how it picks up the yellow from the skirt and adds a hip stylish look for a little one.  The best part is the side snap placket which allows you to wrap the scarf without having to slip it over those big heads 😉

I Love You Sew-3You can also play with how you attach the scarf to change the look.  Snap it right in the middle and fold it over allows the scarf to work as a caplet.  If you use all the snaps, the scarf can stand up better to ensure full neck coverage on chilly days.  If you leave the snaps undone, you get a cute little shawl as shown.  Now who doesn’t love a multi-tasking accessory?!?

SideSnapScarfTutorial

To make the Side-Snap Infinity Scarf:

  • Use 1/3 – 1/2 yards of 42-44″ wide main fabric (depending on how much volume you would like.)
  • Fold the fabric with right sides together and sew down the length creating a long tube.
  • Pull the fabric so right sides are facing out and press
  • For the placket – {A} Take the accent fabric, cut (2) 3″ x 10″ strips (if using 1/2 yd for main fabric) OR cut (2) 3″ x 7″ strips (if using 1/3 yd for main fabric)
  • {B} On the short sides of the accent strips, fold a 1/2″ hem and press on both sides
  • {C} Fold in half length-wise and press.  {D} Open and fold lengthwise again but match the sides to the center line.  Press and make sure you keep a nice rectangle shape with sharp corners.
  • {E} Attach the placket by sewing in the the first crease of the placket closest to the end of the scarf tube.
  • {F} Flip the scarf over and sandwich the open end of the main fabric tube in-between the opening of the placket.  Top-stitch all around with a 1/8″ seam allowance {H.}  Repeat for the other side of the scarf. TIP: Use some washable fabric glue to keep the placket in place as you top-stitch
  • {I} Add plastic snaps such as these KAM ones by marking 5 sets approximately 2 1/4″ apart (for 1/2 yd scarf.) *Yes, I know that one left snap was incorrectly attached, but I didn’t realize it until all the pictures were already taken. It’s been fixed since 😉

Dusk Giveaway Bundle Image

***Giveaway is closed***  Now who’s ready for the giveaway??? Comment with how you would like to use this Dusk color-way for a chance to win the entire fat quarter bundle!  This is open internationally and a winner will be announced once the blog hop is complete.  Make sure to visit everyone on the hop for beautiful ideas and additional chances to win this gorgeous fabric!!!

The complete Hawthorne Threads Roam Blog Hop Schedule:
Tuesday, December 1st – Fabric Mutt
Wednesday, December 2nd – Coffee + Thread
Thursday, December 3rd – Love You Sew
Friday, December 4th – Olivia Jane Handcrafted
Saturday, December 5th – Hawthorne Threads


12/15/2015 Update – Randomly Selected Winner is  Veronique Oudard!  Congratulations!!!


Hugs & Stitches,

Cristy


***The blog hop was sponsored and fabric was provided by Hawthorne Threads.  All opinions  are my own and have not been influenced by outside parties.

Make a Mugrug from the Dwelling Quilt Pattern

P1050776

When Holly Gets Quilty asked for pattern testers for her newest Dwelling Quilt pattern, I couldn’t help but get involved.  I first became familiar with Holly’s patterns through her Squash Blossom pattern I used in the Squash Blossom Bouquet mini.  She makes the most gorgeous quilts and I love how her patterns are so nice and clean…as well as beginner friendly. And this paper-piecing pattern does not disappoint!

IMG_1141

When I received the pattern, I decided to first make the smaller of the two blocks offered.  It measures 4 3/4″ x 5 3/4″ unfinished and I thought it would make for the cutest little mugrug.

IMG_1153

As a single block on its own, I wanted to fussy cut all of the pieces and bring out the literal design to resemble a home.  I dug back into the Cotton + Steel archives and pulled out some Homebody and Hatbox.  These fabrics created the most ideal walls, roof, street and even a little garden!

IMG_1155

1 1/4″ strips were added all around  the block to give a little more area to the block.  I wanted enough room for my larger mugs and even for a little snack 😉  Riley Blake’s newsprint is my favorite text print (out of print, of course…but if someone wants to share any, let me know!) and it goes with the whole house theme, right?

IMG_1156

I used a scrap of cotton batting and more Cotton + Steel for the back to complete the quilt sandwich.  Since you know I’m a straight line quilter, I just cross-hatched the mugrug a 1/4″ apart in a diamond pattern with Auriful 2030 and ….

P1050818

To finish, you know C + S had to be using in the binding too.  Since this was such a small project, I used Cut to Pieces glue binding method to secure the binding into place without the use of Wonder Clips.  It was fast and I top-stitched the binding all around.  I can never get even amounts of the back binding with “stitch-in-the ditch” method, so I sewed about 1/8″ inward to help me with my OCD…

This was a nice quick project you could have completed in an afternoon.  Holly’s Dwelling Quilt pattern is simple and pre-cutting the pieces (measurements provided!) will help cut down on quilt time.  Are you ready to make your mug rug?!?

Check out these Instagram hashtags for more inspiration: #DwellingQuilt #HollyGetsQuiltyPatterns


Hugs and Stitches,

Cristy

What to Do When You Forget to Pre-Wash High Contrast Colored Fabrics (in a Quilt)

What to Do When You Forget to Pre-Wash High Contrast Colored Fabrics

After picking the high contrast fabrics for one of my latest quilts AND after cutting into it AND after piecing it…I realized I should have pre-washed it!  How was I going to prevent bleeding on my project???

When I thought to pair magenta, black and white fabrics together in my recent Jacks Quilt, the thought of pre-washing never crossed my mind.  For quilts, I am not a pre-washer and so I went about my normal way cutting and piecing until it hit me…that all the saturated colors could bleed onto all of that white! I wanted to cry in that moment because there was NO way I was going to buy new fabric and start over. My pockets and my sanity wouldn’t allow it since I had cut hundreds of pieces already.  I couldn’t wash all the  small pieces I had because the threads would fray and there would be considerable size distortion…

I know there is a divided camp among those who always pre-wash fabrics no matter what and those who don’t.  Personally, I don’t wash because I DO love that crinkly texture after a quilt is finished and then laundered.  Also, many times I make quilts that will be photographed and need that crisp color that is fresh off the bolt. Which side of camp do you belong to?

WashingQuiltTools

So off I went to find out how I could prevent any bleeding from occurring.  I consulted with a few quilty friends and good ol’ Google to see what was out there.  Synthrapol kept coming up as the go-to detergent to help dyes from re-depositing back onto the quilt. I also received many recommendations to Shout Color Catchers for this dilemma and to use in pre-washing going forward.  I decided why not try both products since I didn’t want to chance ruining my new quilt?

ColorCatchers

I followed the instructions on the bottle of Synthrapol to use only 1 tablespoon for my quilt without any additional detergents.  I did add two Color Catchers into the load as well.  Why two? I figured the magenta and black fabrics held such strong pigments that two catchers might be needed. As you can see, both Color Catchers did their jobs and caught a good bit of dye (Sigh of relief!)

IMG_0983

The quilt came out without any bleeding…which I was still astonished to see despite my efforts.  The image about is after washing.  You can see there were no runs with the magenta or the black dyes onto the white.  Hallelujah!!!

IMG_0984

I flipped over to the back of the quilt to see if there might be any bleeding there as well.  It was completely clear!  The Synthrapol and Shout Color Catchers worked!

Although I’m glad this all worked out, my lesson has been learned to pre-wash high-contrast fabrics next time.  I plan to still use these products for washing all quilts afterwards…just in case 😉  What do you use to wash your quilts???


Hugs and Stitches,

Cristy


***I was not sponsored for the content of this post. All opinions and experiences are my own and have not been influenced by third parties.

***This post may contain affiliate links.  The nominal compensation helps keep this site safe and running.