Camouflage Kelly Anorak

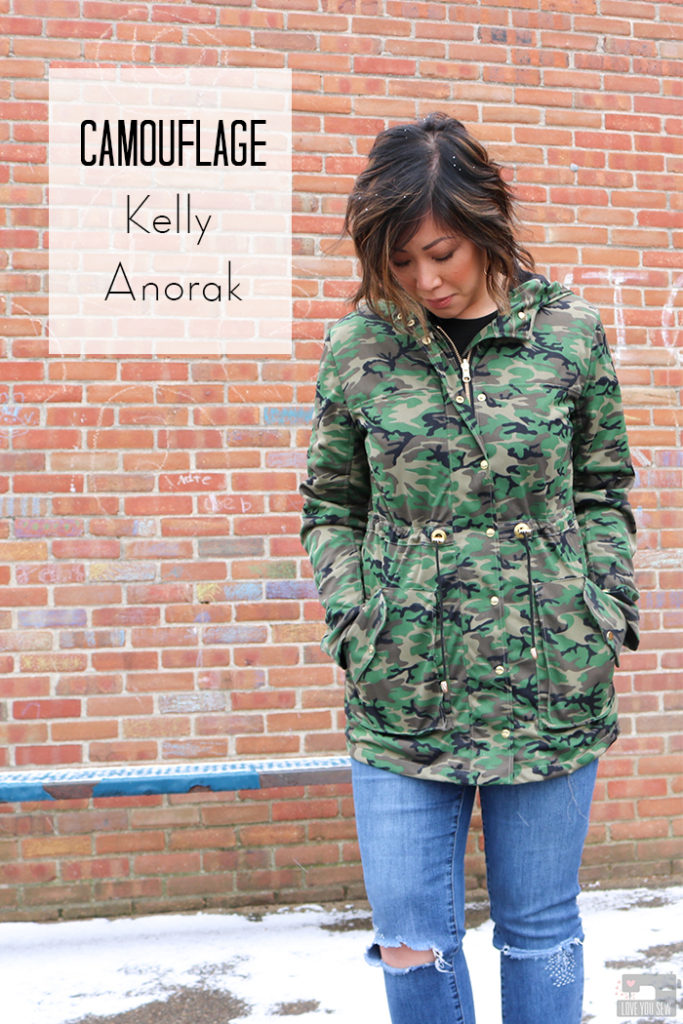
Camouflage prints are not just for combat.  This fabric print is heavy in current street style and I love it!!!  The print we know as camo has been around for decades and goes in and out of fashion.  But with notable fashion houses, like Valentino and Tom Ford, bringing the print into recent collections with either changes from the traditional color palette to the shapes of the pools, camouflage seems to be even more popular in recent years.

I’ve always loved camouflage print and am a big fan of mixing femme and masculine looks together.  At first, I tried to find old military jackets from the thrift shops to tailor down to my sizing, but it proved much harder than I thought it would.  Most of the camouflage from the shops were the newer pixelated prints like this (Marine 2002), whereas I was looking for the more traditional woodland pools of color.

Then Stylish Fabrics asked me to work with some of their fabric and I couldn’t say no.  Since my quest for a second-hand jacket was coming up short, I looked into Stylish Fabric’s selection and was so happy…ok, estactic…to find this Olive Camouflage stretch poly.  (Unfortunately, this fabric no longer available on their site.  But they do have other camo prints here.)  I knew this fabric along with the Kelly Anorak pattern were going to be exactly what I’ve been wanting needing in my wardrobe.

Fabric

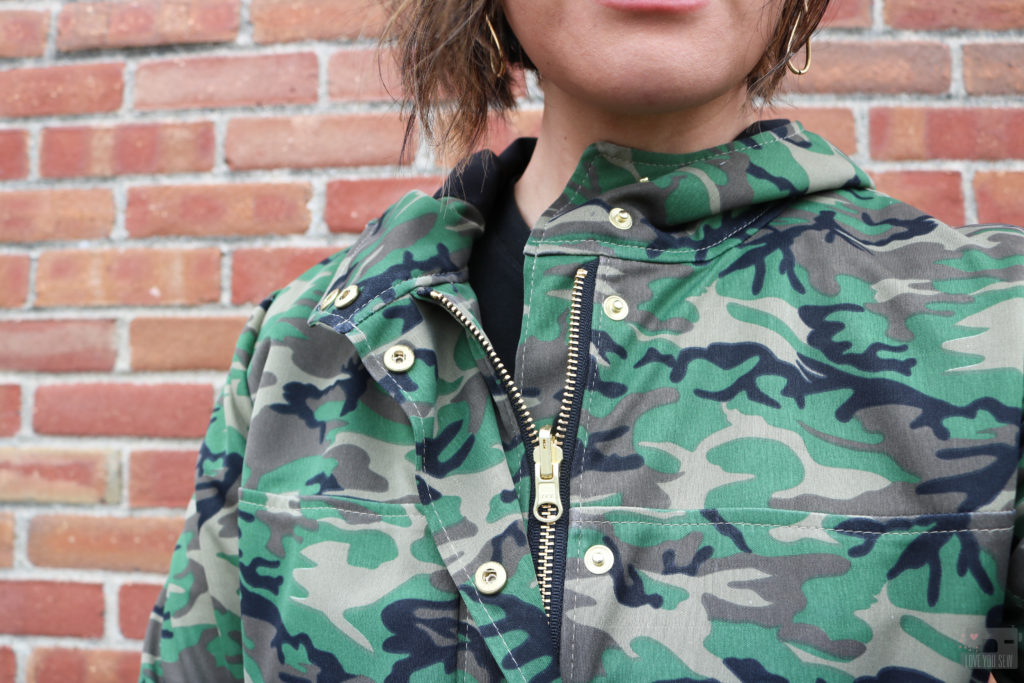
This Olive Camouflage is a screen printed design over polyester fabric with a slight two-way stretch which is great for movement.  I wasn’t sure this would be heavy enough for a jacket.  But paired with this Black Crepe, it’s the perfect combo for a light jacket.  The polyester shell is nice and smooth and I have a feeling it will be great against stains.  When working with this fabric, I did have to use spray starch to help with pressing since the poly content doesn’t give a crisp finish like a natural fiber would.

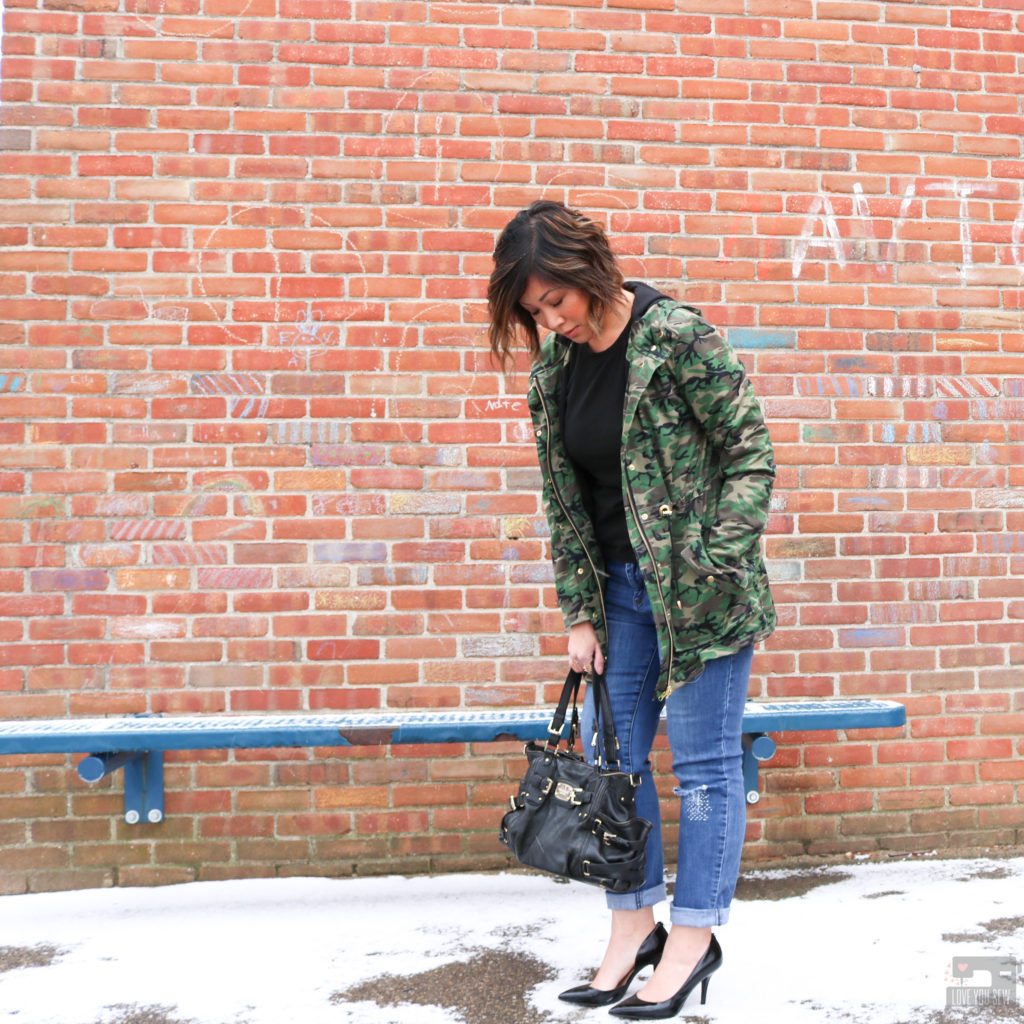
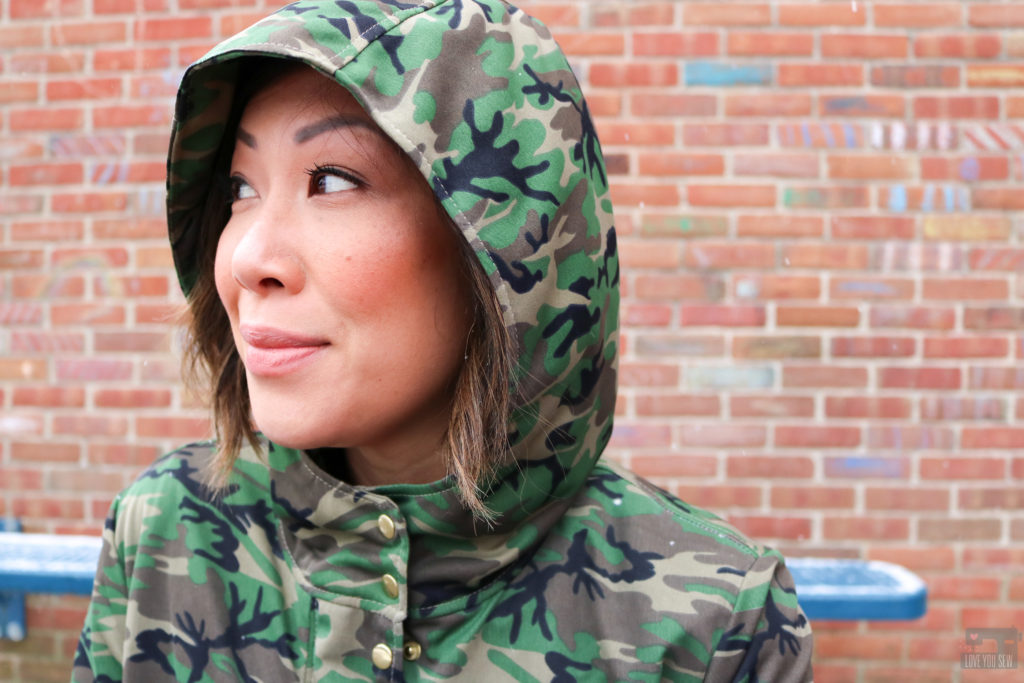
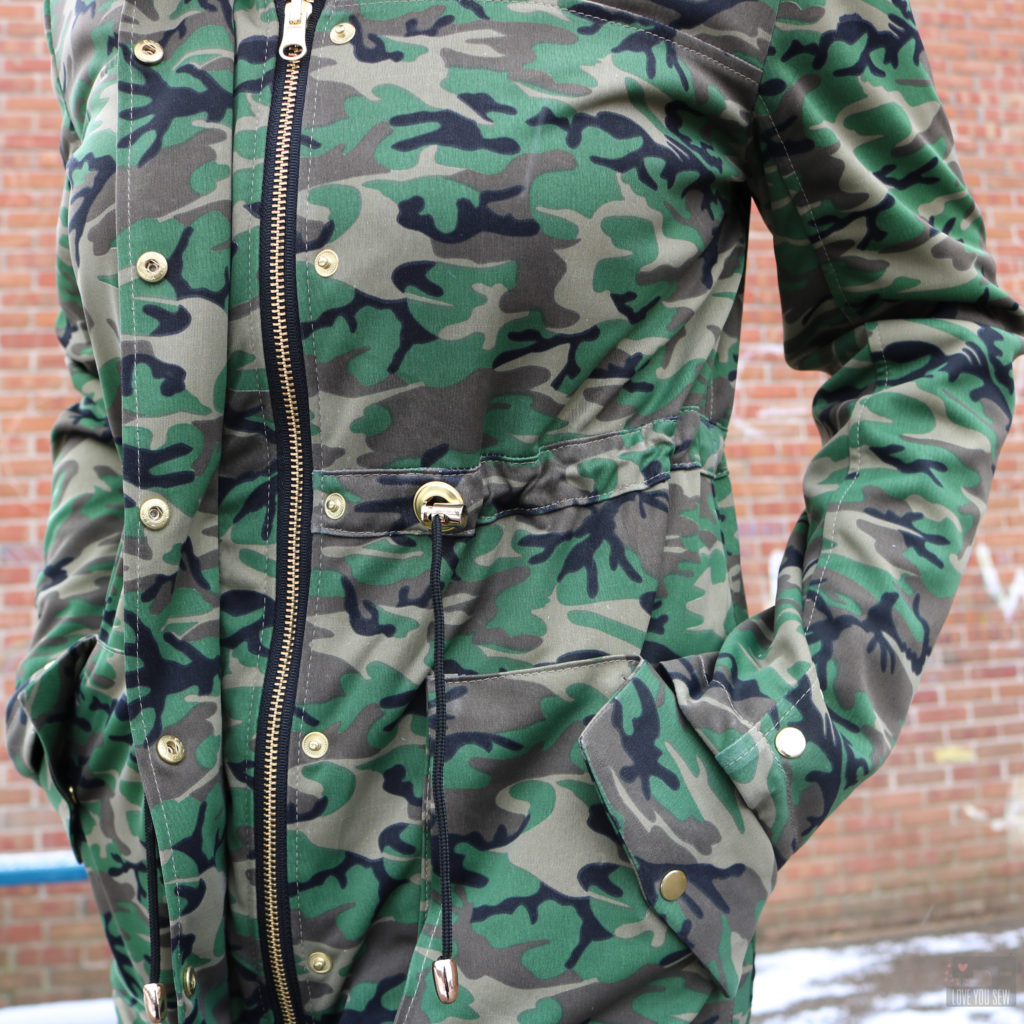
The Black Crepe fabric has a nice hand and is completely opaque.  There is even a little bit of spandex in this fabric for movement as well.  I don’t think I have to worry about seams popping with all the extra give in these fabrics!  With camouflage being a busy print, I though about a bolder pink or red lining.  Since you can see the lining on the hood, I figured neutral was the safer bet so it could be worn anytime…I think I made the right decision!

Pattern

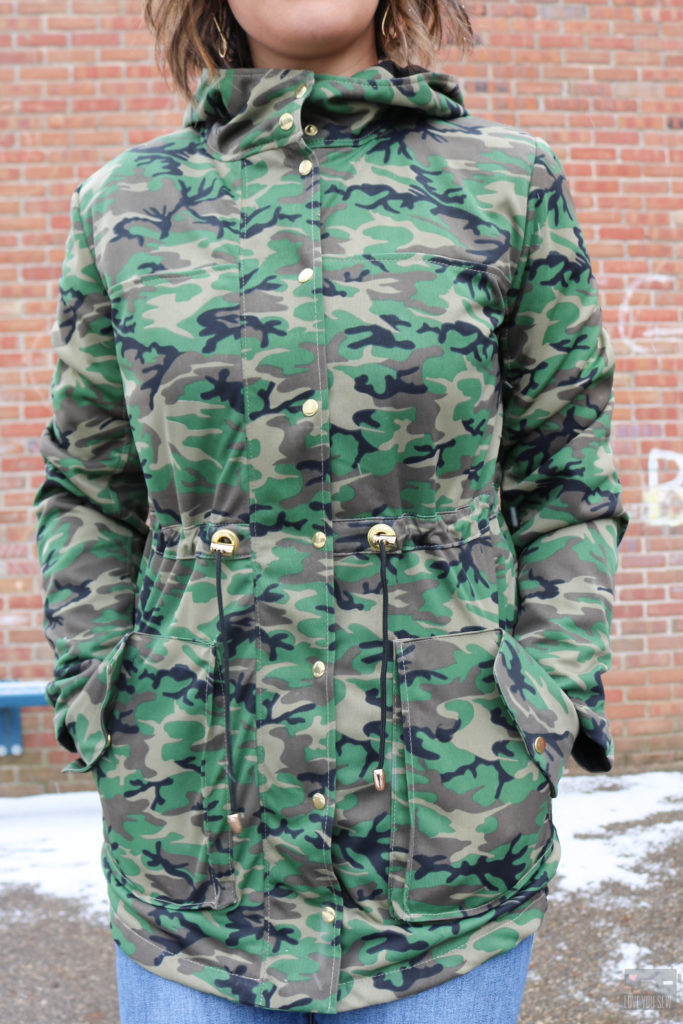
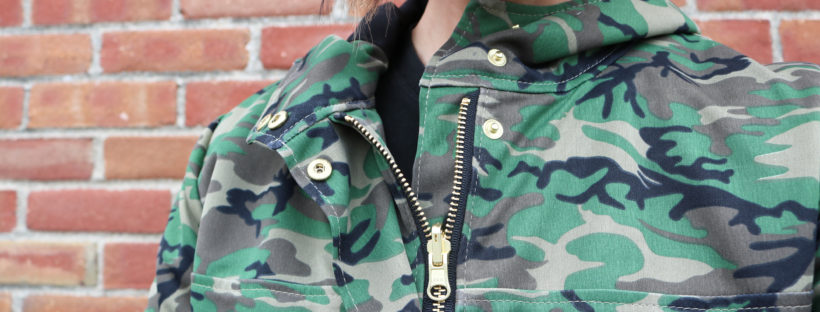
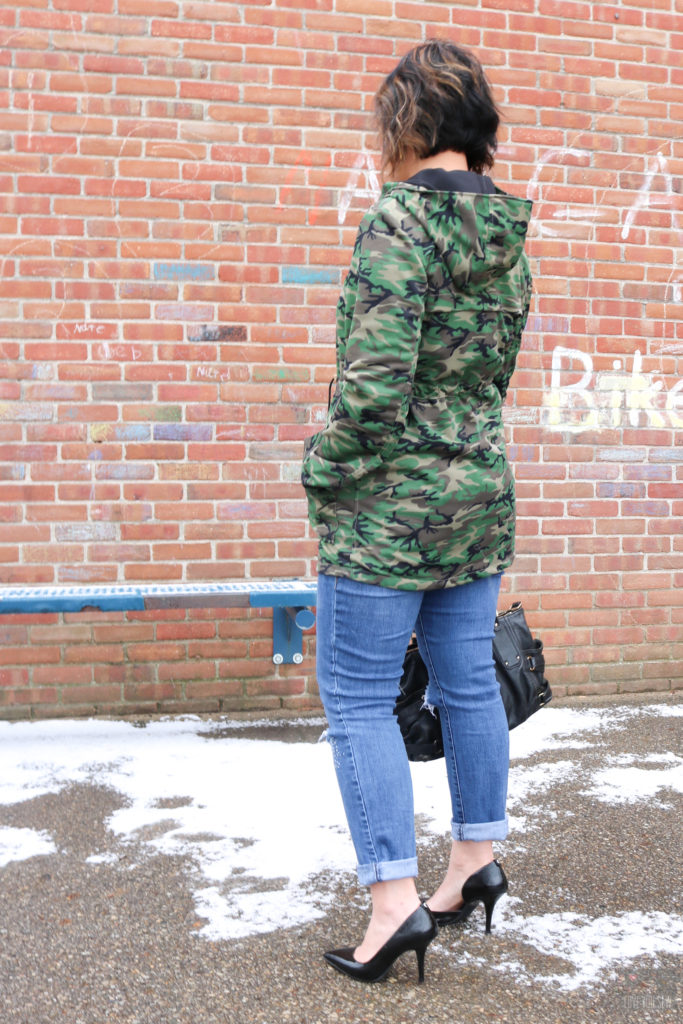
There are a few indie anorak style jacket patterns out there and I ended up going for the Kelly Anorak based on the length (to fully cover my backside) and for the number of snaps.   I also wanted to make the camouflage more femme with lots of gold hardware – and with 11 snaps plus 2 grommets, I was excited about the possibilities!


The original pattern is unlined, but there is an add-on for the lining.  If you make the anorak WITH a lining, be sure to use those instructions.  You will omit some of the pattern pieces from the original pattern and/or swap them out for different ones with the lining.  Don’t make my mistake and end up with wasted fabric from cutting out all of the original pattern pieces first!


After sorting out my pattern pieces, I was ready to go and loved having the Closet Case Sew-Along in conjunction with the actual instructions.  It’s so nice to have the extra pictures and different angles to make sure the jacket is being sewn properly.

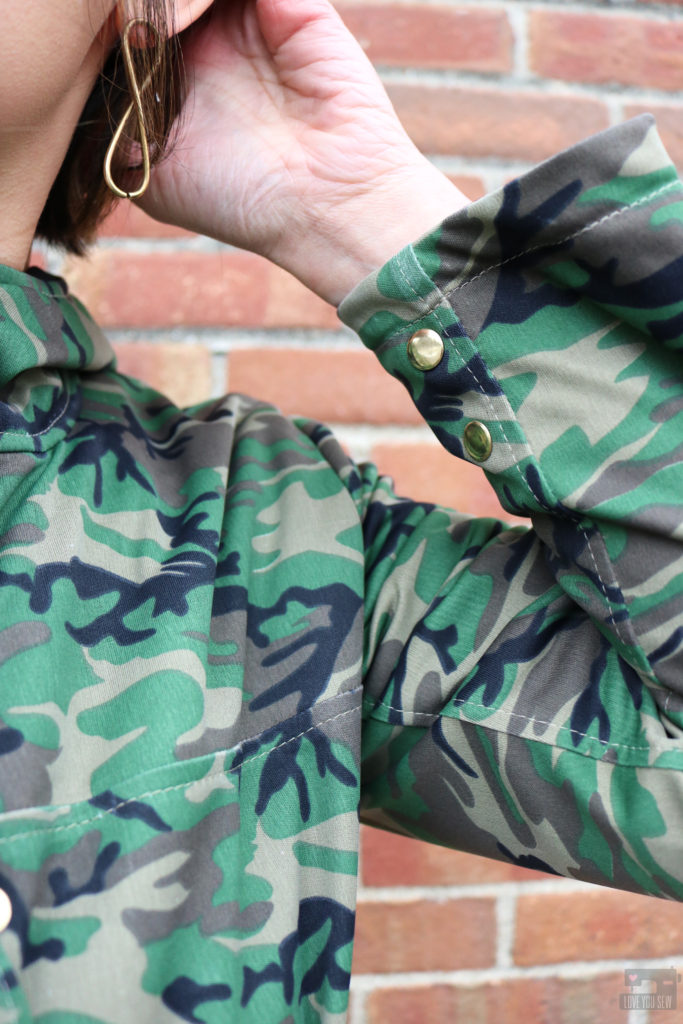
One of the major changes making the lined version of the Kelly Anorak is the cuff — or more so, the lack of.  In the original version, there is a cuff with snaps.  But in the lined version, you just sew the sleeves together.  To give a little bit of the look, I added two snaps for the extra accents.  If I make this jacket again, I will definitely hack the lined version for the cuffs!

Closet Case Patterns has a great kit on their website with all the extra hardware, zipper and drawstring for the project.  I decided to go my own route for chunkier brass accents and used the following:

  • Zipper:  This is actually a reversible jacket from Wawak.  While the pattern doesn’t call for the reversible style, I liked the size and the shape of the metal pull.
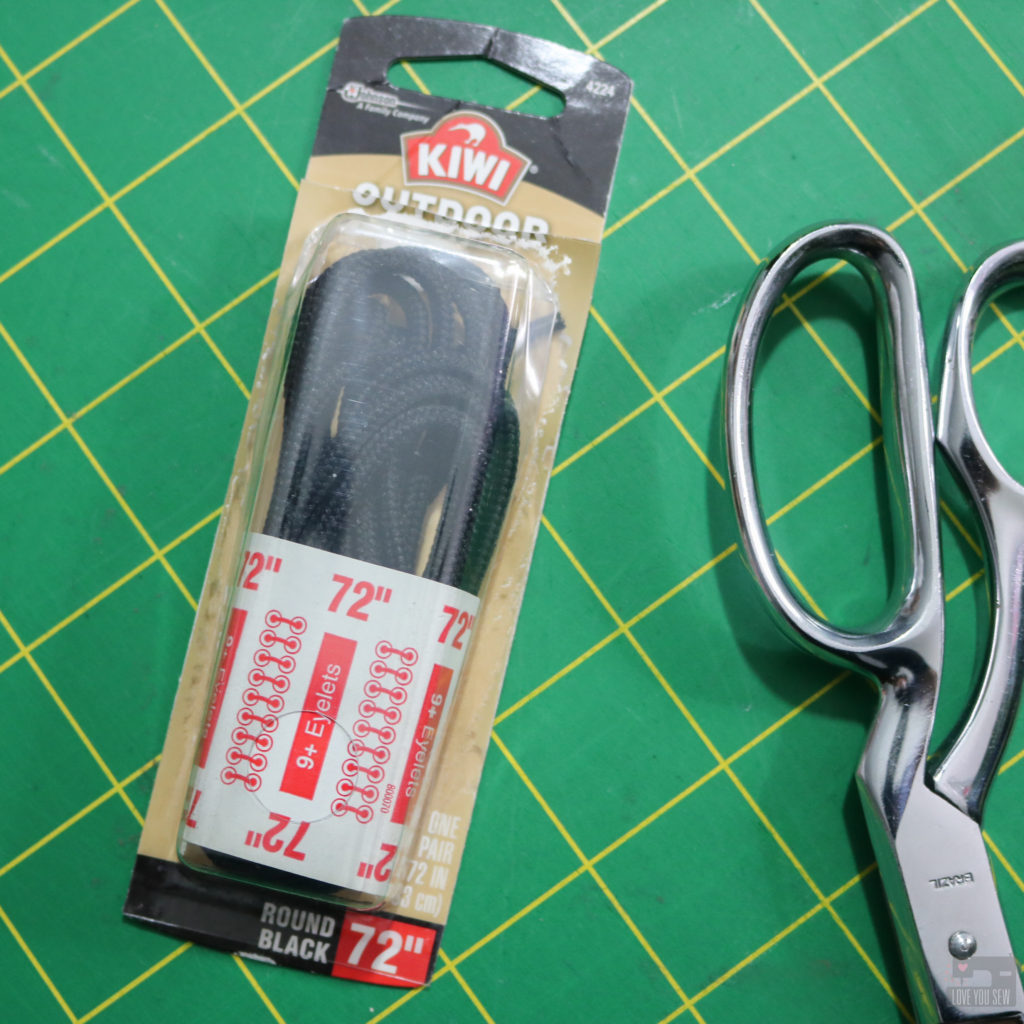
  • Drawstring:  By chance, I happen to have these extra shoelaces after replacing a set of a different length.  I cut one shoelace to length and burned the ends to seal.
  • Cord Stopper and Cord Ends:  I found both items in this cute shop on Etsy, called PacificTrimming.
  • Grommets:  These are size 2 and were also from Wawak.  The pattern suggests size 0 or 1, which I should have read before ordering…doh!  They were very difficult to stitch around, so go with the recommendation!
  • Snaps:  I bought these double capped spring snaps from GoldStar tool and since I already have a press, I went ahead and got the dies.  You can buy these snaps with the hand setter as well.  I like the double-cap snaps for added strength and they look nice on the inside of the jacket too.

Initially, I was pretty overwhelmed with this pattern due to just the number of pattern pieces I had to cut out.  But I paced myself and sewed it slowly step-by-step so I could have this jacket for  years to come.  I’m happy I took my time and sewed the Kelly Anorak in digestible chunks so I wouldn’t be discouraged.  So don’t be scared!  I hope you try out the pattern….and extra points if you go camo like I did!!!

Well, Stylish Fabrics has generously offered 20% off the entire site from now until Sunday, March 10, 2019.  Use the code: STYLISHXCRISTY at checkout.


Happy Sewing!

Cristy


This post was sponsored by Stylist Fabrics and all fabric used was provided by the company.  Pattern and notions were all purchased by me.  This post may also contain affiliate links for which I may receive a small compensation to keep this website running.  Thank you for your support 🙂

Art Gallery Rayon :: Cookie Blouson Jacket

I’m kicking things off with Art Gallery Fabric‘s Rayon Blog Hop today!  Rayon is their newest substrate and I can’t even tell you how much I luuuurve it.  I was lucky enough to get an advanced preview when April Rhodes release her Heritage Fabrics and I just am obsessed with the drape and feel of this fabric.  You can read more about it here.

When most people hear “Rayon,” they think of summery dresses or slippery nightgowns.  But in this blog hop, we were tasked to come up with other ways to use the fabric.  As fall was approaching and while I was looking through the fashion blogs, the maker light bulb went off when I started to see bomber jackets.  The 90s fashion trends are back (some I’d rather not relive…) and I thought a fun bomber made of rayon would be perfect to ride the satin and army green trends showing up on the streets right now.  Check out my Pinterest Board here to see my inspirations.

I’ve had my eye on the Cookie Blouson by Waffle Patterns for awhile now.  The design is a great feminine take  on a track jacket with the gathered sleeves and gathered body around the yokes.  Even though it’s a track style versus a bomber, I knew this pattern would give me the same feel…The only difference  is the collar.

I was in-between sizes per the measurements, but after reviewing the finished measurements, I decided to size down for a more fitted look.  With the fabric and bold pattern, this jacket would look great in heels as much as in sneakers 🙂 I wanted to make sure it would be a great jacket to wear indoors and out.

For the right statement fabric, I chose Floret Sunkissed from the Blush fabrics collection by Dana Willard as the shell.  For the interior, I used Hex Rose from the same collection, but in quilting cotton.  AGF Solid Knit in Sahara Sun was a great complementary color to really make this jacket pop and add some fun!

While working through the jacket, it was very important to reinforce the high stress areas since rayon is so delicate.  I used Pellon 906F interfacing around all the metal zippers (due to their extra weight) and even on the exterior yokes to provide some additional structure as well.

These zipper pockets are such a great detail.  However, the pattern called for a 5″ zipper opening.  After taking 1/2″ allowance away for the zipper head and stopper, I would be left with a 4.5″ opening….which is pretty tight (and I have small hands!)  I increased the opening to 6″ for a little more room to maneuver because I HAVE to use pockets if they are there.

With the track collar, I wanted it to stand up when zipped, but it also needed to handle the weight of the metal zipper.  So I doubled up the layers of the Solid Knit jersey.  Not only does the collar stand up (mission accomplished,) but it keeps my neck extra warm!

For the construction of this jacket, I used Polyester thread throughout for the strength.  A jacket is going to experience a good bit of wear and this thread allows for a bit more give and movement.  However, I used matching Sulky Rayon Thread for all of the top-stitching to match the sheen of the fabric.  I’m pretty hooked on the look of rayon thread….it’s so beautiful!

The Cookie Blouson pattern itself, was not too difficult.  Even with the zippers, I would rate this as advanced beginner.  But then came the lining…   It was a free add-on via a few blog posts by Waffle Patterns.  The pattern designer’s first language is not English, so the translations were a bit rough.   I was pretty frustrated at some points, but made it work.  I would consider the lining at an intermediate level because you are essentially drafting your own pattern pieces.  If I would’ve known this beforehand, I probably would’ve skipped the pattern altogether because I needed a lining with a rayon shell.  But, of course, I love the final product 🙂


I’ve made a handful of Rayon garments, and have a few tips I’d like to share:

  • For accurate cuts, I cut on the floor for an even cutting surface…especially if you are pattern matching.  Any fabric hanging off the edge of a cutting table can pull and distort your cut.
  • Don’t be shy with fabric weights.  This points to the slippery and shifty nature of rayon.  You want an even and accurate cut.  Iron and smooth out your fabric with your fabric aligned and then set the weights down.
  • A small rotary cutter is great to cut out patterns because scissors can cause movement and shifts in your fabric as you cut.  (This doesn’t matter as much if you aren’t pattern matching.)
  • I use ultra fine pins (with the blue heads, shown above) for construction.  The traditional quilting pins (with the yellow heads) are a bit larger and can cause pulls in the fabric.  With the slippery rayon, I also use a lot more pins that I would with cotton – probably twice as many to keep my fabrics aligned together.

Project Summary:

  • Exterior Shell Fabric:  Floret Sunkissed Rayon by Dana Willard for Art Gallery Fabrics
  • Lining Fabric: Hex Rose Quilting Cotton by Dana Willard for Art Gallery Fabrics
  • Accent Knit: Sahara Sun Solid Knit by Art Gallery Fabrics
  • Pattern:  Cookie Blouson by Waffle Patterns
  • Piecing Thread:  Gutermann Polyester
  • Top-Stitching Thread: Sulky Rayon 50 wt
  • Zippers: YKK Brass separating and jeans zippers in Camel by Wawak Sewing Supplies

Don’t forget to stick around all this AND next week for the rest of the #AGFrayonbloghop.  I’m so excited to check out all of the projects alongside you!

Monday, October 9 – Cristy @loveyousew_ (you are here!)

Tuesday, October 10– Nicole @modernhandcraft

Wednesday, October 11 – Sarah @sariditty

Thursday, October 12 – Jesy @needle_ink_and_thread

Friday, October 13 – Danyella @madesewmodern

Monday, October 16 – Nichole @wildboho

Tuesday, October 17 – Cynthia @cnytz51

Wednesday, October 18 – Vicki @orchidowlquilts

Thursday, October 19 – Amanda @pinkmandarinhandmade

Friday, October 20 – Jenn @jennrossotti


I hope you have found some inspiration or just enjoy some fabric eye-candy!  Do you have a rayon project lined up or on the wishlist?  I’d love to hear what you would make.


Happy Sewing Friends!

Cristy


***This post was sponsored by Art Gallery Fabrics.  While the fabric was provided for the post, the ideas, execution and post are all my own work and words.  Please also note there are affiliate links which help run this blog.  Thanks for your support!