Kaleidoscope Quilt and Schnitzel & Boo (R4) Mini Quilt Swap Re-Cap

KaleidoscopeTitle

The Schnitzel and Boo Mini Quilt Swap was the first swap I followed on Instagram.  I was pouring over the hashtag #schnitzelandboominiquiltswap and trying to figure out what the heck was going on!  This swap has the claim of being the original swap where you are blind partnered (the recipient doesn’t know who is the maker) to make sweet mini quilts and thus, it had over 1000 participants…wow!

FabricandColoringSheet

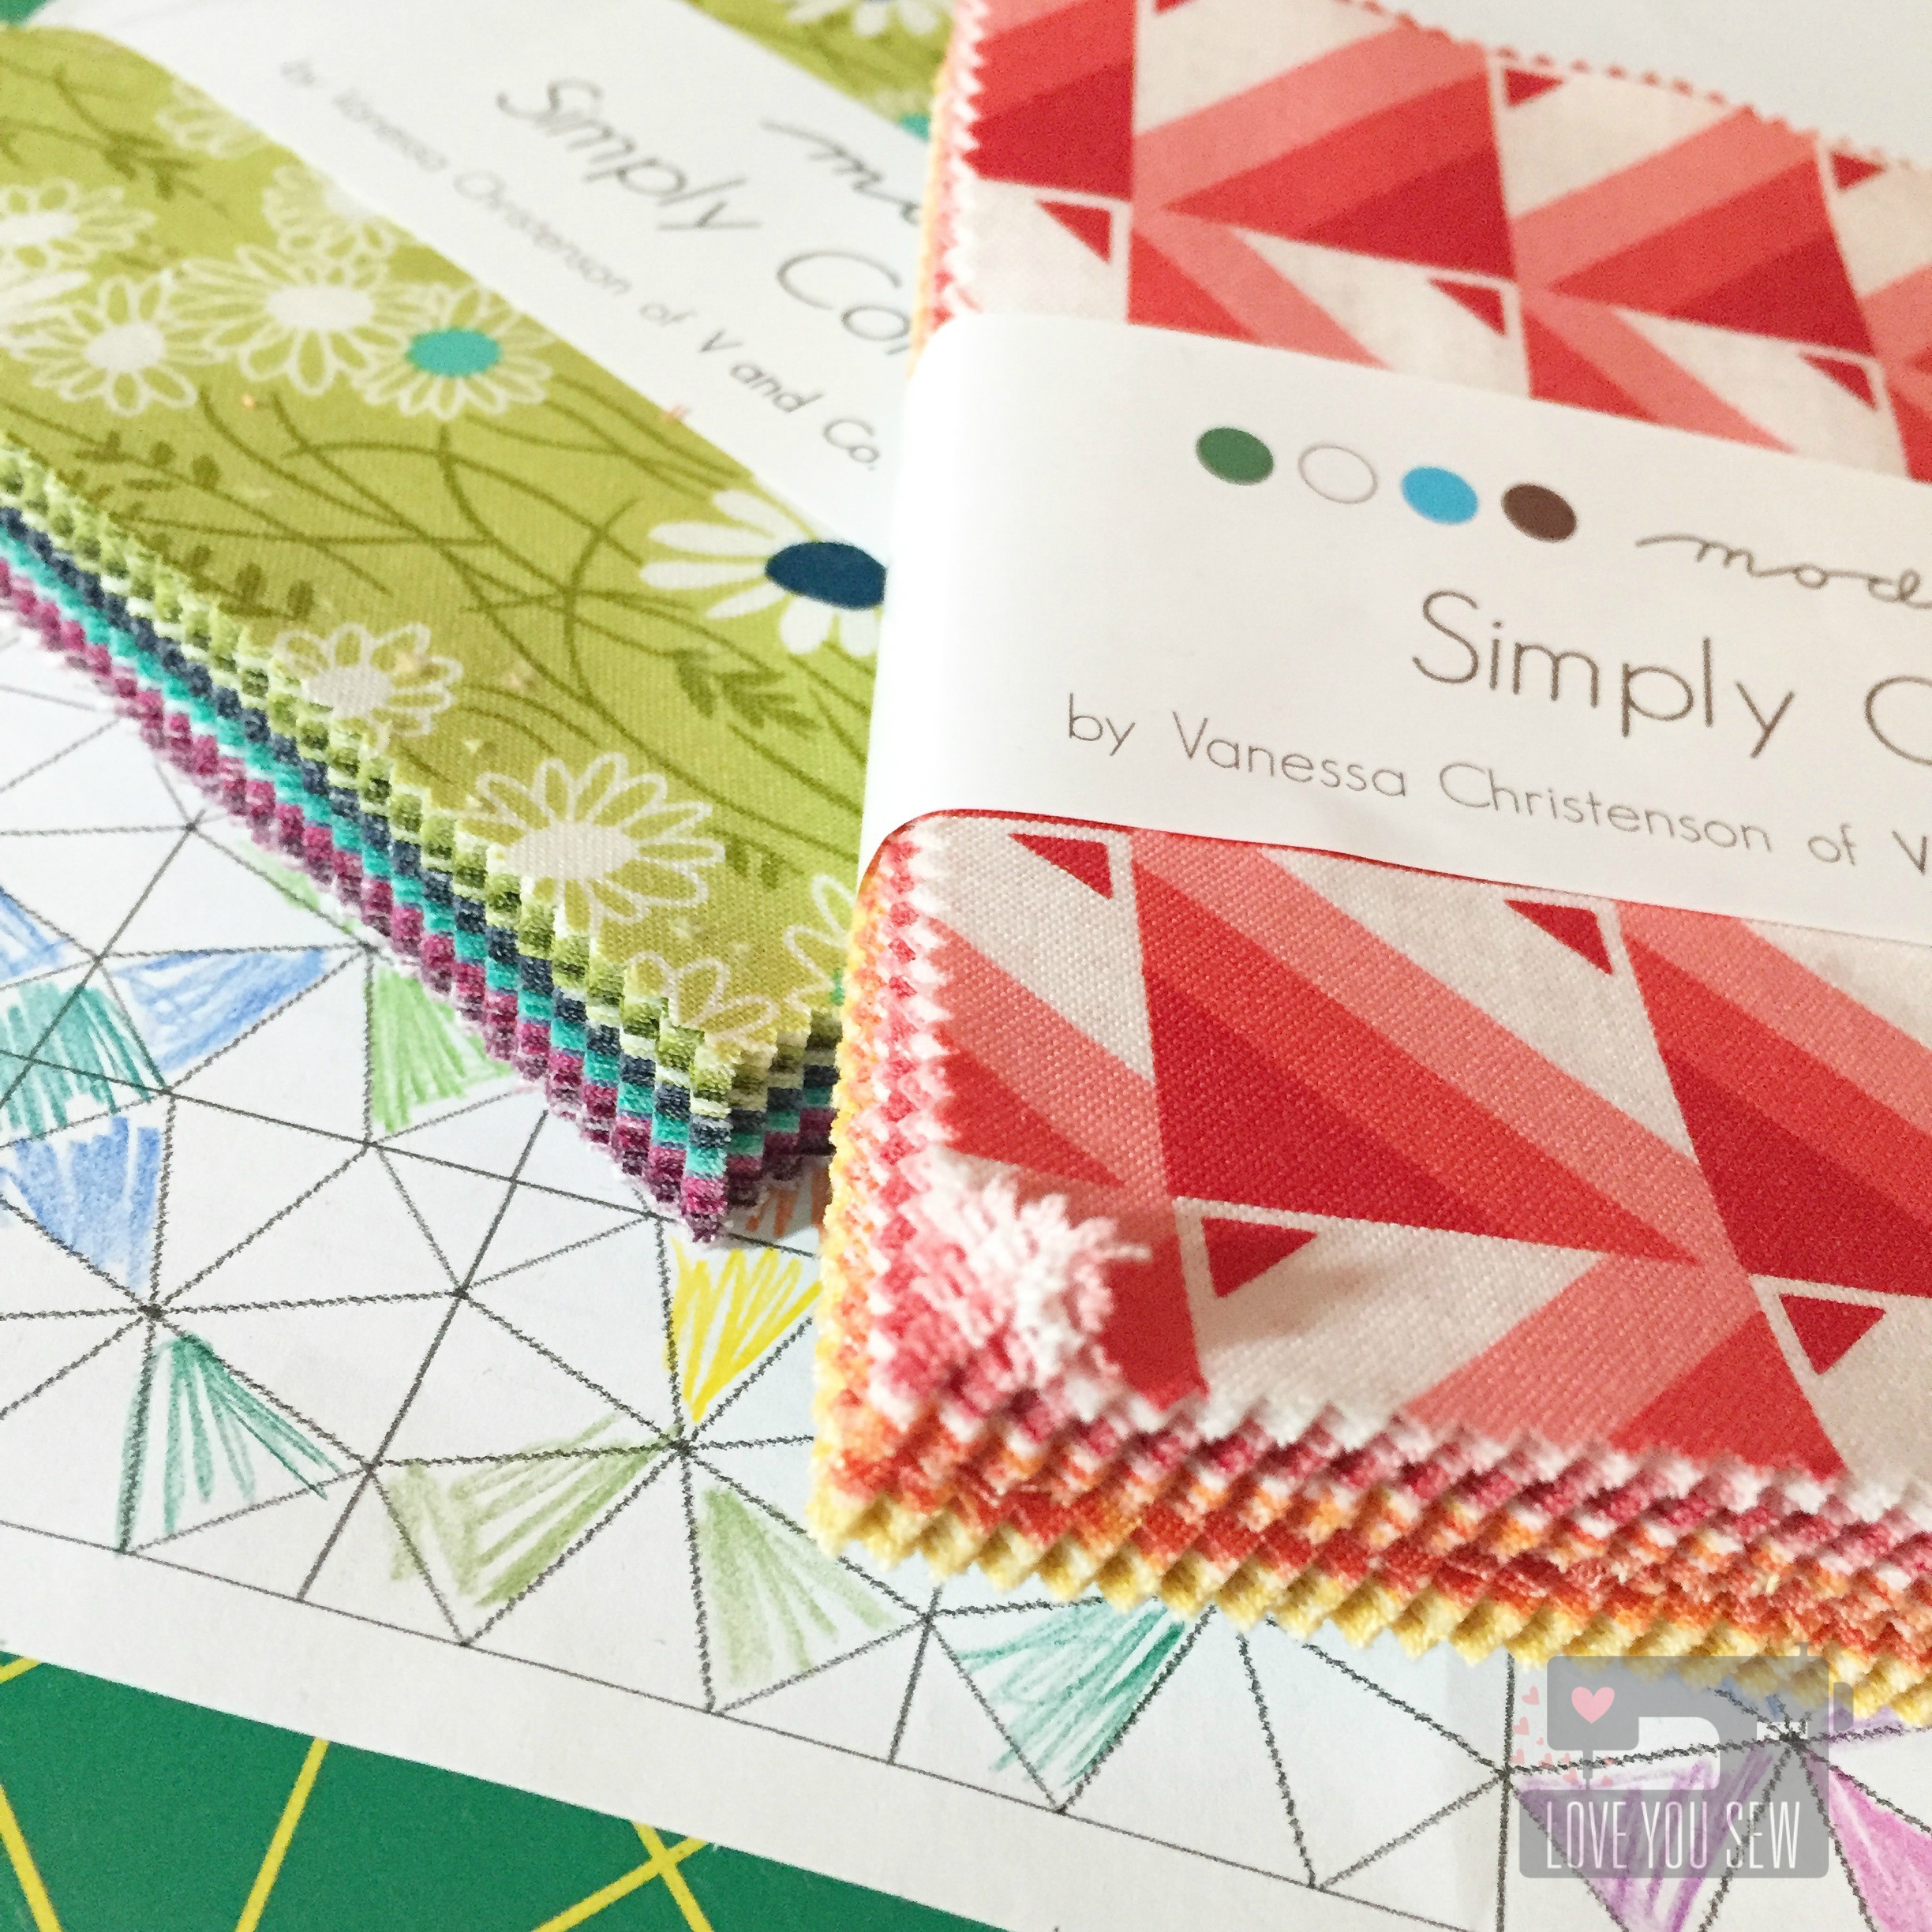
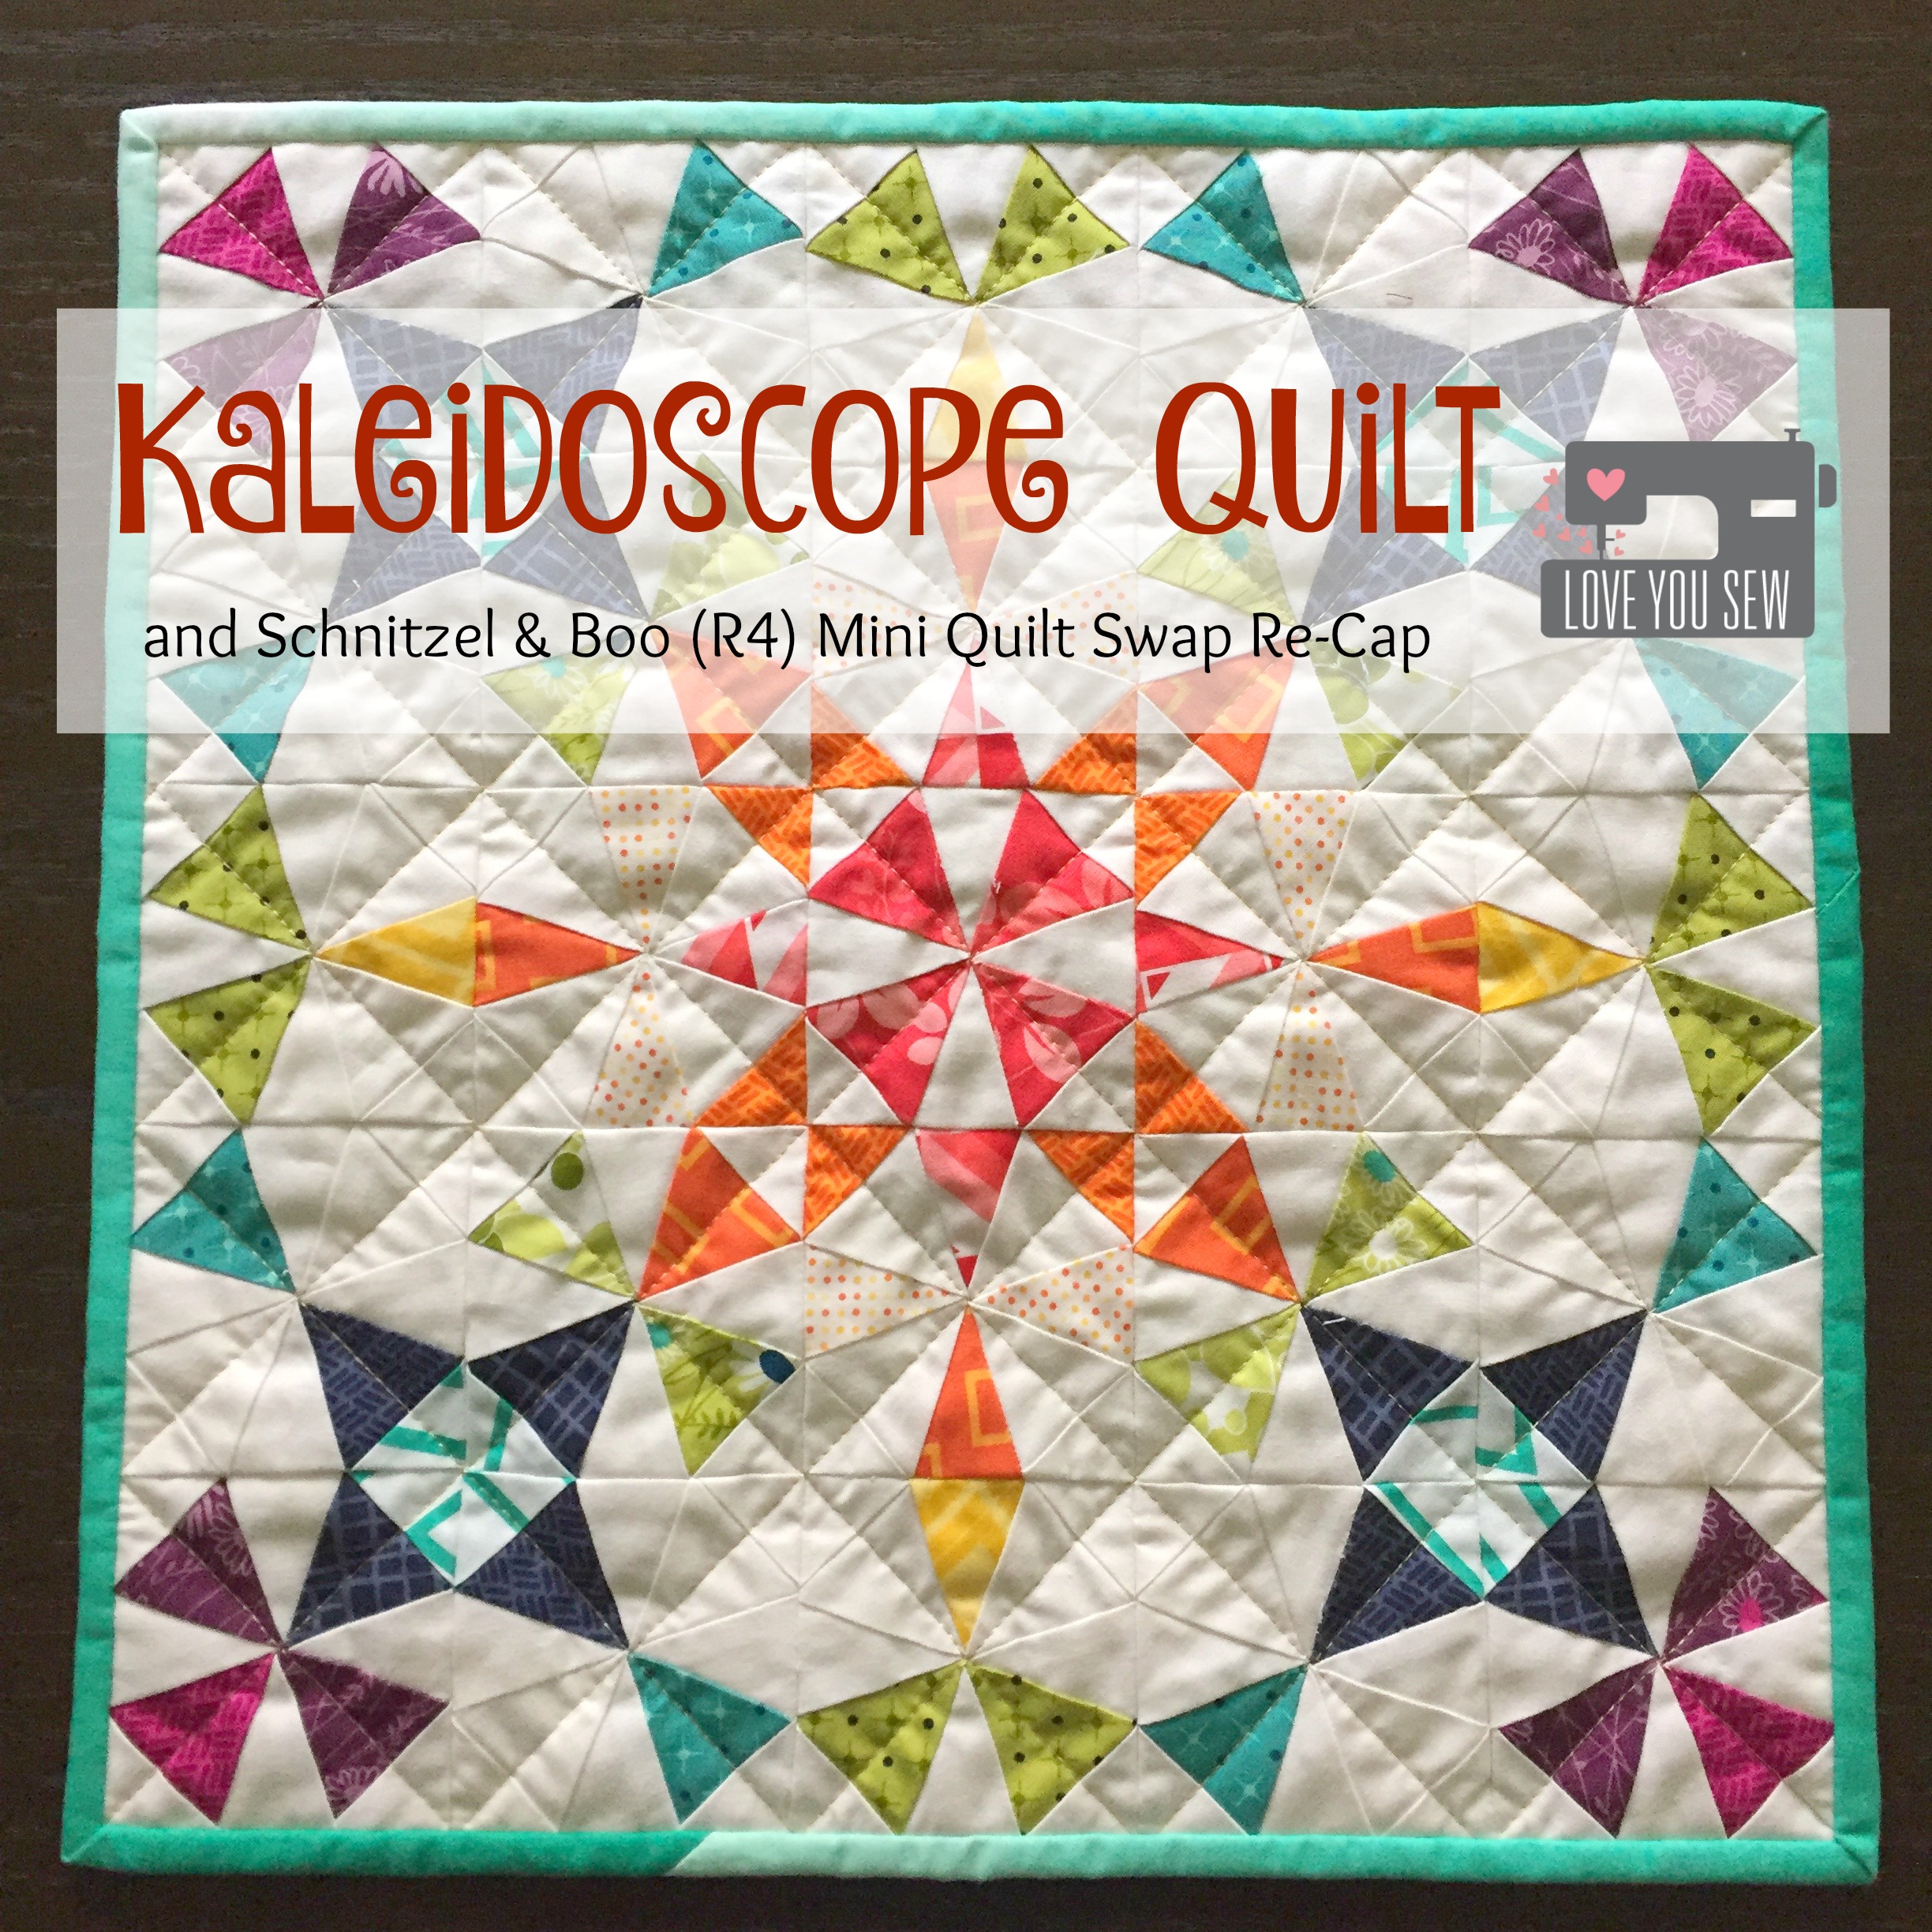
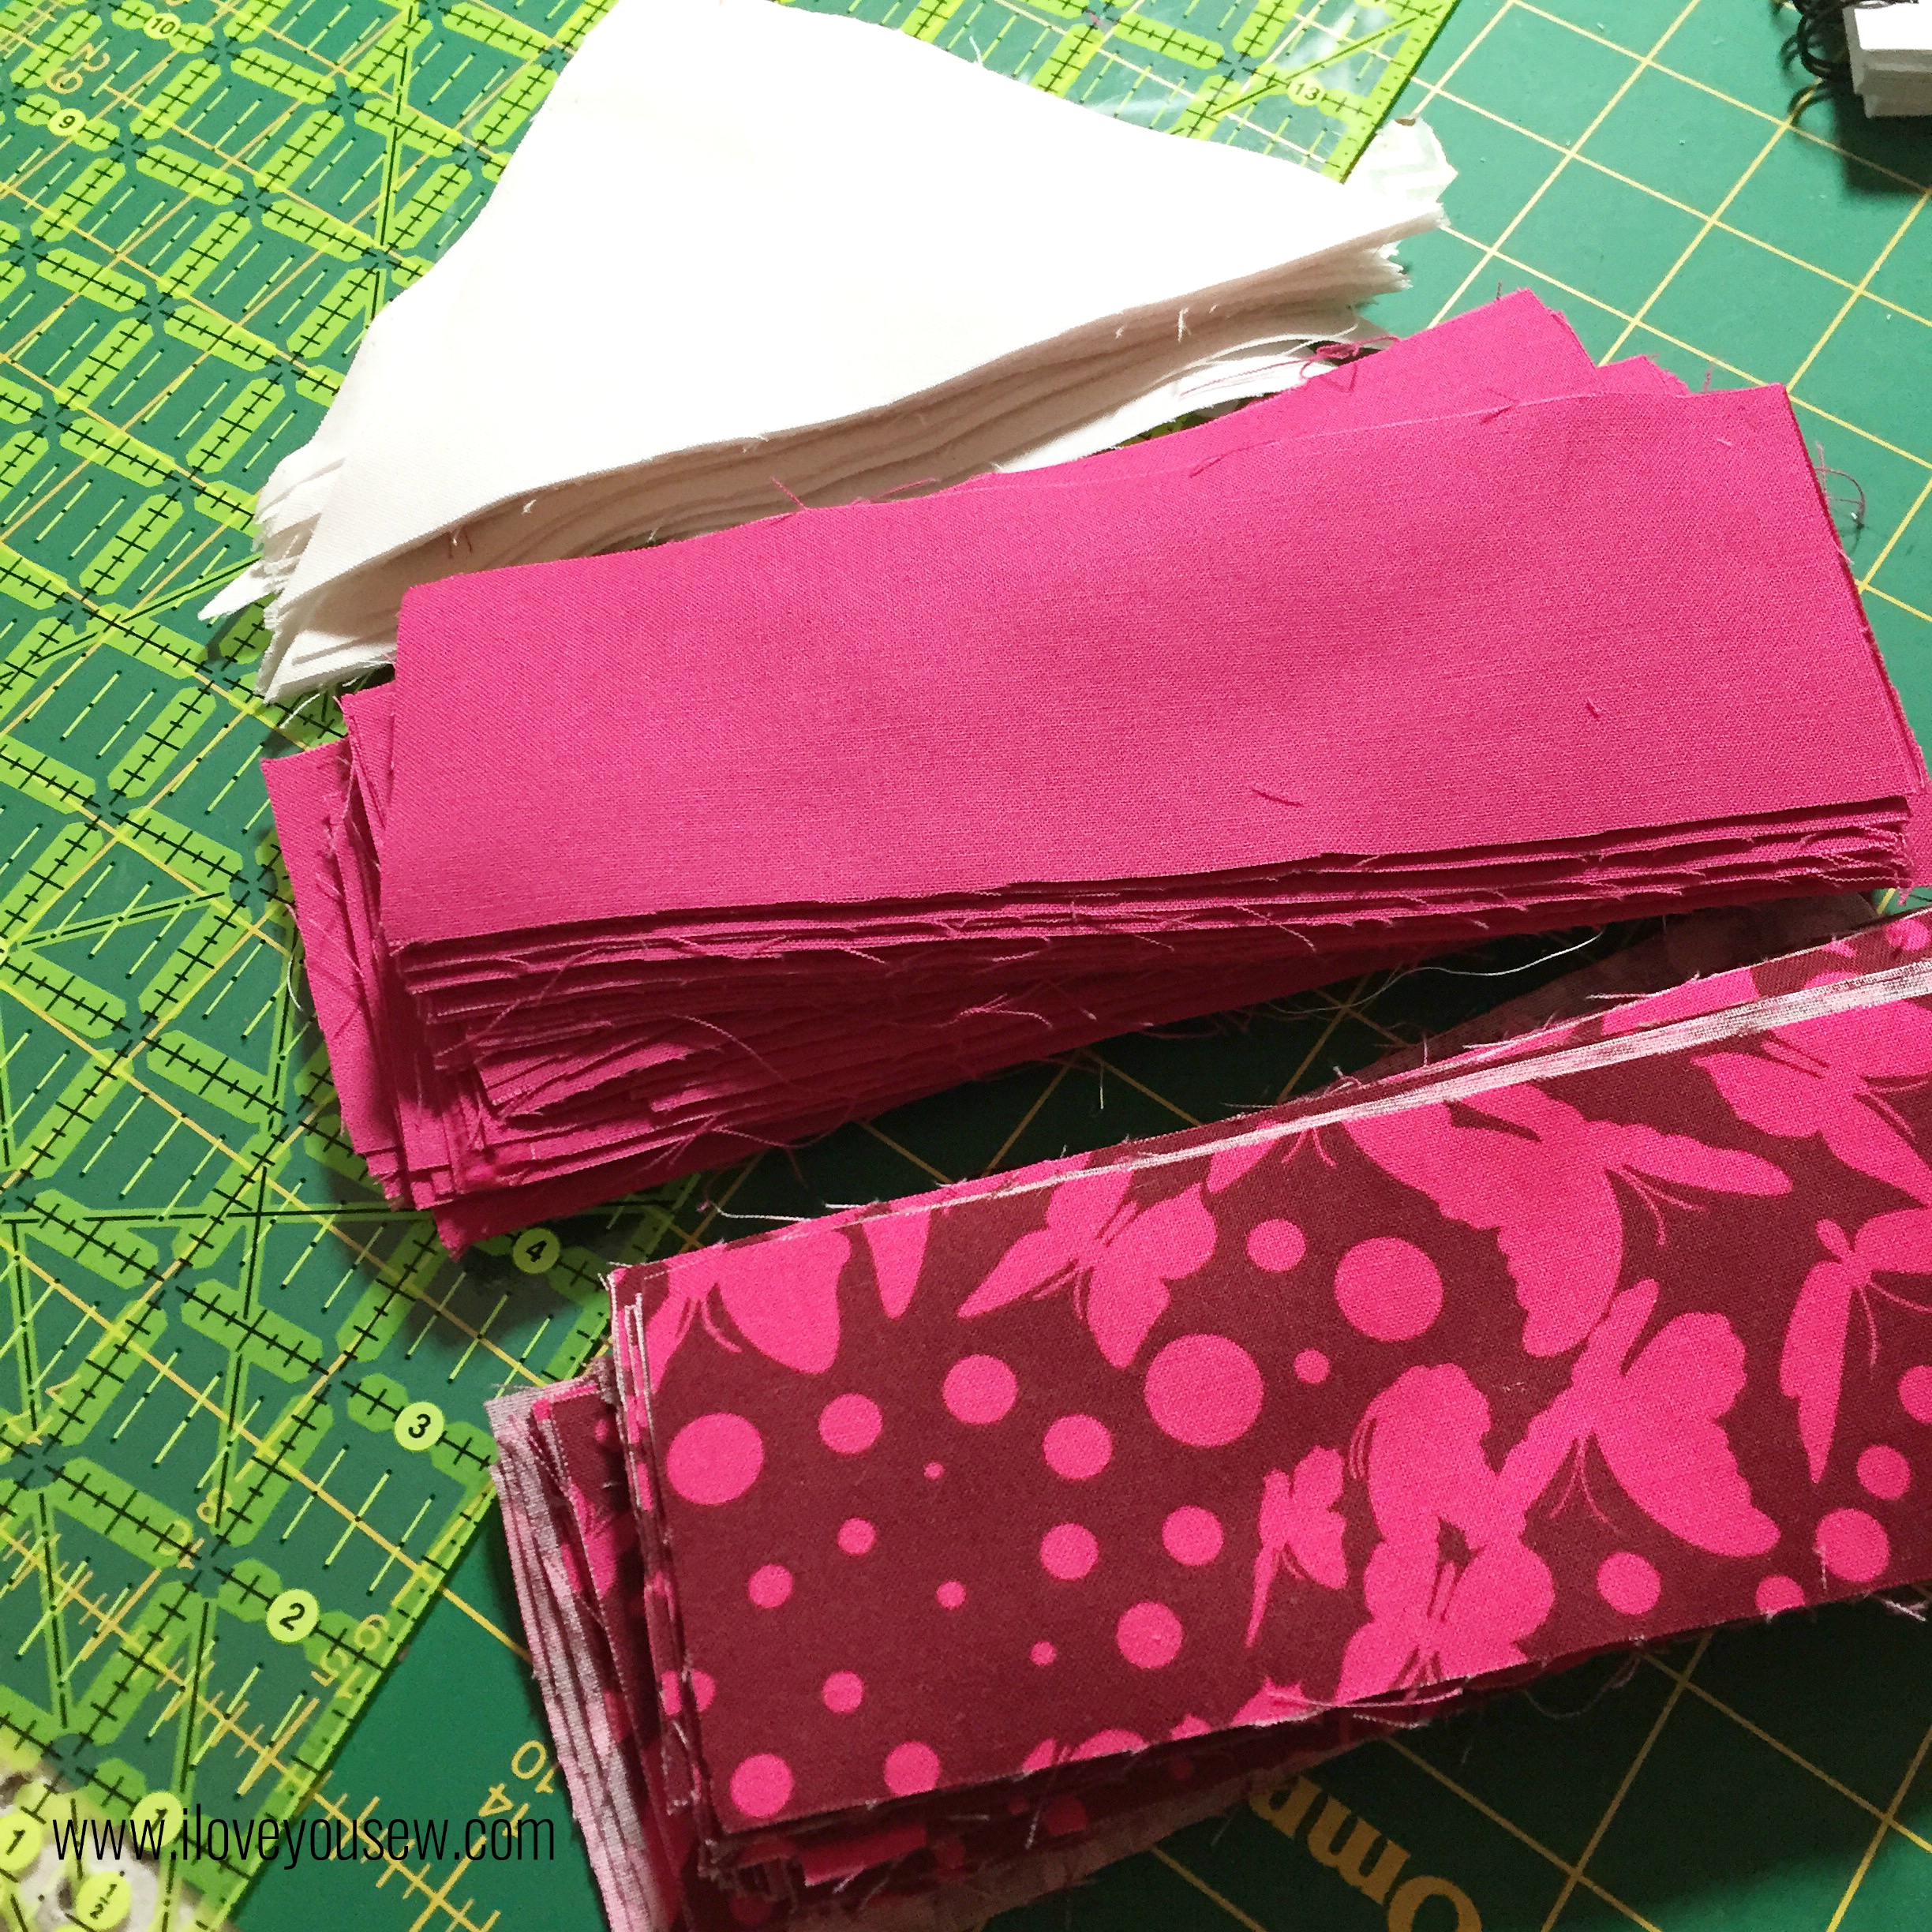
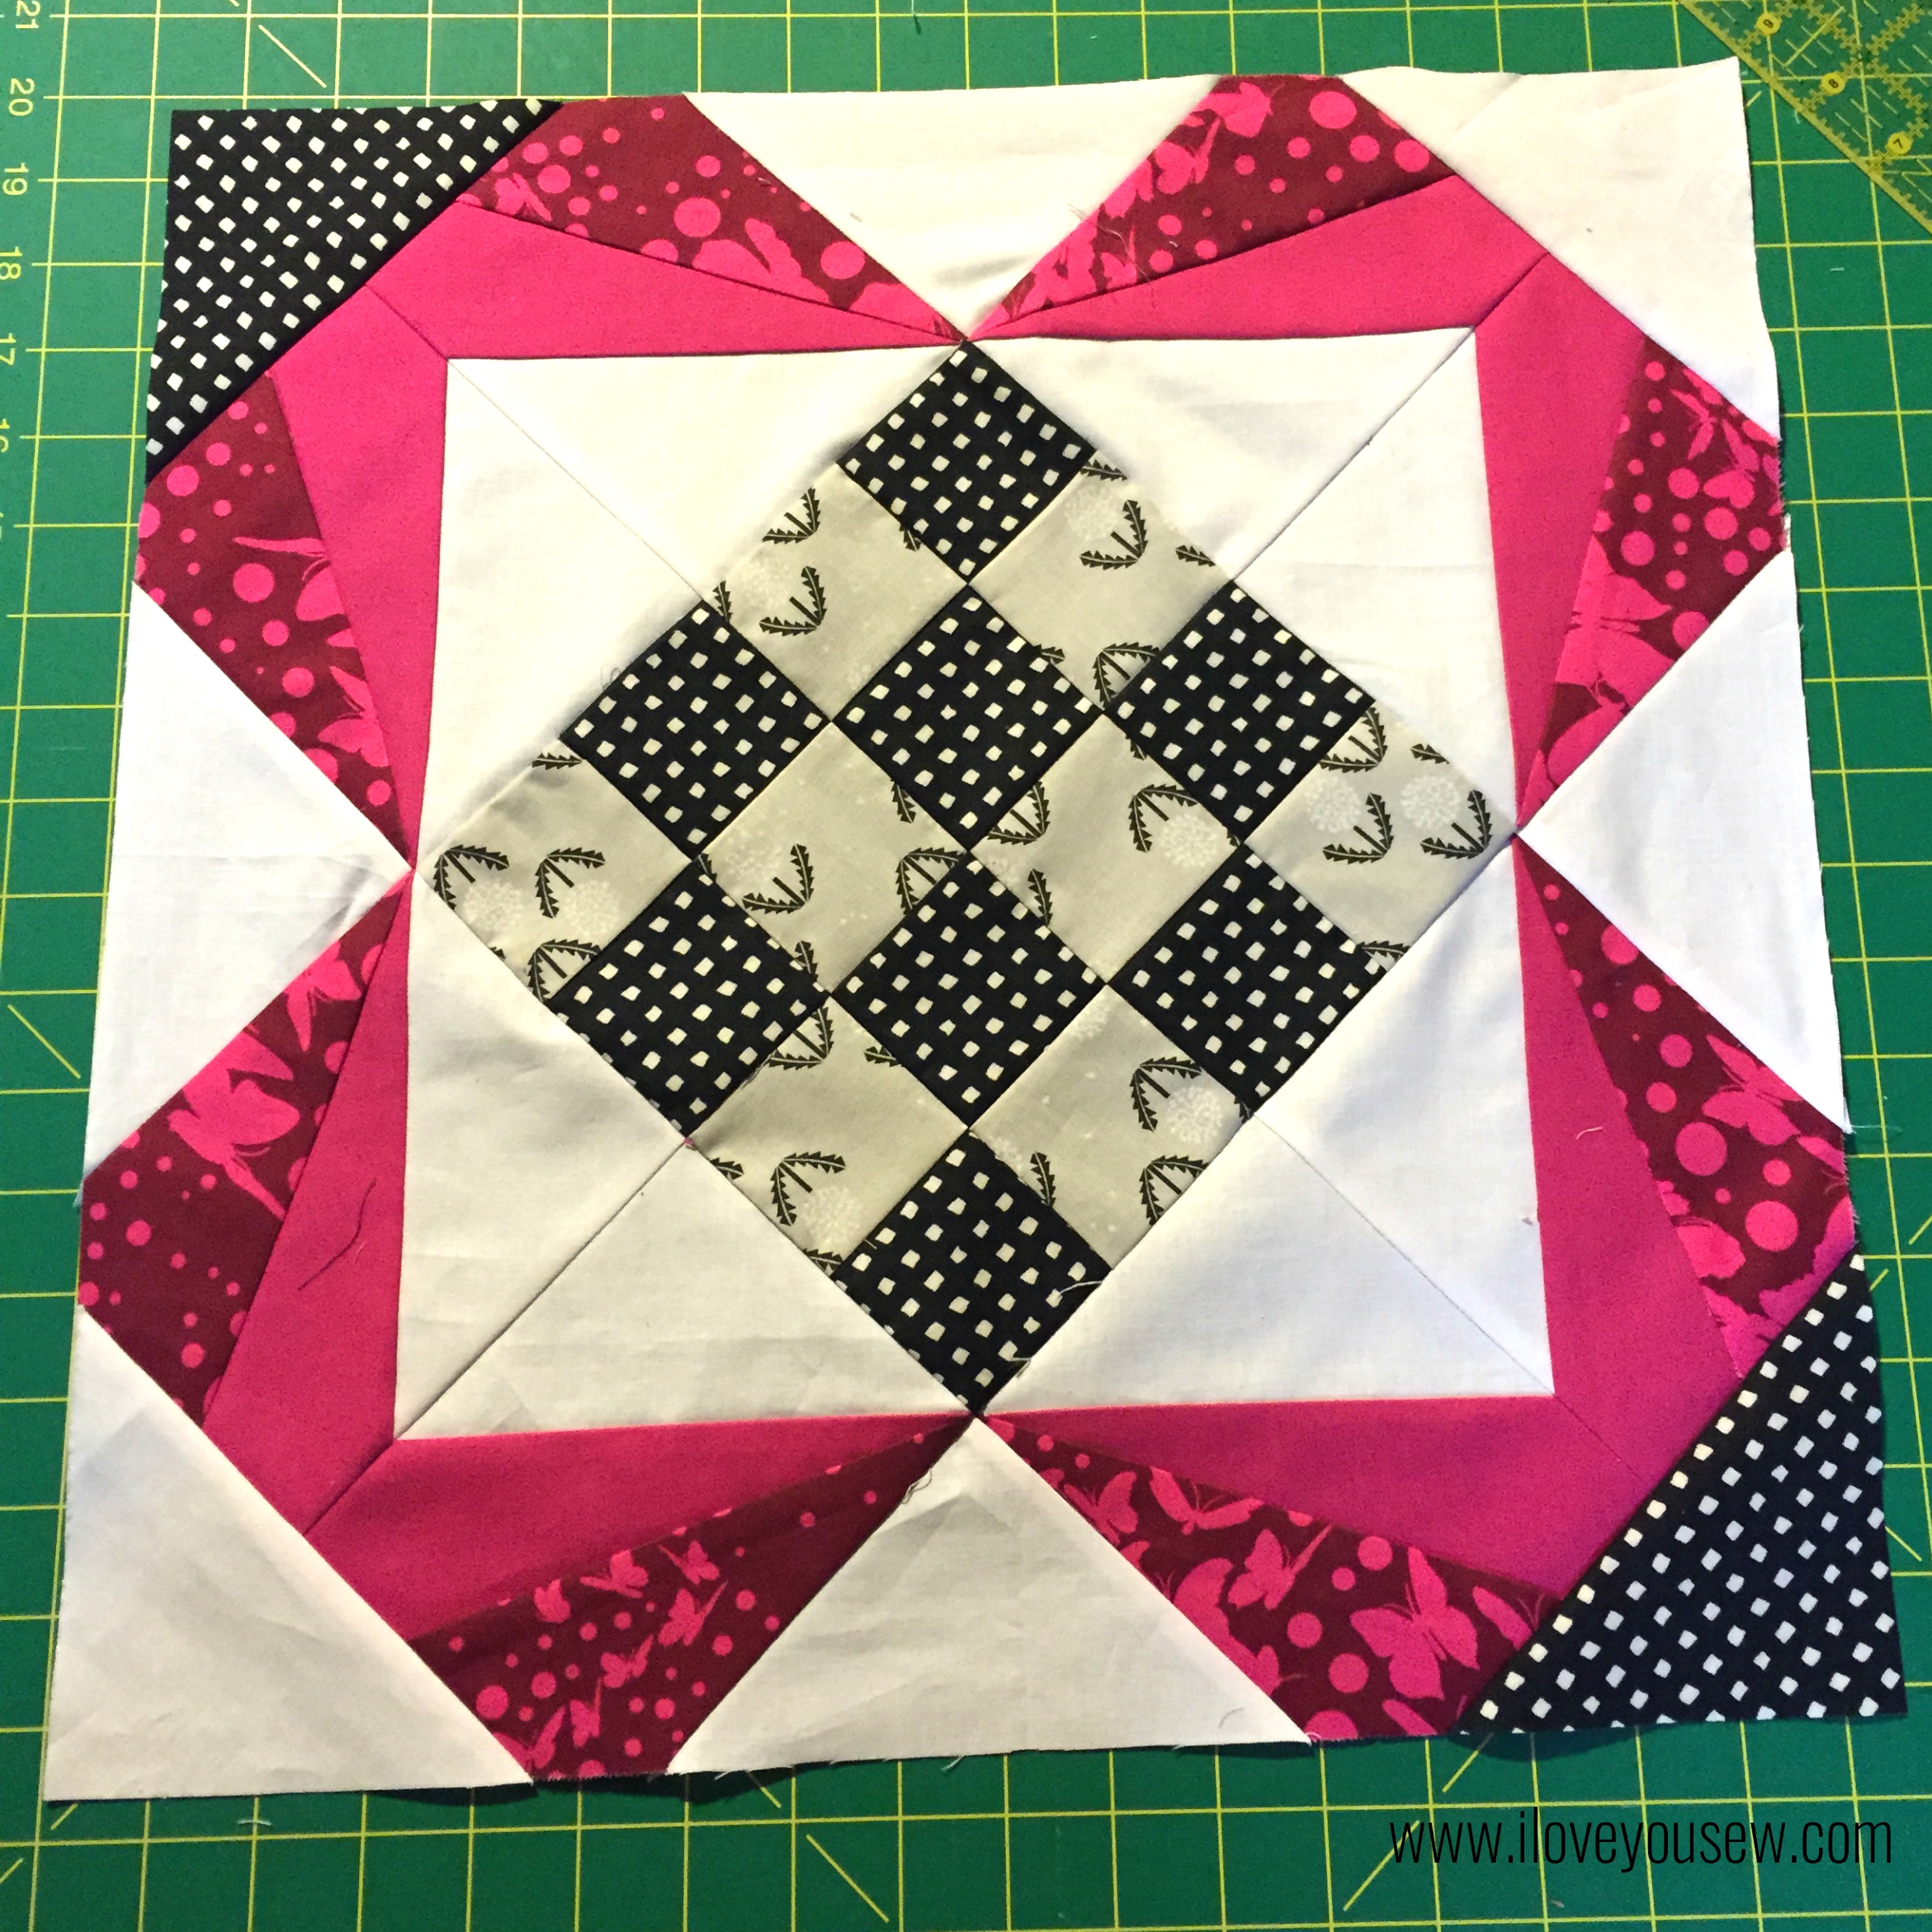
I had the pleasure of making a quilt for someone that liked V & Co fabrics and happened to have charm packs of the newest Simply Colorful and Simply Colorful II lines.  With the popularity of this swap, I felt some pressure to make something pretty nice….so I thought a Kaleidoscope design would be perfect.  It’s very striking and is perfect for some rainbow action 😉

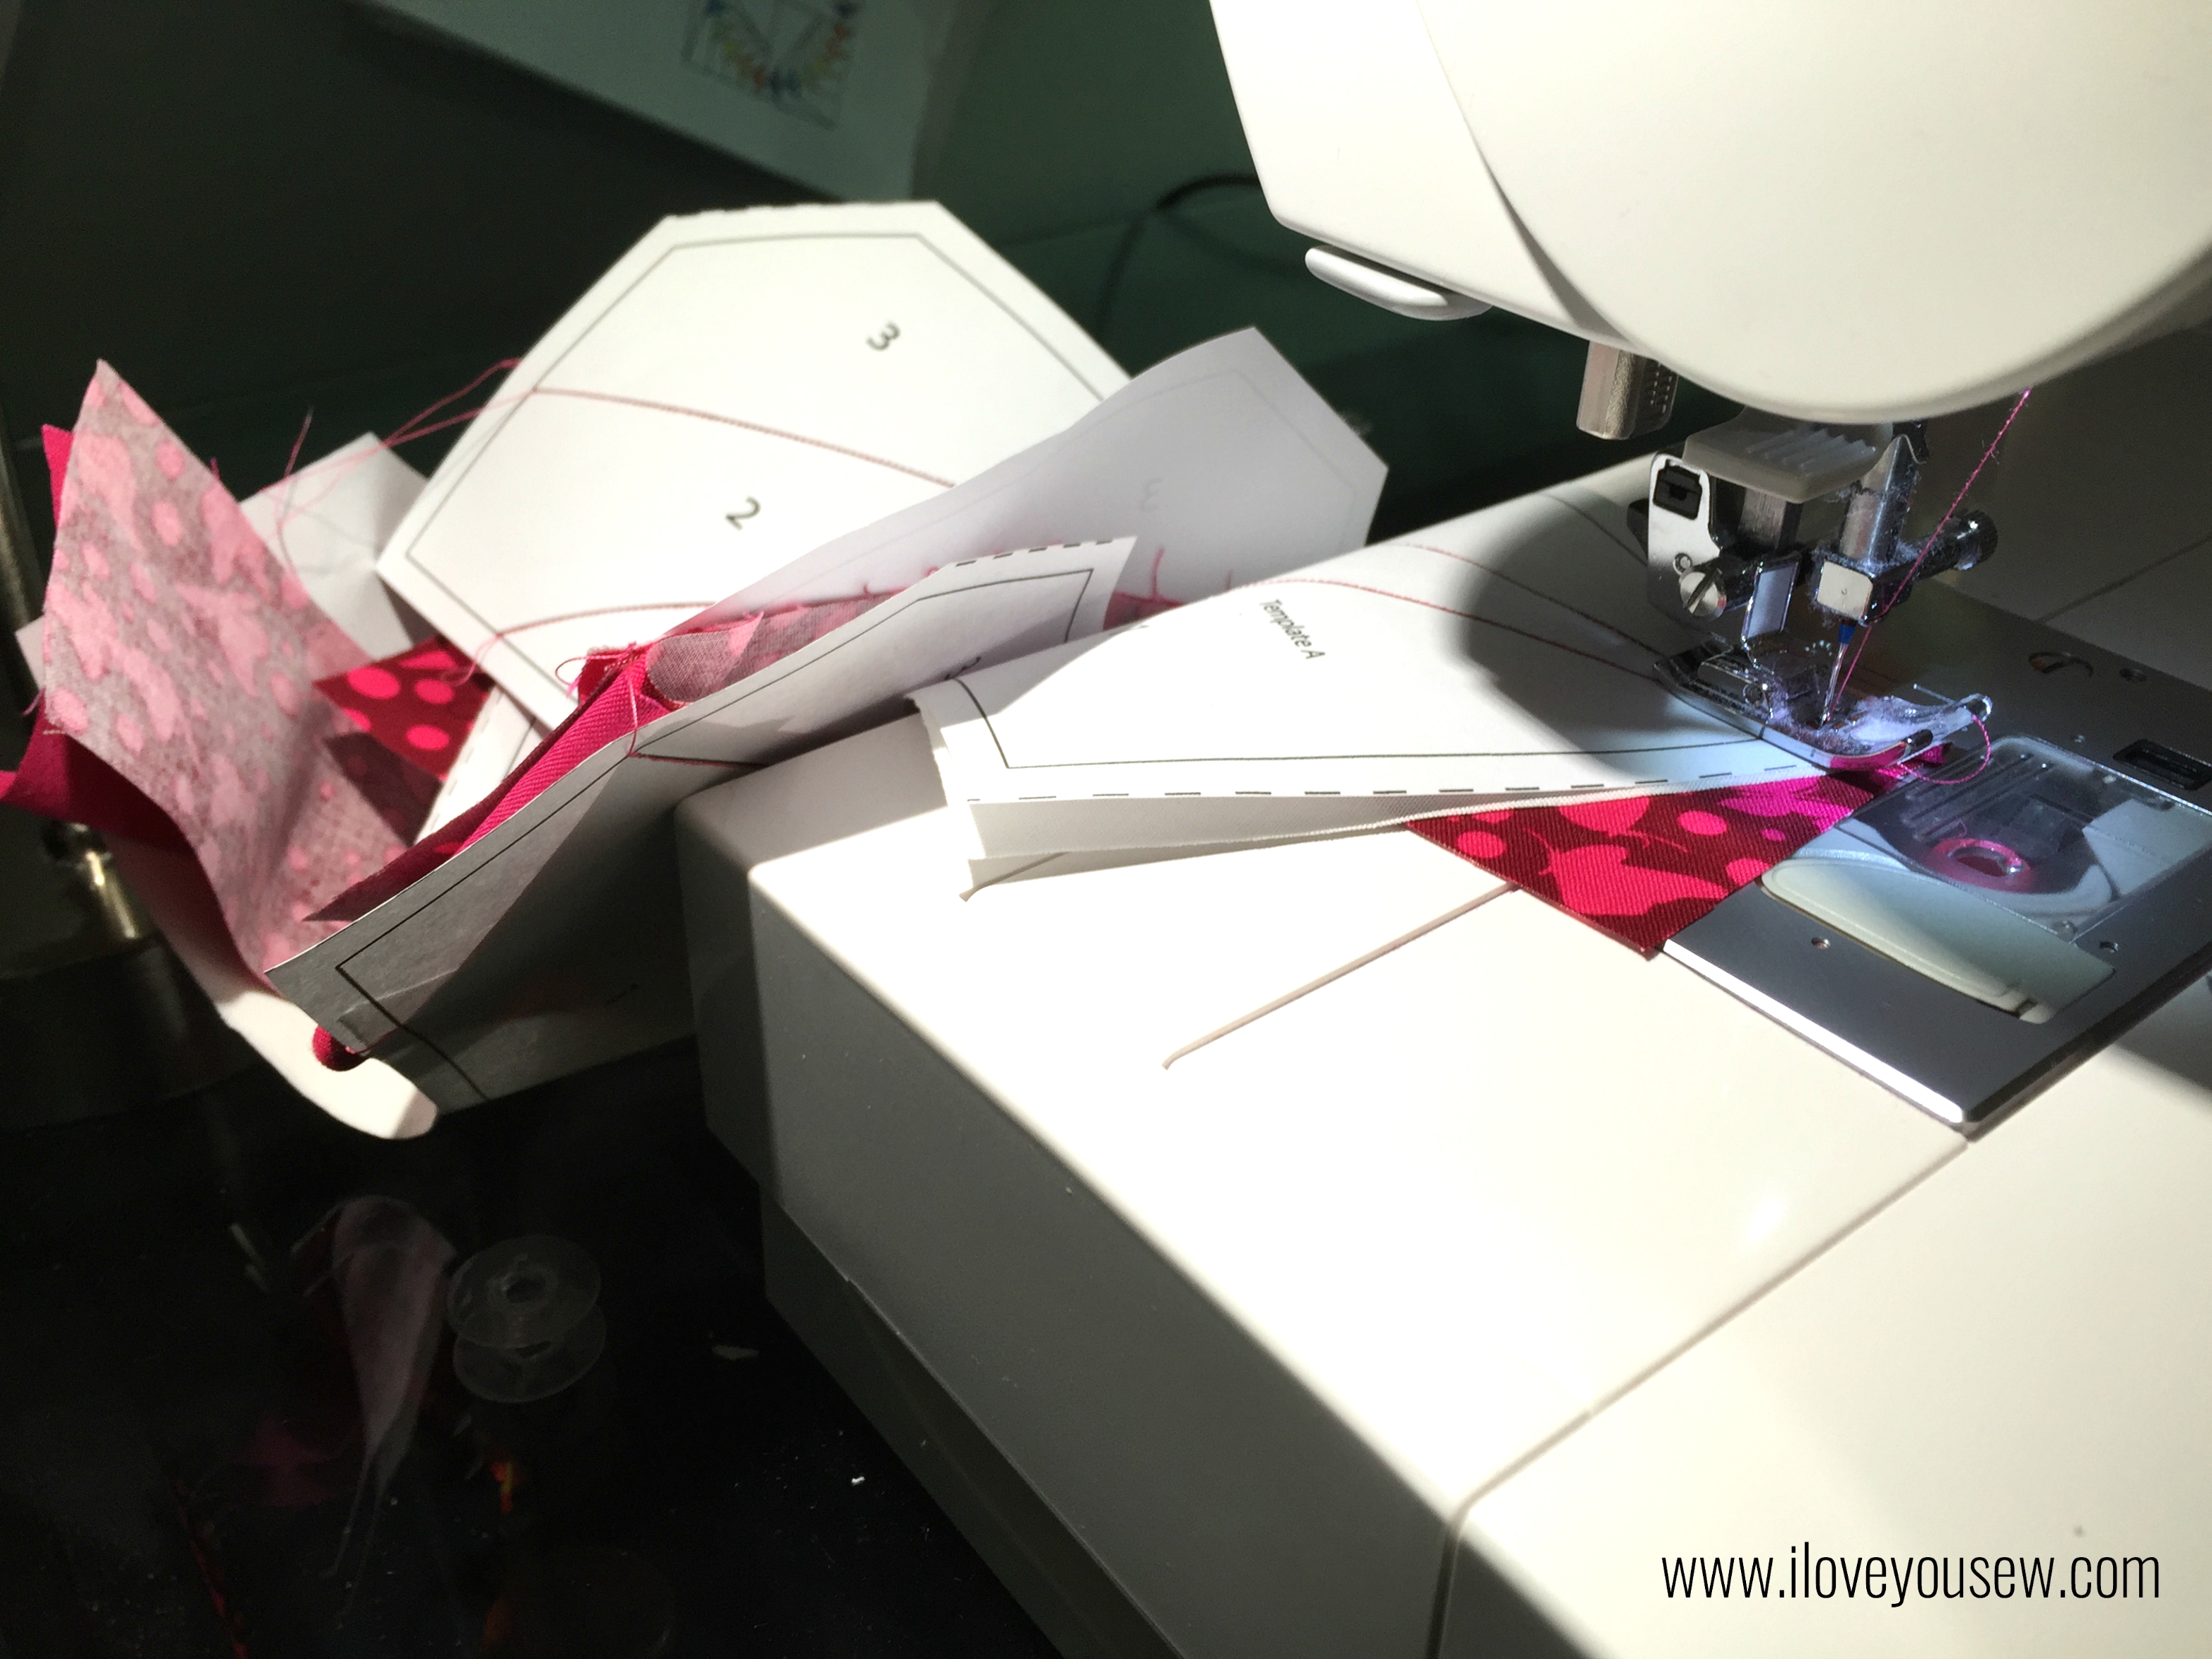
The Kaleidoscope is a traditional paper-pieced pattern I got from Quilter’s Cache.  This is an amazing website with tons of FREE patterns!  The original pattern finishes at a 6″ block.  In order to fit the parameters of a mini, I shrank the pattern to 47% of the original to create a 3″ block. (I don’t know why 50% reduction didn’t work, but a little playing around helped me get to the size I wanted.) To plan out the colors and layout, I used this coloring sheet I found by Debbie Kratovil.  I think every quilt designer should have coloring sheets with their patterns.  They make life SO much easier!

SpiralNestingSeams


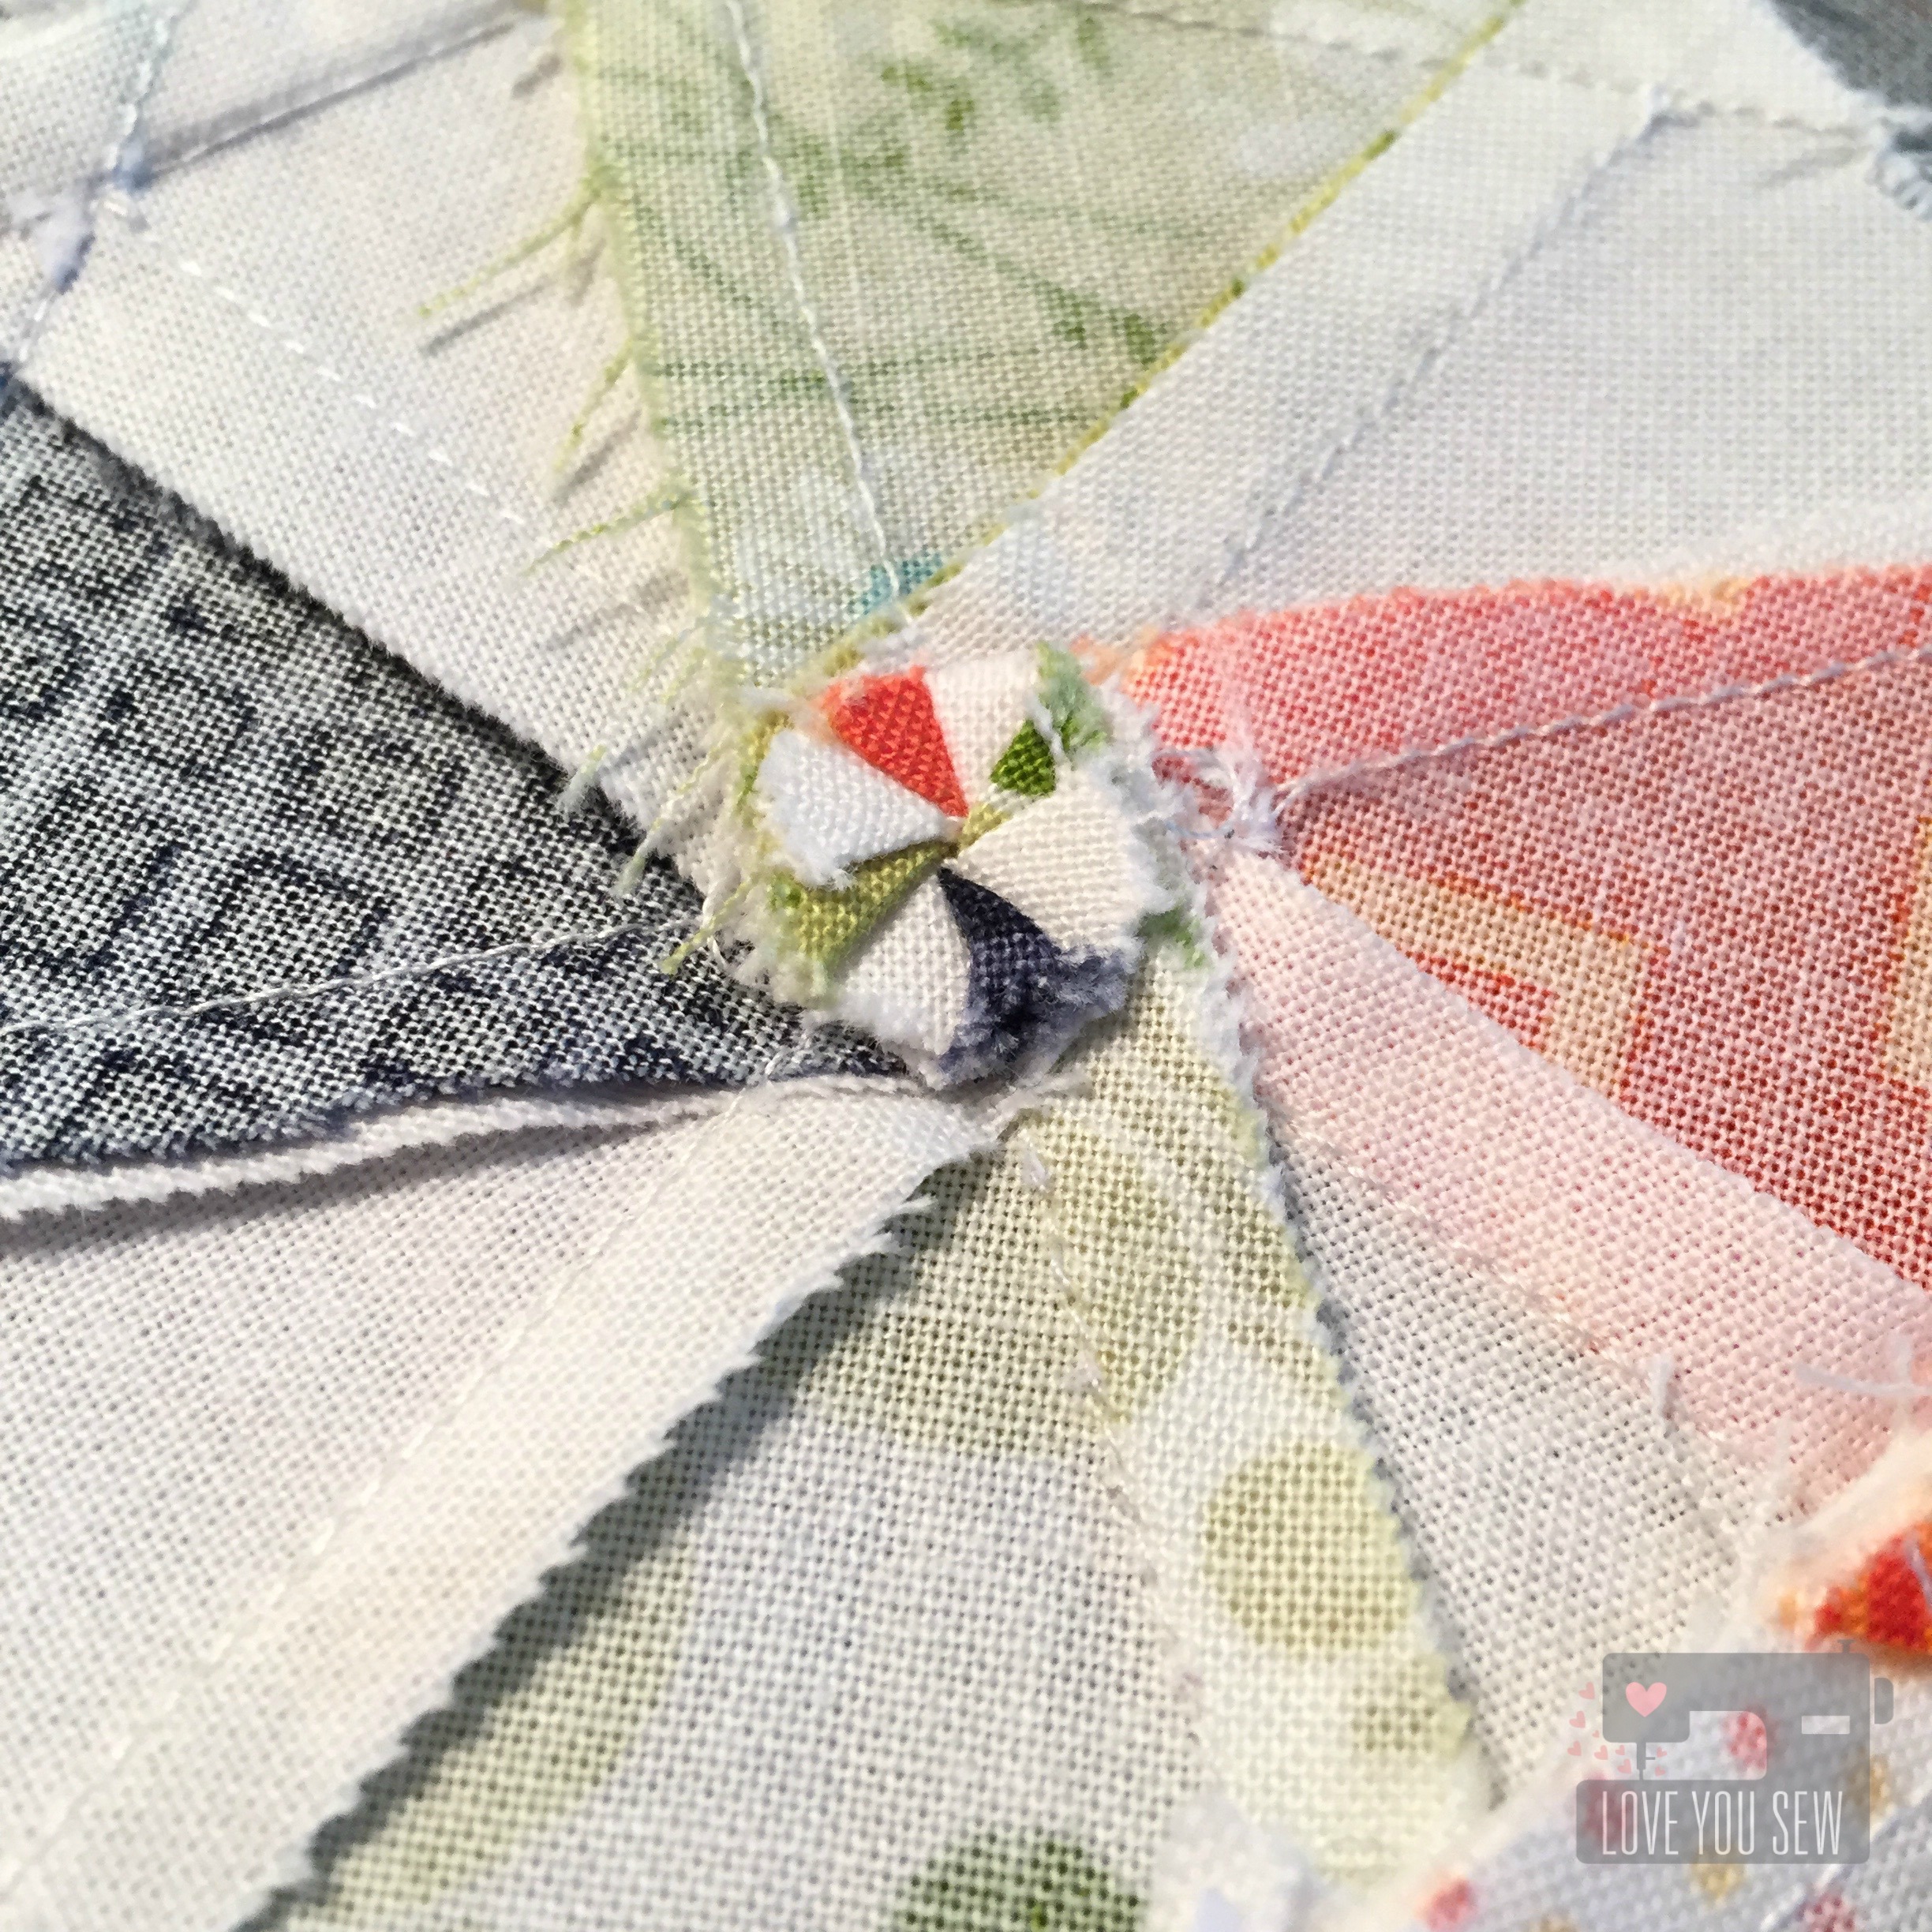
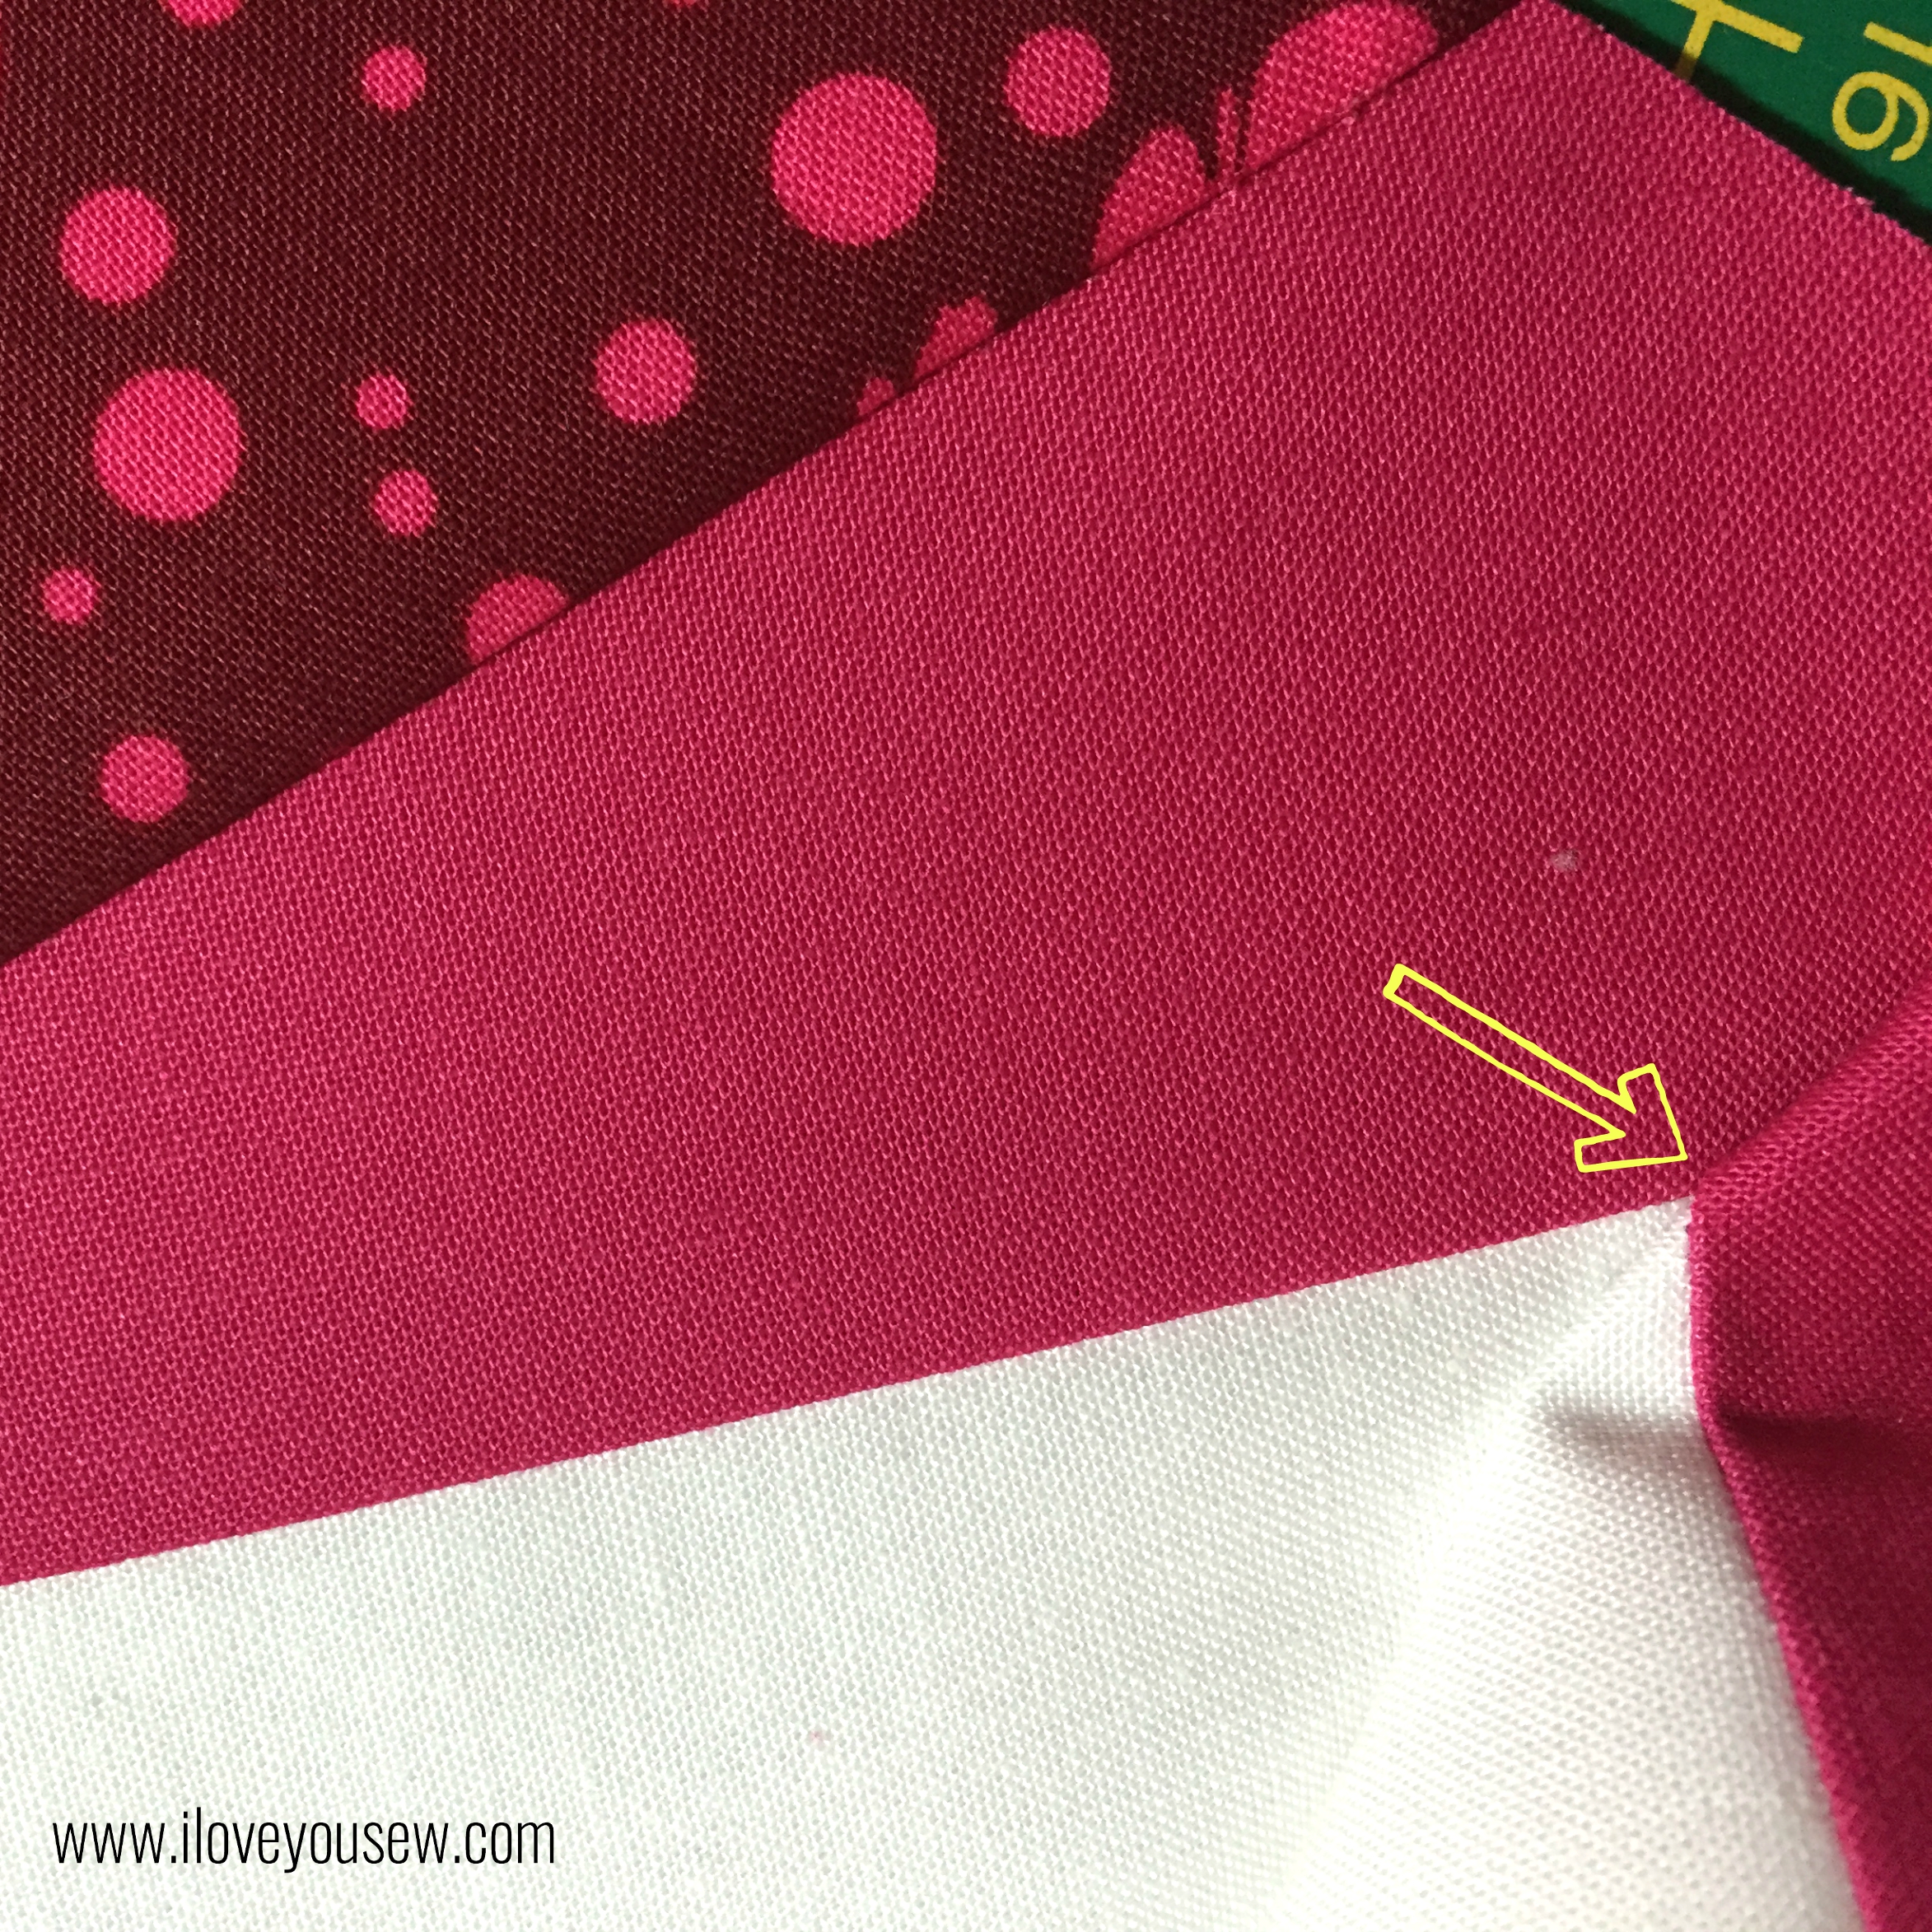
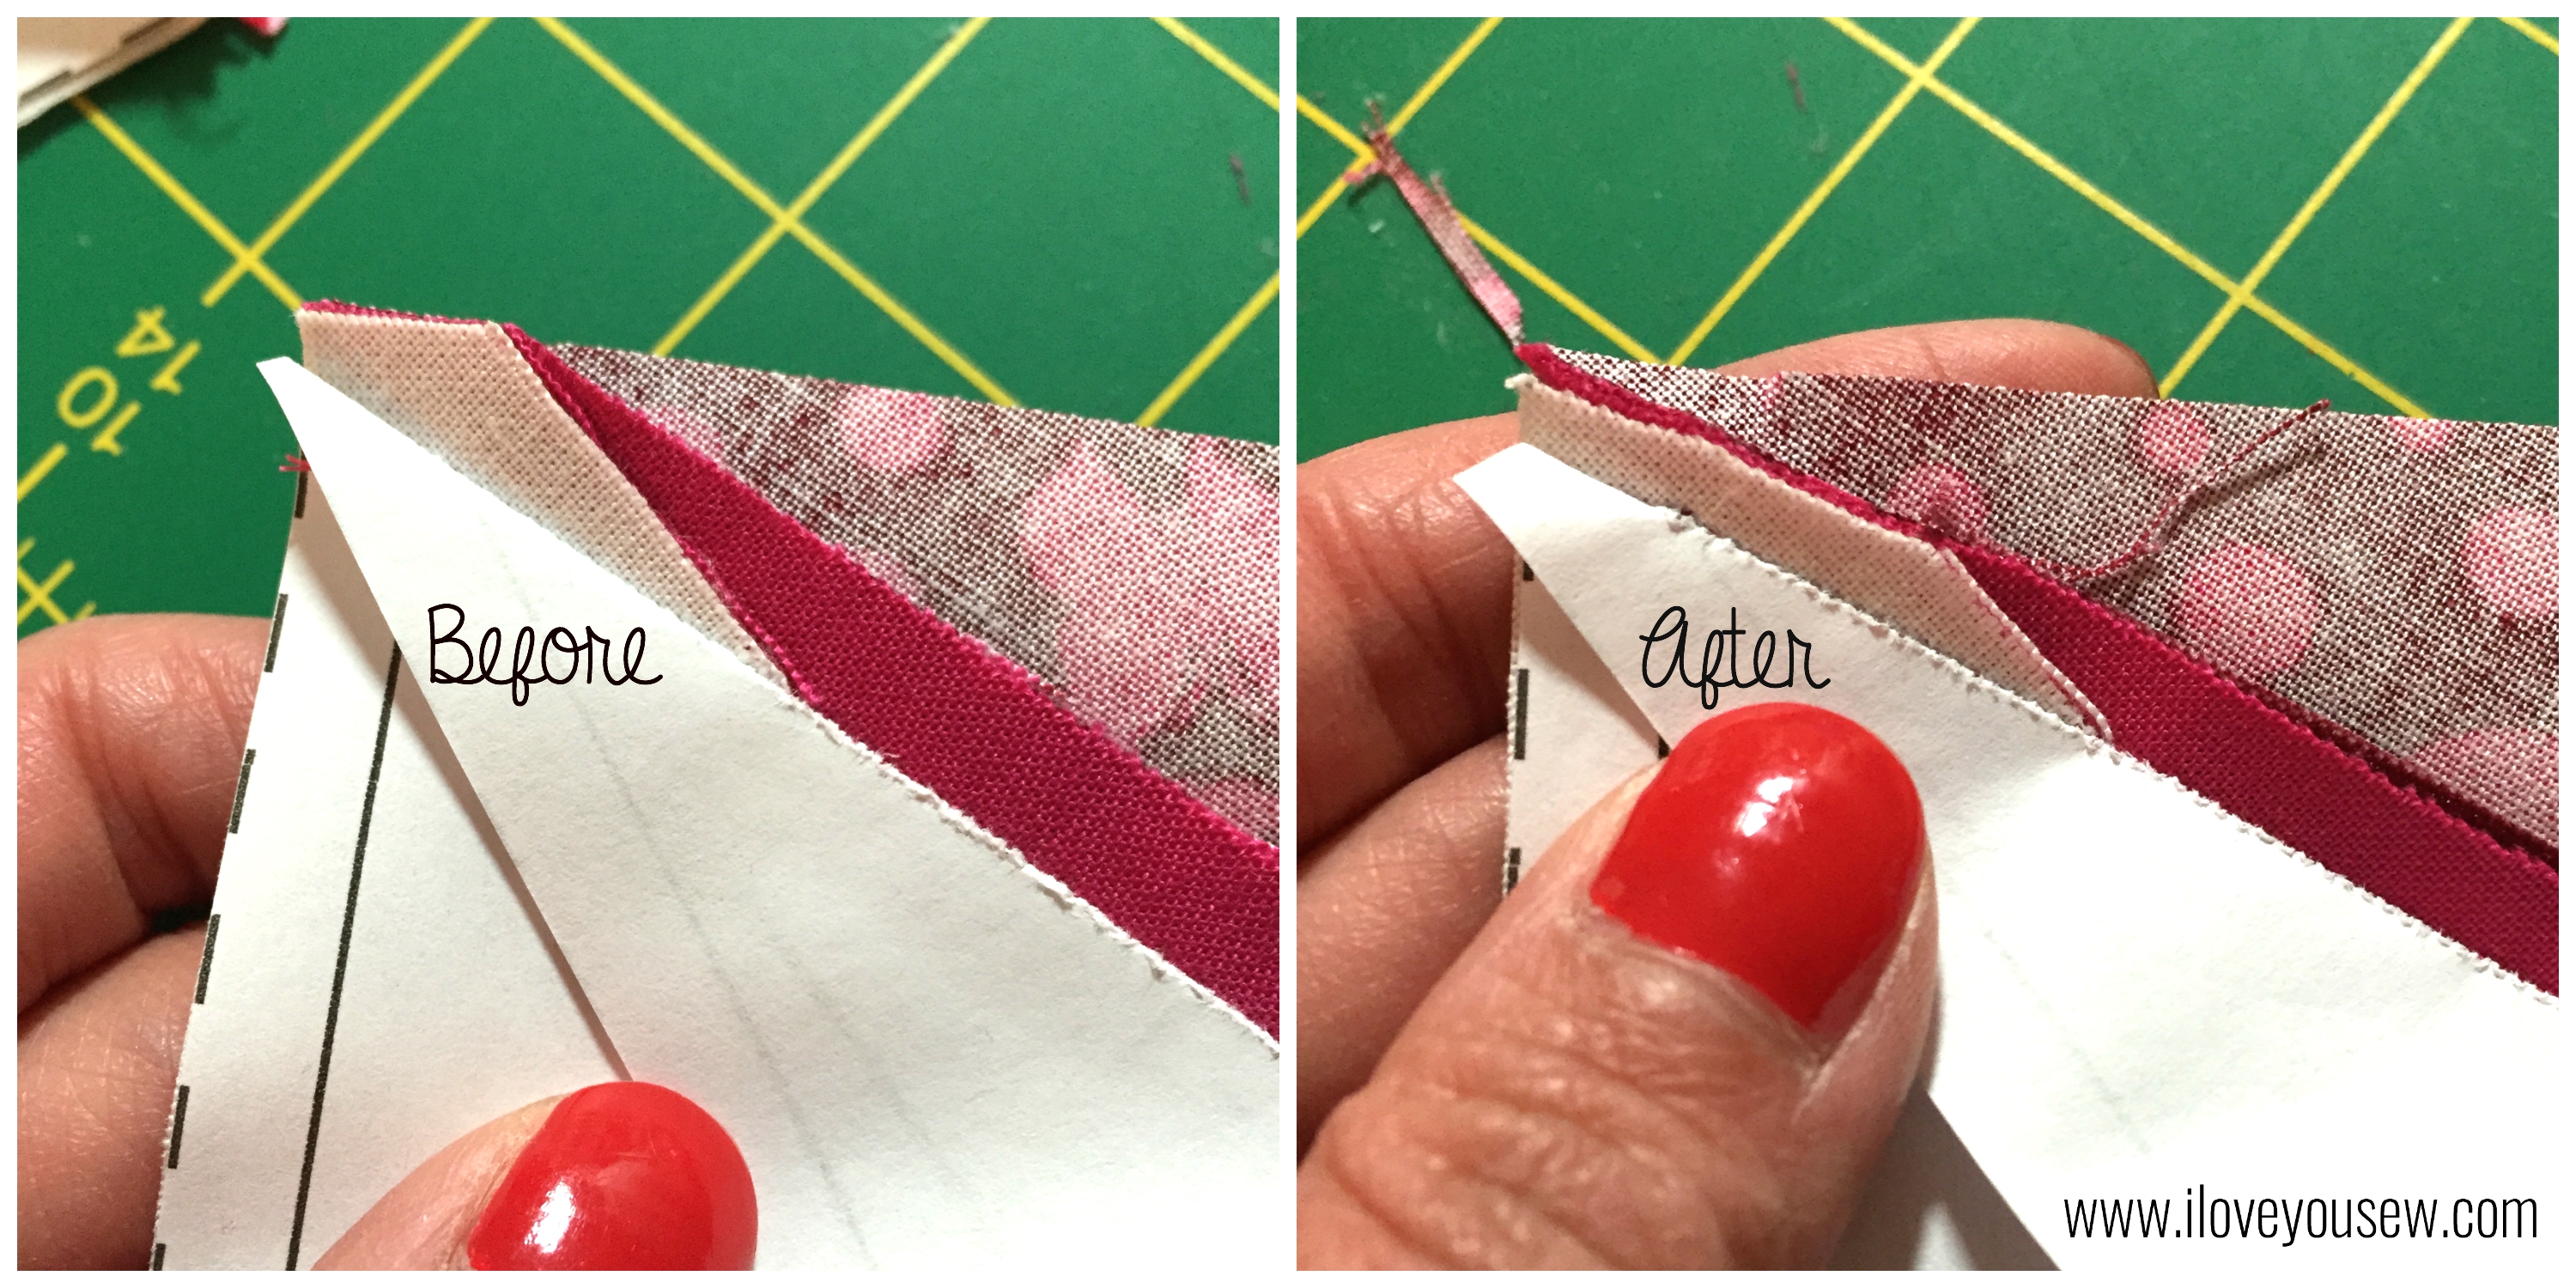
TIP: When piecing together the blocks, there is quite a bit of fabric that ends up at the center.  It is quite thick and can be a nuisance to quilt over later.  Initially, I tried to grade the seams and by luck, saw that I could make a little rosette by opening my seams  back a 1/4″ and tuck the seams under as shown above.

GoldThreadDetail

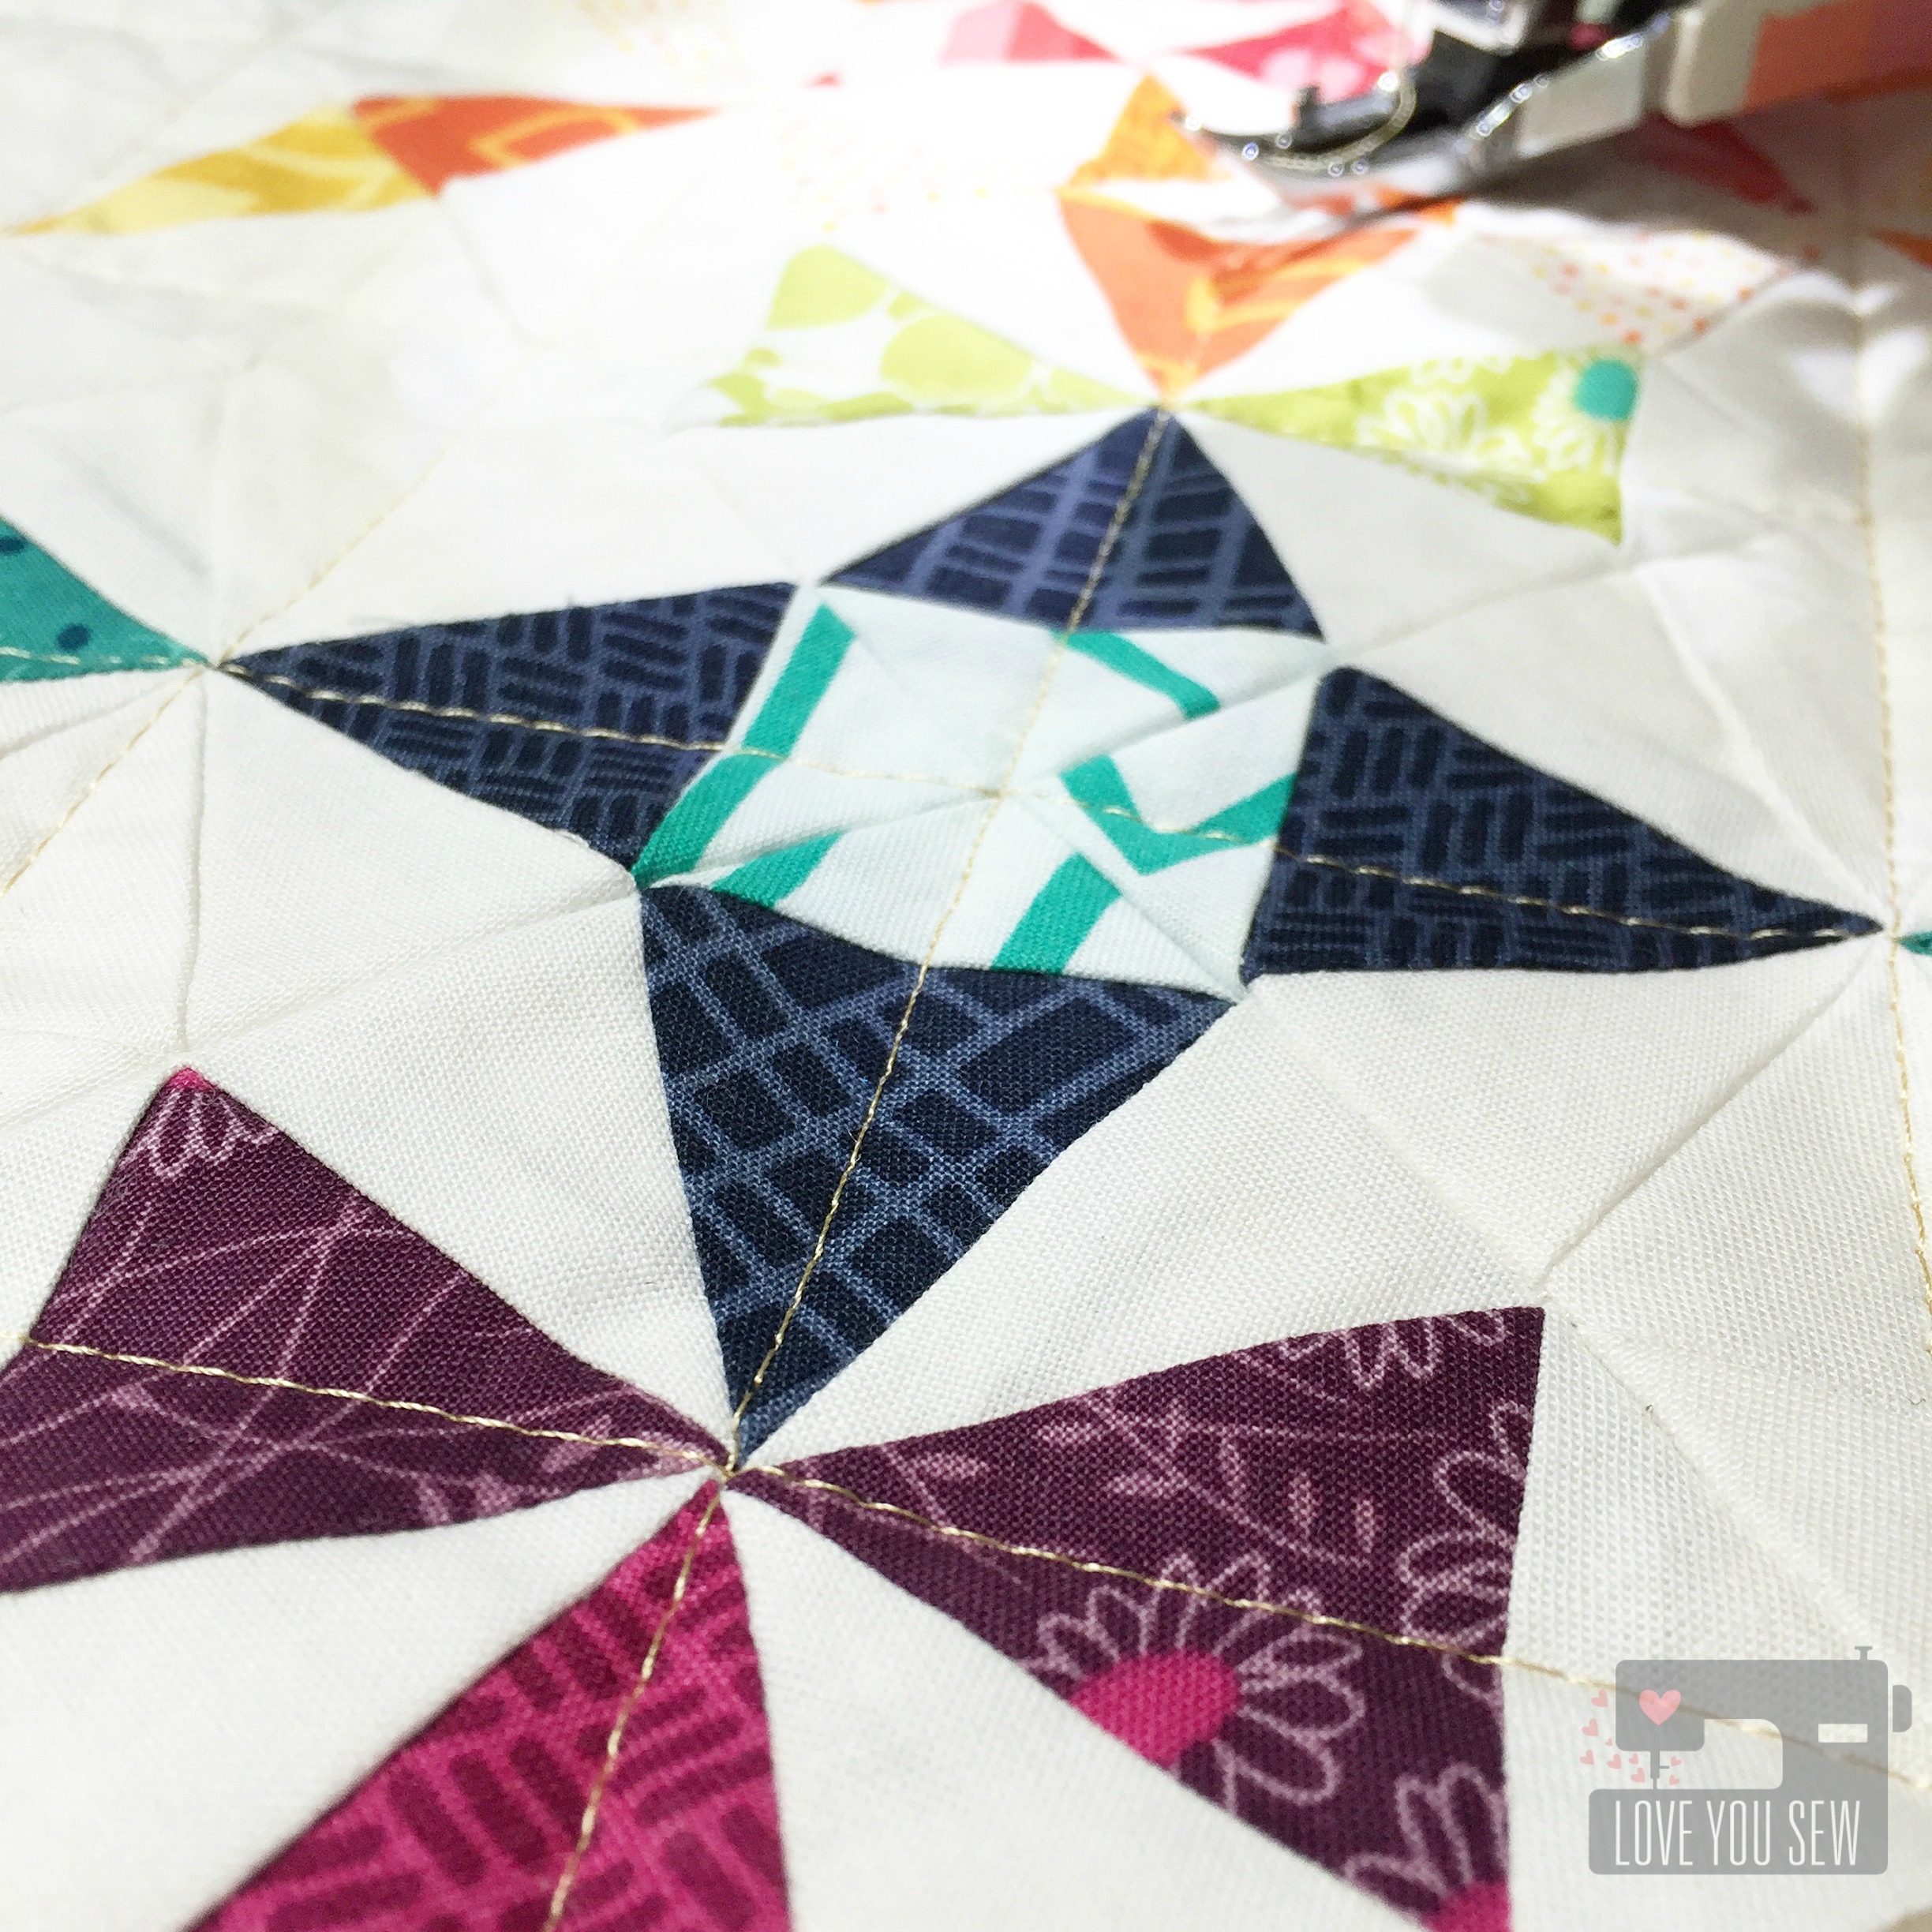
To finish, I used gold thread to quilt (insert heart eyes emoji!!!)  I just love using metallic thread whenever I can.  It just adds that extra “something” special and matched with the gold dot backing.  For the binding, what else would be better than MORE V & Co…and in Teal Ombre?!?  The ombre was fun to use and made this design really pop.

Complete

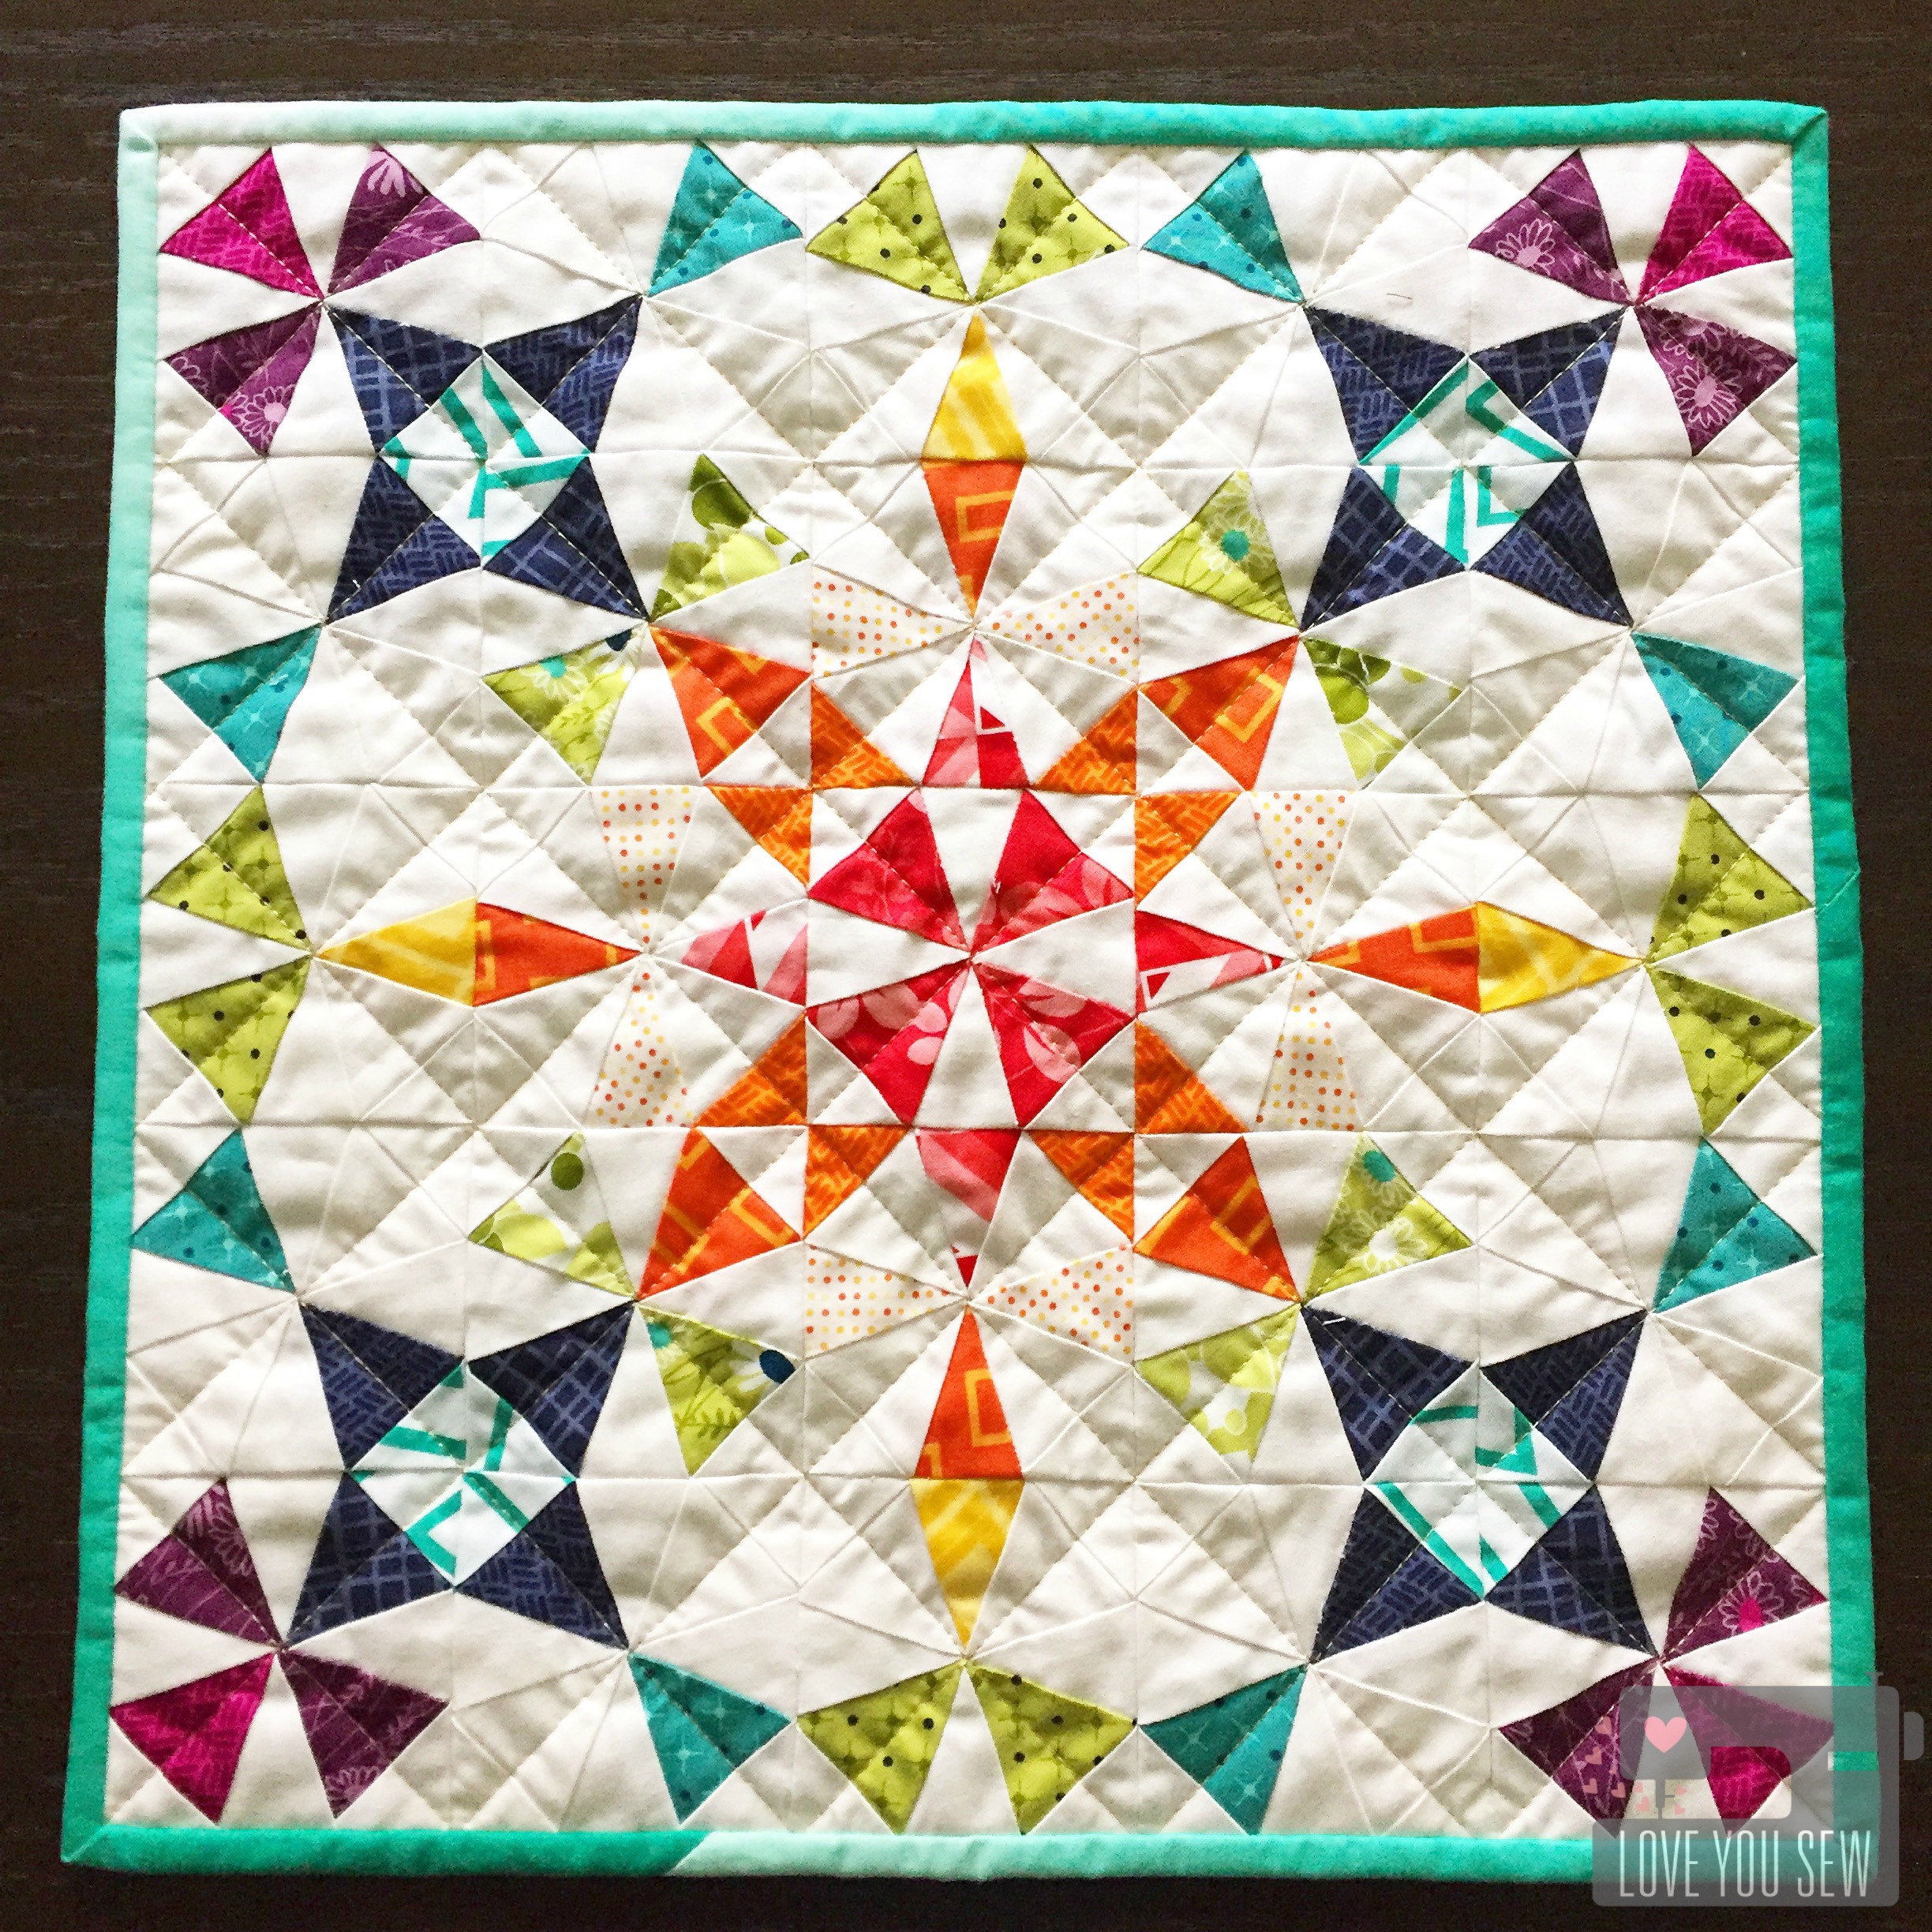
Kaleidoscope Quilt – Completed


MiniReceived

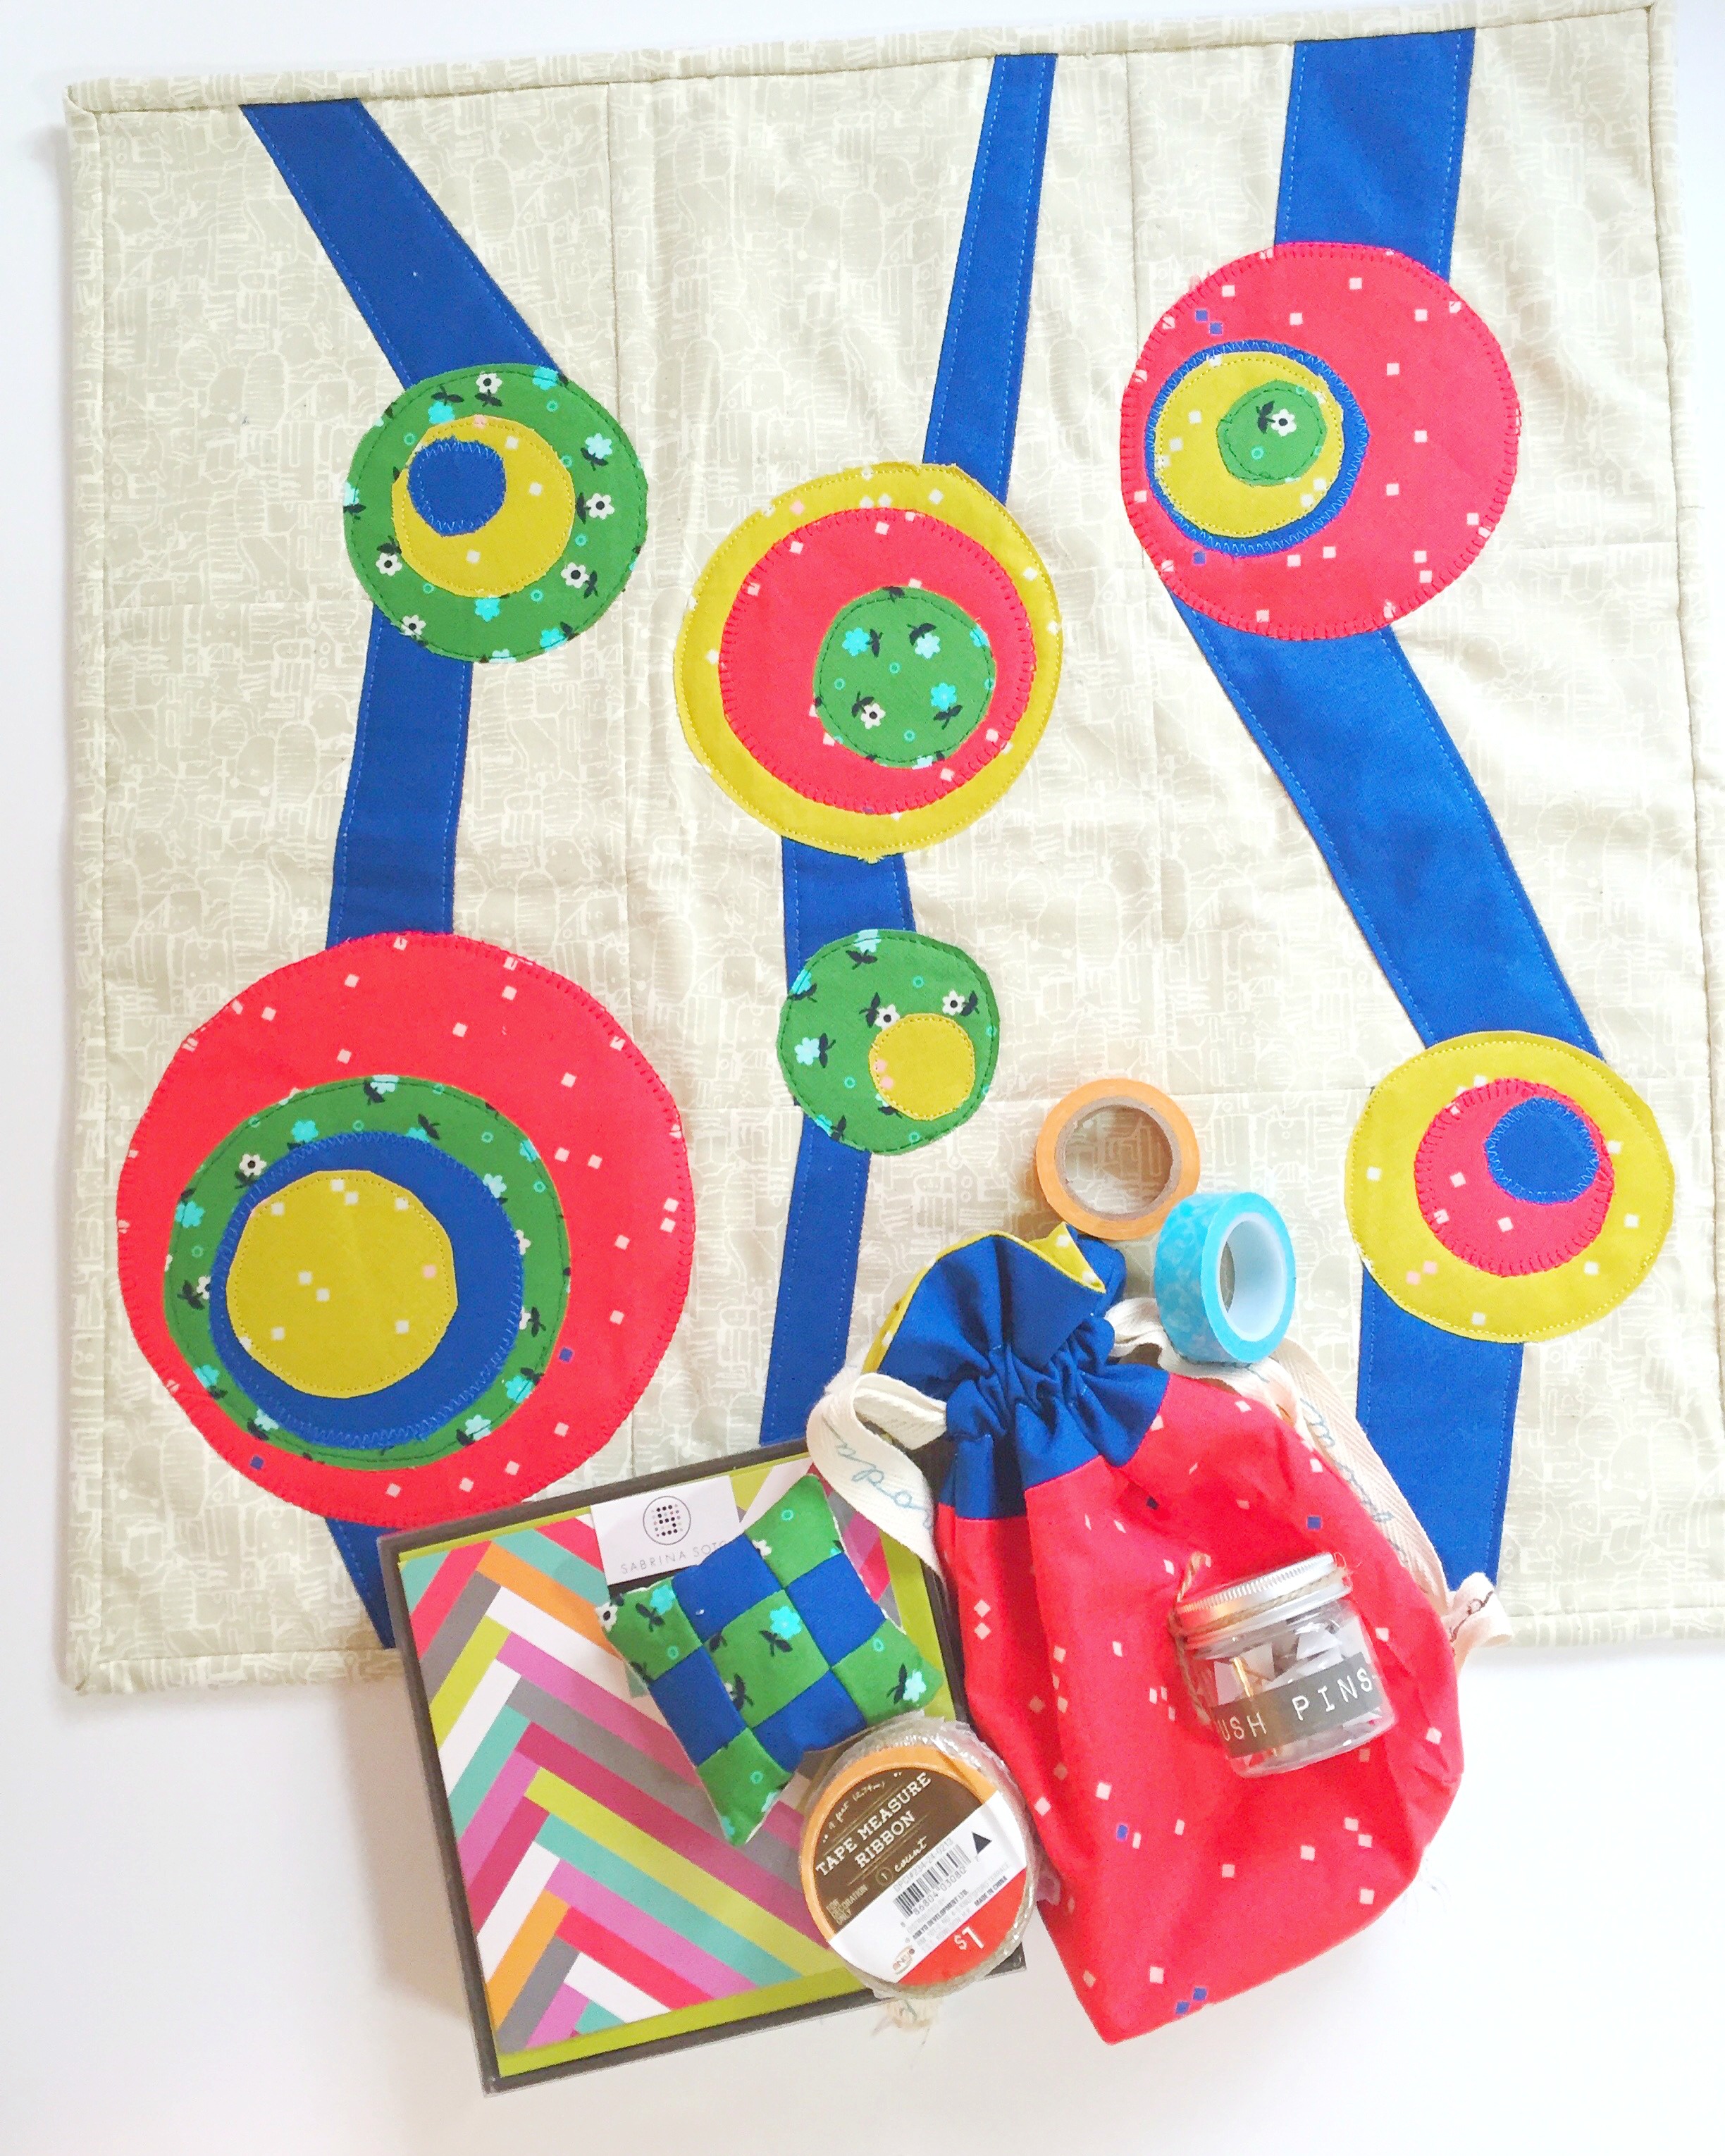
In return for sending off the Kaleidoscope,  I received this beautiful mini with extras from  @amandafech. Isn’t it so fun with the primary palette and appliqué work?  I am 3 for 3 with great swap experiences….all delivered on time with amazing work!  Hopefully, all of you have had positive swap experiences or will decide to join your first one 🙂  They are lots of fun!!!

I’m going to be a swap mama soon so I hope these good vibes carry over 😉


#MakeAQuiltMakeAFriend

Cristy


Make a Mugrug from the Dwelling Quilt Pattern

P1050776

When Holly Gets Quilty asked for pattern testers for her newest Dwelling Quilt pattern, I couldn’t help but get involved.  I first became familiar with Holly’s patterns through her Squash Blossom pattern I used in the Squash Blossom Bouquet mini.  She makes the most gorgeous quilts and I love how her patterns are so nice and clean…as well as beginner friendly. And this paper-piecing pattern does not disappoint!

IMG_1141

When I received the pattern, I decided to first make the smaller of the two blocks offered.  It measures 4 3/4″ x 5 3/4″ unfinished and I thought it would make for the cutest little mugrug.

IMG_1153

As a single block on its own, I wanted to fussy cut all of the pieces and bring out the literal design to resemble a home.  I dug back into the Cotton + Steel archives and pulled out some Homebody and Hatbox.  These fabrics created the most ideal walls, roof, street and even a little garden!

IMG_1155

1 1/4″ strips were added all around  the block to give a little more area to the block.  I wanted enough room for my larger mugs and even for a little snack 😉  Riley Blake’s newsprint is my favorite text print (out of print, of course…but if someone wants to share any, let me know!) and it goes with the whole house theme, right?

IMG_1156

I used a scrap of cotton batting and more Cotton + Steel for the back to complete the quilt sandwich.  Since you know I’m a straight line quilter, I just cross-hatched the mugrug a 1/4″ apart in a diamond pattern with Auriful 2030 and ….

P1050818

To finish, you know C + S had to be using in the binding too.  Since this was such a small project, I used Cut to Pieces glue binding method to secure the binding into place without the use of Wonder Clips.  It was fast and I top-stitched the binding all around.  I can never get even amounts of the back binding with “stitch-in-the ditch” method, so I sewed about 1/8″ inward to help me with my OCD…

This was a nice quick project you could have completed in an afternoon.  Holly’s Dwelling Quilt pattern is simple and pre-cutting the pieces (measurements provided!) will help cut down on quilt time.  Are you ready to make your mug rug?!?

Check out these Instagram hashtags for more inspiration: #DwellingQuilt #HollyGetsQuiltyPatterns


Hugs and Stitches,

Cristy

Quilted Toddler Sleeping Bag

SleepingBagTitle

This week, I’m doing a little throw-back of toddler sleeping bags I made for my boys last year.  I wasn’t a blogger then and figured I’d write a post in honor of our annual trip to the lake.  We brought these puppies along for each of our sons and I couldn’t help take some fun new photos along beautiful Lake Leelanau in Northern Michigan.

SleepingBagHalfOpen

My boys are at a fun age when we can now have little sleepovers in the family room.  This adorable sleeping bag was exactly what I wanted for each of my kids to have their own.  I LOVE the idea of having the sides snap so that you can pull them apart and have a great throw blanket!  Duel-purpose items are key!  The pattern and tutorial can be found on The Sewing Rabbit’s blog.

SleepingBagOpen

For the fabric, I used some fun outdoor-inspired designs from the Camp-A-Lot collection by Bo Bunny for Riley Blake Designs.  Unfortunately, all of the fabrics are out of print (OOP) but you can still find certain patterns online.  I used quilt weight Firewood in chocolate for the border, Tracks in green for the center and then Main in green flannel for the backing.

SleepingBagInterior

My boys are still young and I wanted fun patterns for them that weren’t too mature.  They are already growing up too fast!  Plus, I just loved the flannel backing. It makes for an awesome “I Spy” game…bonus!!!  These sleeping bags should last them awhile for indoor fun, but I know we’ll have to get them “real” outdoor ones soon enough.

SleepingBagSnaps

Luckily, I’m a very loyal fan of KAM Snaps.  If there is a reason to use them, I do!  I was so happy to see them in this tutorial because I have a ton of colors in my craft stash.  They hold well, but are easy enough for little hands to fasten together. There is spacing in between that allows air to come through on the bad, but remember, these are not intended for outdoor use….so I’m perfectly happy to use them!

SleepingBagRolledCloseup

The only modifications I made to the tutorial were increasing the width between quilted lines to about 4″ apart.  As you know, I’m not a fan of actual quilting, so this made for light work!   I also added appliqué letters to personalize each bag.  As a mom, I know how important it is to avoid any fights and keeping each boy accountable for their own stuff helps!  And yes, monograms are also super cute and special 🙂 To attached the appliqué letters, I used a tight zig-zag stitch to cover the edges and to mimic embroidery.  This process takes awhile but the results are worth the extra time!

I hope you are all enjoying your summer (northern hemisphere, peeps!) and get to make a special little person one of these sleeping bags!  Back to some family fun for me…


Hugs and Stitches,

Cristy


Testing the “Jacks Quilt” Pattern

Jacks Quilt Top

The “Jacks Quilt” pattern has just been released by Bryan House Quilts and I was fortunate enough to be one of the testers.  I’m SO excited to finally reveal my #SecretSewing project!  It’s tough not being able to show what I’ve been working on lately…especially since it’s just so darn pretty 🙂

This quilt pattern is gorgeous!  You can find the pattern in Becca’s shop currently for 30% off as part of it’s new release (discount code on her blog.)  This design is based off of a 16-patch and paper-pieced stars and has so much versatility.  You can omit the patches and play with the number of blocks to have completely different looks.

2x2 Mini

There are five different sizes you can make.  I opted for the throw, which is a 4 x 4 block.  It’s a generous size and I could (always) use another couch quilt 🙂  Not mentioned is the possibility to make a mini with a 2 x 2 block (approx 34″ x 34″.)  This would be a perfect baby quilt or stroller blanket.

Fabric Pull

When I received this pattern, I knew I was going to use my Black and White Cotton + Steel bundle.  The 16-patch made for some good mixing and matching of the fabrics for a checkerboard look.  To bring out the stars and add some fun, I chose Tula Pink’s Butterfly Swarm in Jam from her Moonshine collection.  This saturated fuchsia was perfect against the Black and White.  I paired the Butterfly Swarm with Kona Cotton in Valentine to complement, but not compete against the busy fabric.  All of these fabrics were balanced out with Kona Cotton in Snow to make the design of the quilt pop out.  I added Architextures Grid in Black as possible binding, but I’m not entirely sold on it just yet…

PaperPiecingPrep

There is a good amount of paper-piecing involved for the stars, but luckily it involves only three fabrics per Star Spoke and they are a generous size.  Becca provides great instruction on the process to help you along.  If you are new to this and need some more help, this is a great video tutorial on paper-piecing as well.

Chain Piecing

I found that prepping all the fabric at once and setting up an assembly line worked the best for me.  Then I could have a “modified” chain-piecing line.  This is “modified” because you generally do not sew through the seam allowance on paper-piecing templates, so I had to lift the presser foot to pull the templates through vs continually feeding fabric.

Matching Points

When attaching the spokes together, I decided not to nest the seams to keep the look of the triangles clean (since they were white and you could see through to the seam allowance.)  So to match up the points, I pinched the ends where they met.

Matching Points Preview

Then I flipped over the pieces to check that the points indeed matched.  I pinned the pieces and sewed away 🙂

Grading Seams

A great tip from Becca was to grade the seam allowances of the stars as you assemble the blocks.  This takes out some of the bulk and allows the blocks to lay better for pressing.  The points of the stars get pretty bulky otherwise.

Finished Single Block

So far, I’ve completed the quilt top and am waiting on the backing fabric to arrive so I can quilt this puppy.  I can’t wait to show you more….plus, this will be my first quilt completed on my new sewing machine….eek!!!

***For pictures and the post of the completed “Jacks Quilt,” go here.***


Happy Stitching,

Cristy


The pattern was provided by Bryan House Quilts as part of testing. All material was purchased and selected by myself. All opinions and comments are my own and have not been influenced by 3rd parties.


Astrodelic Quilt Hack: Resize to a Mini

AG Mini Complete Title

If you have been following my posts, I shared the re-cap of my Instagram based Alison Glass Mini-Quilt Swap experience last week. This week, I’ll share how I hacked and re-sized the Astrodelic Quilt pattern from a 42″ x 42 ” throw to a 21″ x 21″ mini using the amazing 2015 Sunprints line.  Based on the colors selected, I decided to call my mini, “Fireball.”

How did I decide on this size?  Honestly, it seemed like the easiest way to resize to a fourth of original by halving many of the fabric cuts.   The measurements fit within the parameters of the swap and I could follow all of the instructions without having to deviate too far…Simple enough, right???

I re-drew the design on good old graph paper and I scaled each block to 1.5″.  This made it easier for me to visualize the changes to the pattern and where I need to adjust for seam allowances.   Plus, counting the blocks is a nice double-check before having to actually cut the fabric 😉  As you can see, my sketch is nothing fancy and not worthy of the refrigerator, but it does give a good picture of my color selection and placement.

FireballSketch

To get started on construction, you will need to download the FREE Astrodelic Quilt Pattern designed by Frances Newcombe for Art Gallery Fabrics. This will provide all of the instructions and I will reference her fabrics as A, B, C, etc.

Cutting Directions:

  • Fabrics A & E:  3.5″ x 2″ [cut 4]
  • Fabrics B & F:  6.5″ x 2″ [cut 4]
  • Fabrics C & G:  9.5″ x 2″ [cut 4]
  • Fabric D:  2″ x 2″ [cut 6]
  • Fabric H:  2″ x 2″ [cut 6]
  • Fabric I:
    • 6.5″ x 6.5″ [cut 4]
    • 5″ x 2″ [cut 8] matches with Fabrics A & E
    • 3.5″ x 2″ [cut 8] matches with Fabrics B & F
    • 2″ x 2″ [cut 8] matches with Fabrics C & G
  • Backing fabric – 24″ x 24″
  • Batting – 22″ x 22 “
  • Binding – 2 1/3 yd

Follow the instructions exactly as directed, making sure you use a 1/4″ seam allowance.  If you don’t quilt much, double-check your seam allowances on scraps.  A mini is not as forgiving on measurement inaccuracies as a larger quilt since your eye is focused on ALL of it at once.  If it’s not perfect, quilting will always help and some good washing for the awesome crinkle will help diffuse the attention as you can see in the title photo.

FireballPieced


I hope you enjoy this hack and use it in your next mini quilt swap!

#AlisonGlassMiniQuiltSwap, #AGTeamSpectrum, #AlisonGlass, #AstrodelicQuilt #LoveYouSew


Happy stitching,

Cristy